DiskImageParams JobFile structure
This section describes the settings available for configuring a disk image collection job. Disk image collection is supported in all editions of Nuix Collector Suite 7.2 and Nuix Enterprise Collection Center 7.2 and newer.
The root element for a disk imaging JobFile is a pair of <DiskImageParams>..</DiskImageParams> elements. The opening <DiskImageParams> tag appears just after the XML Declaration. This opening tag should include optional attributes for the XML namespace and schema, as follows:
<DiskImageParams
xmlns="-//nuix.com/2014/CollectorEngine"
xmlns:xsi="http://www.w3.org/2001/XMLSchema-instance"
xsi:schemaLocation="-//nuix.com/2014/CollectorEngine
./CollectorEngine.xsd">
Titan element
<Titan> is the first child element within the <DiskImageParams> element. The <Titan> element is required. The following is sample of the <Titan> element and its child elements.
<Titan>
<!-- various "child" elements go here:
<Threads/>
<RetryCount/>
...etc -->
</Titan>
The <Titan> element has no attributes or text. All settings are stored in "child" elements, described below.
Threads element
<Titan>
<Threads>1</Threads>
</Titan>
The maximum number of simultaneous processing threads to run. The only supported value for disk image collections is 1.
RetryCount element
<Titan>
<RetryCount>2</RetryCount>
</Titan>
The <RetryCount> element specifies the number of times to retry reading a portion of the disk after encountering a read error. Valid values for disk image collection range from 0 to 5.
CloudRetryCount element
<Titan>
<CloudRetryCount>7</CloudRetryCount>
</Titan>
The <CloudRetryCount> element specifies the maximum number of retries when saving data to a Cloud destination such as AWS S3 or Azure. Can be 0 or higher. If not specified, the default value is 7.
CloudRetryTimeout element
<Titan>
<CloudRetryTimeout>300</CloudRetryTimeout>
</Titan>
The <CloudRetryTimeout> element specifies the total time allowed (in seconds) to retry writing to a Cloud destination such as AWS S3 or Azure. Can be 0 or higher. If not specified, the default value is 300.
ExaminerName element
<Titan>
<ExaminerName>Joe Examiner</ExaminerName>
</Titan>
The <ExaminerName> element documents the user that initiated the disk image. If the Encase 6 file format is chosen for output, this field is stored in the metadata portion of the resulting image file. The element is optional, and the value can be left empty.
CaseName element
<Titan>
<CaseName>The Big One</CaseName>
</Titan>
The <CaseName> element is used to document the name of the case or project associated with this disk image collection. If the Encase 6 file format is chosen for output, this field is stored in the metadata portion of the resulting image file. The element is optional, and the value can be left empty.
Description element
<Titan>
<Description>Biggus Diskus</Description>
</Titan>
The <Description> element describes the disk imaging job. If the Encase 6 file format is chosen for output, this field is stored in the metadata portion of the resulting image file. The element is optional. The value is limited to 512 characters and can be left empty.
CollectionName element
<Titan>
<CollectionName>My Disk Image</CollectionName>
</Titan>
The <CollectionName> element specifies a name for the disk image. The element is optional. The value is limited to 256 characters of any kind and can be left empty. For Nuix Collector users, this name is shown in the Collector Wizard.
CollectionType element
<Titan>
<CollectionType>DiskImage</CollectionType>
</Titan>
The <CollectionType> element specifies the type of collection. For a disk image collection, this element must be present and set to the following:
DiskImage
A collection of a disk image – either a physical disk image or a logical volume (partition). The volume must be a local volume, and not a RAM disk or optical drive.
EvidenceNumber element
<Titan>
<EvidenceNumber>9999</EvidenceNumber>
</Titan>
The <EvidenceNumber> element holds an evidence number for the disk imaging job. If the Encase 6 file format is chosen for output, this field is stored in the metadata portion of the resulting image file. The element is optional. The value is limited to 256 characters of any kind and can be left empty.
TempFolder element
<Titan>
<TempFolder UseDefault="No">G:\temp</TempFolder>
</Titan>
The <TempFolder> element and its UseDefault attribute are always ignored for disk image collection jobs. The element is optional.
Notes element
<Titan>
<Notes>Notes for sample disk imaging job.</Notes>
</Titan>
The <Notes> element holds additional notes for the imaging job. If the Encase 6 file format is chosen for output, this field is stored in the metadata portion of the resulting image file. The element is optional. The value is limited to 512 characters and can be left empty.
End of General Settings, closed by the </Titan> tag.
Input element
The Input element is the second child element within the <DiskImageParams> element. The Input element specifies the volumes which will be imaged. These settings reside within one set of <Input>..</Input> tags.
The <Input> element is required, although some elements within the element are optional, as noted in the description of each element. The following is a sample <Input> element with its child elements.
<Input>
<!-- various "child" elements go here:
<MediaType>LogicalVolume</MediaType>
<ImageSources AutoDetectVolumes="None">
<Source>\\.\J:</Source>
</ImageSources>
...etc -->
</Input>
MediaType element
<Input>
<MediaType>LogicalVolume</MediaType>
</Input>
Defines the type of disk to image. Must be one of the following values:
PhysicalDisk
Save disk images for one or more physical devices. An image will be created for each physical device in its entirety, regardless of the number of logical volumes, type of volumes, or unallocated space.
LogicalVolume
Save disk images for one or more logical disk partitions or volumes.
ImageSources element
<Input>
<ImageSources AutoDetectVolumes="None">
<Source>\\.\J:</Source>
</ImageSources
</Input>
<ImageSources> does not have a value. It has one attribute and serves as a parent element to the optional <Source> child elements.
The AutoDetectVolumes attribute allows the source volume(s) to be automatically selected at runtime, on the computer where the disk imager will run. Can be set as follows:
AddAllVolumesExcludeCli
Selects all discovered volumes as image sources, except for (1) the volume that Disk Collector is running on, and (2) the destination volume where the image will be saved.
AddAllVolumes
Selects all discovered volumes, including the volume Disk Collector is running on. The destination volume where the image will be saved is excluded.
AddOSVolume
Selects only the volume the OS is running on, so long as it is not the destination volume where the image will be saved.
AllVolumesExcludeOS
Selects all discovered volumes, except (1) the volume the OS is running on, and (2) the destination volume where the image will be saved.
None
No volumes added through AutoDetect.
Note that the AutoDetectVolumes feature always excludes the volume where the resulting disk image(s) will be saved. This image destination is specified in the <Target> element via the <DiskImageFolder> element.
Using the AutoDetectVolumes feature allows a more generic JobFile to be created, that can be used on several different machines. For instance, using AutoDetectVolumes="AddOSVolume" allows a general JobFile to be created which will always image the volume with the OS on it, even if that volume is not C:.
The AutoDetectVolumes feature can be used for both logical volume and physical disk media types. In the case where AutoDetectVolumes="AddOSVolume" and the <MediaType> element is set to PhysicalDisk, all physical disks will be scanned at run time, and the disk containing the OS volume will be chosen. Since the media type is set to PhysicalDisk, the entire physical disk will be imaged, so any other logical volumes on that physical disk will also be included in the disk image.
Source element (optional)
<Input>
<ImageSources AutoDetectVolumes="None">
<Source>\\.\J:</Source>
</ImageSources>
</Input>
A <Source> element explicitly specifies a logical volume or physical disk to be imaged. Multiple <Source> elements can be specified, each containing one logical volume or physical disk. <Source> elements can be used in conjunction with an AutoDetectVolumes option. The value of each <Source> element can take three forms, as follows:
If <MediaType> is set to PhysicalDisk, the <Source> value must be in the form:
\\.\PhysicalDrive<Disk Number>
e.g.:\\.\PhysicalDrive0
If <MediaType> is set to LogicalVolume, the <Source> value must be in the form:
\\.\<drive letter>:
e.g.:\\.\c:
The <Source> element can also take a special value of ? (e.g.: <Source>?<Source>), which specifies that a user or custodian will be prompted to add additional logical volumes or physical disks at runtime, in addition to any other volumes specified in the JobFile. The ? value is valid only when processing this JobFile via DiskCollectorCli.exe (i.e. when using a Portable Disk Collection Device).
End of Input Settings, closed by the </Input> tag.
Target element
Target is the final required child element within the <DiskImageParams> element. The Target element specifies all options that control the destination, file type, logging and error handling of the disk imaging. These settings reside within one set of <Target>..</Target> tags. The following is a sample Target element with some of its child elements.
<Target>
<!-- various "child" elements go here:
<DiskImageFolder ...>F:\OutputFolder\</DiskImageFolder>
<DiskImageBaseName>TestImage</DiskImageBaseName>
<GenerateMD5>Yes</GenerateMD5>
<GenerateSHA1>No</GenerateSHA1>
...etc -->
</Target>
DiskImageFolder element
<Target>
<DiskImageFolder
ImageFormat="DD"
SegmentSize="2"
SegmentSizeMagnitude="GB"
Compression="None"
Suffix="MyDiskImageFolder"
DestDrive="RelativeDrive">
E:\Destination\MyDiskImageFolder
</DiskImageFolder>
</Target>
Specifies the output folder for the resulting image files. The value represents the path to the folder only and does not include a file name. The path can be relative or absolute, and can be a network share specified by a UNC path. Relative paths are relative to the Modules folder within the Portable Disk Imaging Device or the ECC Client installation folder.
Note: Disk images can be saved to an Amazon S3 bucket or to an Azure blob storage container directly from Windows PCs running Nuix Collector or Nuix ECC.
The ImageFormat attribute specifies the resulting image file format, and can be set to one of the following values:
Encase6
The Encase6 disk image format includes metadata about the image, as well as resulting hash values calculated on the image. Can be compressed.
DD
A bit-for-bit copy of the volume or disk being imaged. Contains no additional information (metadata). Cannot be compressed. Allows configuring advanced read failure behaviors via the <ReadFailureOptions> element (these options are often suitable for drives in poor condition).
The SegmentSize attribute specifies how large the saved disk image files can grow before being split into multiple files.
A value of 0 specifies that the disk image should be written as a single file. A SegmentSize of 0 is valid only when the ImageFormat is DD.
A positive SegmentSize value specifies the maximum size for each spanned image file. The SegmentSizeMagnitude attribute defines the unit (MB, GB, TB) applied to the SegmentSize value. A positive SegmentSize value is valid for both DD and Encase6 image formats.
For example, a SegmentSize of 2 and a SegmentSizeMagnitude of GB will save a 7 GB volume as a set of four image files (assuming no compression). The first three spanned files (segments) will each reach the maximum 2 GB segment size, while the fourth file will be 1 GB.
Note: If the ImageFormat attribute is set to Encase6, SegmentSize must be a positive number, and together with SegmentSizeMagnitude are limited to 7 GB.
The file system on the destination volume may limit the maximum file size possible (e.g.: FAT has a maximum file size of 4 GB).
Disk images which span multiple segments will be saved as multiple files (one file per segment).
For DD disk image format, filename extensions will begin at .001 and increment to .002, .003, .004, etc.
For Encase6 disk image format, filename extensions will begin at .E01 and increment to .E02, .E03, .E04, etc.
The SegmentSizeMagnitude attribute specifies the unit to be applied to the value of the SegmentSize attribute. Possible SegmentSizeMagnitude values are MB, GB, or TB (megabytes, gigabytes or terabytes, respectively). Any other value entered will be ignored and default to GB. See SegmentSize, above, for details.
The Compression attribute specifies the degree of data compression within the saved disk image file. The higher the compression, the smaller the image size, but the longer the image processing will take. Applies only when ImageFormat is Encase6. The Compression attribute can be set to one of the following values:
Medium
Use moderate data compression
High
Use a high level of data compression, to conserve disk space. Requires the most time.
None
Do not compress the saved disk image. Fastest execution. The only valid option when ImageFormat is DD.
The DestDrive attribute determines the meaning of the <DiskImageFolder> element value. This attribute is optional, and can be set to one of the following values:
RelativeDrive
The <DiskImageFolder> value is processed as a relative path. Relative paths are relative to the Modules folder within the Portable Disk Imaging Device or the ECC Client installation folder.
?
The end-user or custodian is prompted to confirm or change the <DiskImageFolder> value at run time. Applies only when processing this JobFile via DiskCollectorCli.exe (i.e. when using a Portable Disk Collection Device).
If the DestDrive attribute is omitted, or its value is empty, the <DiskImageFolder> value is processed as an absolute path.
The Suffix attribute specifies the portion of the <DiskImageFolder> value that represents the additional sub-folders to be created inside the destination folder specified by the user. When using ECC, a typical value for Suffix is "Case\Collection\Custodian\Target", where blue values represent placeholders for the specified case, collection, etc. The New Collection Wizard in ECC Admin Console obtains the default Suffix value from the Job XML template.
AlternateDestination element
<Target>
<DiskImageFolder>. . .</DiskImageFolder>
<AlternateDestination
Force="No"
LoginUser="Alice"
Password="G1sv4zz2#"
LoginDomain="MYCOMPANY">
\\OtherServer\AlternateShare
</AlternateDestination>
</Target>
Optional. Specifies an alternate target folder path for the disk image collection. This path does not specify any filename. It is used only if the primary destination specified in <DiskImageFolder> is not reachable. The AlternateDestination element has several attributes:
The Force attribute, if set to "Yes", ensures the AlternateDestination is used regardless of the accessibility of the primary destination. Otherwise, the AlternateDestination is used only if the primary destination is not accessible and writeable.
The LoginUser attribute specifies the user ID for accessing the <AlternateDestination> when it resides on a network path.
The Password attribute specifies the password for the above LoginUser.
The optional LoginDomain attribute specifies the login domain for the above LoginUser. Omit this attribute when accessing workgroup shares via local users.
Note: AlternateDestination, if present, can specify a local path or a network path for a disk image collection.
DiskImageCredentials element
<Target>
<DiskImageFolder ImageFormat="DD" SegmentSize="2" SegmentSizeMagnitude="GB" Compression="None" DestDrive="RelativeDrive">
..\..\Evidence\
</DiskImageFolder>
<DiskImageCredentials
LoginUser="Alice"
Password="G1sv4zz2#"
LoginDomain="MYCOMPANY"
</DiskImageCredentials>
</Target>
Specifies the credentials needed to access the <DiskImageFolder> when the folder resides on a network path, such as a UNC share. This element is optional.
The LoginUser attribute specifies the user ID for accessing the network path.
The Password attribute specifies the password for the above User ID.
The optional LoginDomain attribute specifies the login domain for the above User ID. Omit this attribute when accessing workgroup shares via local users.
Note: JobFiles containing user IDs and passwords should be encrypted and stored carefully to reduce their exposure to unauthorized users. For details see topic Customizing JobFiles.
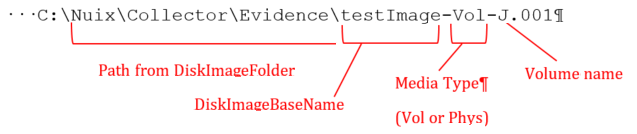
DiskImageBaseName element
<Target>
<DiskImageBaseName>testImage</DiskImageBaseName>
</Target>
Specifies the base portion of the image filename. Note this does not include any portion of the path, which is specified by the <DiskImageFolder> element. The base name should not include the file extension. At runtime, the base name will be appended by suffix defining the media type ("Vol" or "Phys", for logical volume or physical disk, respectively) and the logical volume name (drive letter) or physical disk number. The extension will reflect the file type specified (.001 for DD, .E01 for Encase6). See the example below:
Note: Disk images which span multiple segments will be saved as multiple files (one per segment).
For DD disk image format, filename extensions will begin at .001 and increment to .002, .003, .004, etc.
For Encase6 disk image format, filename extensions will begin at .E01 and increment to .E02, .E03, .E04, etc.
GenerateMD5 element
<Target>
<GenerateMD5>Yes</GenerateMD5>
</Target>
Specifies an MD5 hash value will be generated for the image. MD5 is a 128 bit hash value generating a 32 character string. The string will appear in the log file. If the output file format is Encase6, the string will also appear in the metadata portion of the image file. Can be Yes or No:
Yes
Generate an MD5 hash of the disk image during processing.
No
Do not generate an MD5 hash of the disk image during processing.
GenerateSHA1 element
<Target>
<GenerateSHA1>Yes</GenerateSHA1>
</Target>
Specifies a SHA1 hash value will be generated for the image. SHA1 is a 160 bit hash value generating a 40 character string. The string will appear in the log file, and if the output file is Encase6, the string will also appear in the metadata portion of the image file. Can be Yes or No:
Yes
Generate a SHA1 hash of the disk image during processing.
No
Do not generate a SHA1 hash of the disk image during processing.
GenerateSHA256 element
<Target>
<GenerateSHA256>Yes</GenerateSHA256>
</Target>
Specifies a SHA256 hash value will be generated for the image. SHA256 is a 256 bit hash value generating a 64 character string. The string will appear in the log file, and if the output file is Encase6, the string will also appear in the metadata portion of the image file. Can be Yes or No:
Yes
Generate a SHA256 hash of the disk image during processing.
No
Do not generate a SHA256 hash of the disk image during processing.
AutoStart element
<Target>
<AutoStart>No</AutoStart>
</Target>
Specifies whether to automatically start the disk image collection process. Applies only when processing this JobFile via DiskCollectorCli.exe (i.e. when using a Portable Disk Collection Device). Can be Yes or No:
Yes
The application will start imaging immediately upon loading the JobFile, with no interaction from the user. Note that any use of the '?' option (for the <Source> element or DestDrive attribute) will override <AutoStart> and allow the user the option to modify the image sources or destination.
No
Prompt the end-user to initiate the disk image collection process.
IsResume element (optional)
<Target>
<IsResume>No</IsResume>
</Target>
Indicates that this JobFile represents a resume job that was generated after a successful Stop request was made by the user during disk imaging.
This element should initially be omitted from the JobFile. The application will always set this value. It should not be changed by the user.
ResumeIndex element
<Target>
<ResumeIndex>0</ResumeIndex>
</Target>
Only used in a resume scenario, if the <IsResume> element is set to Yes. Indicates which disk image (if multiple volumes were being imaged) should be resumed.
This element should initially be omitted from the JobFile. The application will always set this value. It should not be changed by the user.
VerifyImage element (optional)
<Target>
<VerifyImage AllHashes="Yes" IncludeMetaData="Yes">Yes</VerifyImage>
</Target>
Specifies whether the disk image(s) should be verified after completion. Verifying each image entails calculating a new hash value on the final image file (or set of segmented files), then comparing this final hash value to the hash value which was calculated earlier as the source disk or volume was read. Can be Yes or No:
Yes
Verify the image after imaging is complete. Requires additional processing time. A log file will be generated containing verification details.
No
Do not verify the image.
Note: When <VerifyImage> is set to Yes, then one or more of the following must also be Yes:
<GenerateMD5>
<GenerateSHA1>
<GenerateSHA256>
The AllHashes attribute specifies which hashes are recalculated and verified when disk imaging is complete. Applies only when the <VerifyImage> value is Yes. Can be Yes or No:
Yes
All hash values found are recalculated. For example, if MD5, SHA1, and SHA256 are all calculated during the image, then all three hashes are recalculated for verification. Requires additional processing time.
No
Only the first hash value found is used for verification.
The IncludeMetaData attribute specifies whether the log file will also list the metadata stored in the file. Applies only when the <VerifyImage> value is Yes, and only when the image file is saved in Encase6 file format. Can be Yes or No:
Yes
Include metadata stored in the resulting Encase6 image file during the verification stage.
No
Do not display metadata stored in the resulting Encase6 image file during the verification stage. Also specify No when saving DD images.
LogFile element
<Target>
<LogFile GenerateLogFile="Yes"/>
<!-- various "child" elements go here:
<LogFileBaseName></LogFileBaseName>
<LogFileFolder></LogFileFolder>
<Verbose></Verbose>
-->
</LogFile>
</Target>
Specifies log file options for the disk imaging process. This element has no value. It contains one attribute that specifies whether to create a log file or not, and child elements that specify the log file location and level of detail.
The GenerateLogFile attribute specifies whether to create a log file. Can be Yes or No:
Yes
Create a log file during the imaging process.
No
Do not create a log file.
Note: If the GenerateLogFile attribute is set to "No" and the <VerifyImage> element value is set to Yes, then a minimal log file will be generated containing verification information. In this case, the log file name and path are derived from the <DiskImageBaseName> and <DiskImageFolder> element values.
LogFileBaseName element
<Target>
<LogFile GenerateLogFile="Yes"/>
<LogFileBaseName>TestImage-Log</LogFileBaseName>
</LogFile>
</Target>
Specifies the base portion of the log file name. Note this does not include any portion of the path, which is specified by the <LogFileFolder> element. The base name should not include the file extension. At runtime, the base name will be appended by a suffix and a .txt extension.
LogFileFolder element
<Target>
<LogFile GenerateLogFile="Yes" />
<LogFileFolder Suffix="MyDiskImage\Logs"
LoginUser="s.smith"
LoginDomain="mycompany.com"
Password="GF34!jaZ">
\\MyServer\MyDestination\MyDiskImage\Logs</LogFileFolder>
</LogFile>
</Target>
The value of the <LogFileFolder> element specifies the output folder for the log file. The value represents the path to the folder only and does not include the file name. The path can be relative or absolute, and can be a network share specified by a UNC path, or a URL pointing to an Amazon S3 bucket or Azure Blob Storage container. Relative paths are relative to the Modules folder within the Portable Disk Imaging Device or the ECC Client installation folder.
The Suffix attribute specifies the portion of the <LogFileFolder> value that represents the additional sub-folders to be created inside the logs destination folder specified by the user. When using ECC a typical value for Suffix is "Case\Collection\Custodian\Target\Logs", where blue values represent placeholders for the specified case, collection, etc. The New Collection Wizard in ECC Admin Console obtains the default Suffix value from the Job XML template.
The optional LoginUser attribute specifies the user ID for accessing a log folder on a network path (including Amazon S3 or Azure).
The optional Password attribute specifies the password for the above LoginUser.
The optional LoginDomain attribute specifies the login domain for the above LoginUser. Omit this attribute when accessing workgroup shares via local users.
Verbose element
<Target>
<LogFile GenerateLogFile="Yes"/>
<Verbose>Yes</Verbose>
</LogFile>
</Target>
Specifies the level of detail in the log file. Can be Yes or No:
Yes
Enable verbose logging, which includes a segment map detailing information on each image file segment (if the image is not a single file), as well as more detailed log entries during imaging if any read errors occur.
No
Use a standard level of logging.
MemoryUsage element
<Target>
<MemoryUsage>
<!-- various "child" elements go here:
<RAMAvailableMB>24</RAMAvailableMB>
<ReadBufferSizeKB>512</ReadBufferSizeKB>
...etc -->
</MemoryUsage>
</Target>
This element has no value. It serves as a parent element to child elements to tune memory utilization while performing disk input/output.
RAMAvailableMB element
<Target>
<MemoryUsage>
<RAMAvailableMB>24</RAMAvailableMB>
</MemoryUsage>
</Target>
The number of megabytes of RAM allocated to disk imaging read/write buffers. This value, in combination with the <ReadBufferSizeKB> value, determines the number of buffers.
For example, if <RAMAvailableMB> is 24, and <ReadBufferSizeKB> is 512, then 24 MB of RAM is allocated to 48 buffers, each of which holds 512 KB of data.
If the number of buffers in each group is too small, then the handing off of buffers between read and write threads occurs too frequently, and the synchronization of the threads can become a bottle neck.
If not specified, the default value of 24 (MB) provides a sufficient number of buffers, (assuming a default <ReadBufferSizeKB> value of 512). This value should be adjusted only to account for changes in the <ReadBufferSizeKB> value.
ReadBufferSizeKB element
<Target>
<MemoryUsage>
<ReadBufferSizeKB>512</ReadBufferSizeKB>
</MemoryUsage>
</Target>
The number of kilobytes read from the source device on each read, and stored in memory. If not specified, the default value of 512 provides an optimal value for reading an entire device or volume in a sequential manner (assuming a default <RAMAvailableMB> value of 24).
Reducing this value, especially below 256, can significantly reduce imaging performance.
ReadFailureOptions element
<Target>
<ReadFailureOptions>
<!-- various "child" elements go here:
<EnableJumping>Yes</EnableJumping>
<RetryJumpAreas>Yes</RetryJumpAreas>
<JumpDistance>32</JumpDistance>
...etc -->
</ReadFailureOptions>
</Target>
The <ReadFailureOptions> element specifies error recovery strategies and other behaviors after a read error occurs. These options can be helpful in recovering the maximum amount of data from a fragile device.
The <ReadFailureOptions> element has no value. It serves as a parent element to several child elements.
Note: The various <ReadFailureOptions> are only valid when the ImageFormat is DD. The ImageFormat is set via an attribute in the <DiskImageFolder> element.
EnableJumping element
<Target>
<ReadFailureOptions>
<EnableJumping>Yes</EnableJumping>
</ReadFailureOptions>
</Target>
Specifies whether to jump over an area on the disk that triggers a read error. Jumping over a bad area on a disk provides an option to read all the valid areas that can be found first, and then go back as a second pass and read as much as possible from the bad sections. This can be useful when imaging a disk that is in a fragile state and may be close to a serious crash, as it provides a better chance of getting as much as possible before the entire drive becomes unreadable. Can be Yes or No:
Yes
After a read error occurs, the disk collection engine will immediately jump to a new read position. The new read position is determined by the <JumpDistance>, <JumpDistanceUnit> and <ReverseScanWithJump> elements. After the first pass of the disk or volume is completed, any skipped area resulting from jumps will be retried if <RetryJumpAreas> is set to Yes.
No
After a read error occurs, the disk collection engine will immediately retry reading the area which triggered the error, assuming <RetryCount> is greater than 0. The collection engine will progress sequentially to the next area after a successful retry or after the maximum number of retries have been attempted.
Note: When <RetryJumpAreas> is set to Yes, the disk imager will make a second attempt to read any skipped areas – even if <RetryCount> is set to 0. If these secondary read attempts are unsuccessful, the disk imager will retry reading the skipped areas multiple times, according to the value of <RetryCount>.
Any areas that cannot be successfully read are always saved in the output file as either padded zeros or the <CustomPadding> value.
RetryJumpAreas element
<Target>
<ReadFailureOptions>
<RetryJumpAreas>Yes</RetryJumpAreas>
</ReadFailureOptions>
</Target>
Specifies whether skipped areas of the source volume are retried. Applies only if the <EnableJumping> element is Yes.
Yes
Retry reading skipped areas.
Note: When <RetryJumpAreas> is set to Yes, skipped disk areas will be retried at least one time. If <RetryCount> is greater than 0, additional retries may also occur.
No
Do not retry reading skipped areas.
JumpDistance element
<Target>
<ReadFailureOptions>
<JumpDistance>32</JumpDistance>
</ReadFailureOptions>
</Target>
The <JumpDistance> value, in conjunction with the <JumpDistanceUnit> element, specifies the distance jumped when a read error occurs. Must be a positive whole number. Only applies when the <EnableJumping> element is Yes.
Note: The following values are suggested:
<JumpDistance>32</JumpDistance>
<JumpDistanceUnit>MB</JumpDistanceUnit>
JumpDistanceUnit element
<Target>
<ReadFailureOptions>
<JumpDistanceUnit>MB</JumpDistanceUnit>
</ReadFailureOptions>
</Target>
Specifies the unit to be applied to the value of the <JumpDistance> value. Possible values are KB, MB, or GB (kilobytes, megabytes or gigabytes, respectively).
ReverseScanWithJump element
<Target>
<ReadFailureOptions>
<ReverseScanWithJump>No</ReverseScanWithJump>
</ReadFailureOptions>
</Target>
Specifies whether to enable reading the source volume in reverse direction (i.e. from the end to the start) after encountering a read error. Only applies if the <EnableJumping> element is Yes.
Yes
Upon the first read error, jump to end of the drive, then read from then on in reverse, from the end of the disk back towards the first read error. Be aware that reading in reverse is inherently slow, so this option should not be enabled without consideration for the performance impacts.
No
Continue to read the disk from start to end after encountering a read error.
ReduceReadOnRetry element
<Target>
<ReadFailureOptions>
<ReduceReadOnRetry RetryBufferKB="0">Yes
</ReduceReadOnRetry>
</ReadFailureOptions>
</Target>
The read size during disk imaging is normally the <ReadBufferSizeKB> value (which defaults to 512). The <ReduceReadOnRetry> element can specify a smaller read size during retries to maximize the amount of data imaged. When specifying this option, consider both the importance of the data being read, and time available to read it.
Yes
Reduce the size of reads during retries. A smaller value will provide finer granularity (and therefore capture more data), but will take longer to read.
No
Do not reduce the size of reads during retries. This will result in faster retries, but may miss good read areas adjacent to any bad sectors.
The RetryBufferKB attribute specifies the size of the read buffer during retries.
A value of 0 indicates a size of One Sector. This is the smallest size possible and is usually equivalent to 512 bytes for most devices. This value will provide the smallest granularity possible, and capture the most data, but will take the longest to process.
A value greater than 0 specifies the exact read size (in KB) to be used during retries. This must be a whole number no greater than the <ReadBufferSizeKB> value. Larger values will retry faster but will miss more data in readable areas that are adjacent to bad sectors.
CustomPadding element
<Target>
<ReadFailureOptions>
<CustomPadding PaddingString="DEADBEEF">Yes
</CustomPadding>
</ReadFailureOptions>
</Target>
This option specifies what values are used to pad the output disk image file when sectors from the source device cannot be read. Unreadable areas are initially padded with zeros. When a skipped area is retried, and the retry attempts fail, the corresponding locations in the output image file can be re-padded with a custom string. Padding with a custom string can be useful if the image file will be opened in a hex editor, as the custom string will be easier to identify and/or search for.
Yes
The custom value specified in the PaddingString attribute will be used for any locations which fail to be read upon retrying.
No
Zeros will be used for padding for any locations which fail to be read.
Note: Values for <EnableJumping>, <RetryJumpAreas> and <CustomPadding> must all be Yes to use a Custom padding String.
The PaddingString attribute specifies a text string value used for custom padding. The string must consist of hexadecimal numerals (characters 0-9 and A-F), and must have a length of either 2, 4 or 8 characters.
The default PaddingString value is DEADBEEF.
End of Target Settings, closed by the </Target> tag.