Terms
The output of a search term report is dependent on the terms that are defined prior to generating the report. Search terms can be either keywords or NQL formatted queries. Each term can also have an associated short name. The Short Name is an optional field that can provide a description for the term or add any other relevant context. This text is visible only within the Search Term Reporting view.
The following section outlines the methods that can be used to define search terms for a report and the scope for where to search for terms.
Define search terms
The Terms section includes a table, which is used to collect the terms that are included within the search term report. The following details are included within the Terms table.
| Column Name |
Description |
| Number (#) |
A numerical placeholder associated with each defined term. |
| Validation |
A visual indication of whether the entered term is valid or not. |
| Term or Query |
A keyword, phrase, or query formatted using valid NQL syntax. |
| Short Name |
(Optional) A brief description for the specified term. |
| Remove Term |
Hover over this column and select the Remove |
 icon to delete a term from the table.
The Search Terms table displays 50 terms per page and can include any number of terms for a report.
To delete all terms in the table, click Delete All Terms located below the Terms table.
Add individual search terms
To add individual terms to the table:
Click + Add Terms from the bottom of the table if an empty row is not currently visible.
Enter a keyword, phrase, or query formatted using NQL into the Term or Query field.
Optionally provide a brief description for the term in the Short Name field.
Repeat the previous steps to add additional search terms.
Validation occurs automatically for all terms and queries added to the table. Once validation is complete, one of the following validation status icons is displayed next to the term within the table.
| Icon |
Status |
Description |
|
|
Valid |
Term or query is valid. |
|
|
Invalid |
Query contains improperly formatted NQL syntax. |
|
|
Warning |
A Notepad or imported CSV submission has been truncated to remove additional values. |


To generate a search term report, all defined terms must be valid. You can view the total number of terms that have been marked as invalid or with a warning by hovering over the filter icons at the bottom of the table.
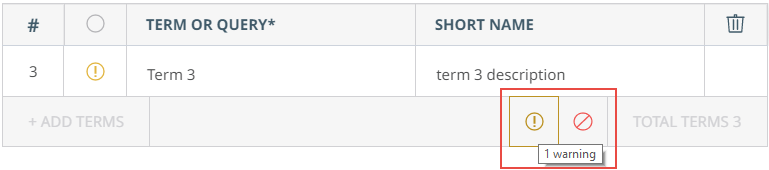
To filter the table to display only these items, click on either icon, or both, to filter the table with those entries.
Modify individual search terms
To modify an existing term or short name, double click on a field to enter edit mode and make any required changes. Navigating away from the selected field exits edit mode and saves all changes. Terms and queries are revalidated upon saving.
Note: Terms that are marked with a warning must be opened in edit mode to ensure that the term is correct. If no changes are required, exit edit mode by navigating away from the field within the table to revalidate the field.
Import terms from CSV
Commonly used search terms can be imported into the Search Term Reporting view using any properly formatted Comma Separated Value (CSV) file. Use the following guidelines when constructing the CSV:
Include only one term/short name pair, per row.
Format values as: Term, Optional Short Name
Terms with a null value are not imported.
Terms that are encased in quotes must be escaped using double quotes:
Original format: “term”
Escaped format: ”””term”””
To import terms from a CSV:
Click Import Terms, located below the terms table.
Navigate the file explorer and select a CSV file to import.
Click Open within the file explorer to import the file.
Imported terms are validated and added to the table below any existing terms.
Note: If more than two comma-separated values are included on a single row within the file, the row is truncated to include only the first two values and the entry is marked with a validation warning in the table.
Add terms in bulk using the Notepad
The Terms section includes a Notepad that allows you to paste or manually enter and review terms before formally populating them within the terms table. The Notepad can be used to paste a subset of terms from a CSV file or other location or to simply manually enter several terms and short names at once. When entering terms, the same guidelines used for constructing a CSV apply:
Include only one term/short name pair, per row.
Format values as: Term, Optional Short Name
Terms with a null value are not imported.
Terms that are encased in quotes must be escaped using double quotes:
Original format: “term”
Escaped format: ”””term”””
Click Open Notepad from below the Terms table to open the notepad. While open, the Notepad acts as a basic text editor allowing you to add terms and short names and make revisions if necessary.
Click Add Terms within the Notepad to finalize your submission. All terms added from the Notepad are validated and added to the table below any existing terms.
Note: If more than two comma-separated values are included on a single row within the Notepad, the row is truncated to include only the first two values and the entry is marked with a validation warning in the table.
Define search term scope
In conjunction with using a scoping query to narrow the items that are available to report on, you can also apply a search scope to the defined search terms to only query specific areas of an item. Selected search scopes are applied to all terms and queries defined within the Terms table. If a search scope is not selected, default search settings are applied.
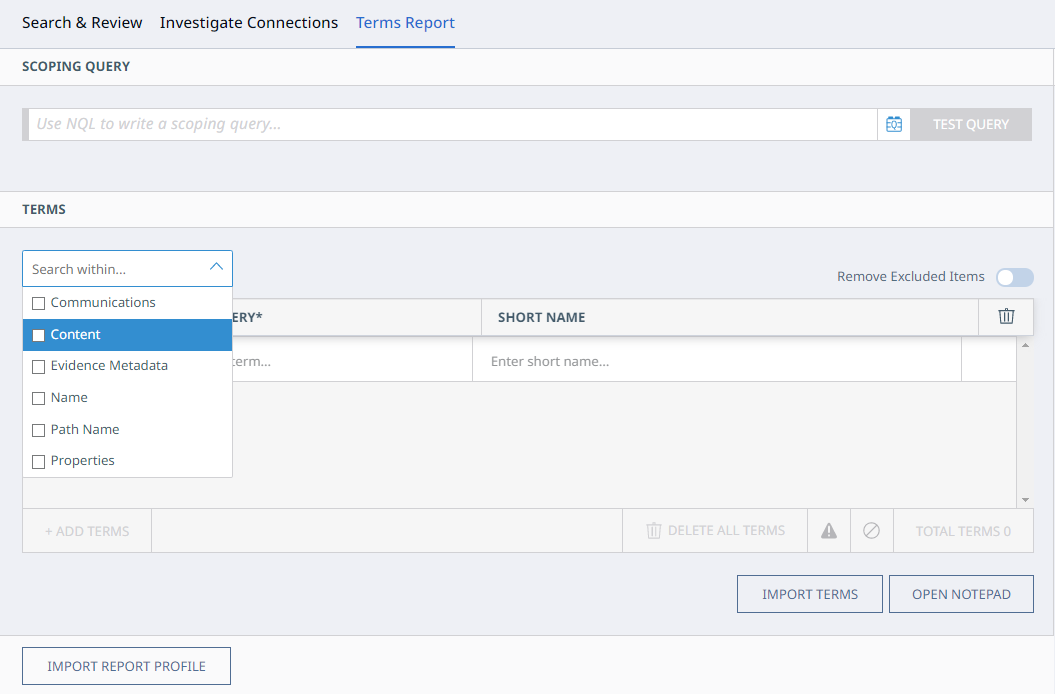
To select a search scope:
Expand the Search Within drop-down located above the Terms table.
Select any of the available scopes to narrow your search:
Communications
Content
Evidence Metadata
Name
Path Name
Properties
Selected scopes display next to the drop-down.
Optionally, select Remove Excluded Items to prevent excluded items from being included in the report.