Create and configure an Elasticsearch case
This section covers how to:
Create an Elasticsearch case in Nuix Workstation
Configure settings for Elasticsearch cases
Specify the binary store
Update settings
Close Elasticsearch indexes
Elasticsearch case types
To start working with data in Nuix Workstation, create an Elastic case - the container for an indexed collection of evidence. You can create an Elastic simple case or an Elastic compound case (a collection of Elastic cases stored in a single Elasticsearch cluster). However, all simple Elastic cases added to an Elastic compound case must be on the same Elasticsearch cluster.
You cannot add the following to an Elastic compound case:
An embedded Elastic case
A Lucene simple case
A Lucene compound case
How X-Pack provides access to Elasticsearch cases
X-Pack controls role-based access to Elasticsearch, which for Nuix Workstation, includes all case data – effectively, the indexes distributed through Elasticsearch. See Elasticsearch security for further information.
SSL or TLS secures the case data while it is in transit. Therefore, to enable SSL or TLS security on your Elasticsearch platform, you must first install X-Pack on Elasticsearch and Nuix Workstation, and then configure X-Pack settings in both applications. You configure X-Pack settings to secure the authentication for roles and access to SSL certificates. See the following Configure settings for Elasticsearch cases for details.
Note: X-Pack Security Transport settings are no longer required. Also, all SearchGuard settings are no longer required.
Create an Elasticsearch case in Nuix Workstation
To create a case:
On the Welcome to Nuix Workstation window, click Create a new case.
The right pane of the window opens the Create a new case pane.
As the case type, select Elastic simple case or Elastic compound case.
In the Case details section, enter the necessary Case name, Case location, Investigator name, and Description fields.
Go to the following Configure settings for Elasticsearch cases to check and update the Advanced Settings for an Elasticsearch case.
Configure settings or keys for Elasticsearch case creation
As Elasticsearch is a distributed search engine, an index is usually split into elements known as shards. Shards are distributed across multiple nodes. Elasticsearch allows you to make one or more copies of your index's shards into replica shards or replicas. You can replicate an index with no or many replicas. You define the number of shards and replicas per index when you create the index.
When you store an Elastic simple or compound case in an Elasticsearch cluster, it provides a near real-time search capability by searching while indexing is in progress. This requires the index to refresh intermittently. See how to set the index.refresh_interval in the following table.
X-Pack controls role-based access to Elasticsearch, which for Nuix Workstation includes all case data. Effectively, the indexes distributed through Elasticsearch. SSL or TLS secures the case data while in transit. Therefore, to enable SSL or TLS security on your Elasticsearch platform, you must first install X-Pack on Elasticsearch and Nuix Workstation, and configure X-Pack settings in both applications to secure the authentication for roles and access to SSL certificates. See all X-Pack security keys in the following table.
Note: Elasticsearch settings on the Advanced Settings dialog persist unless you change them.
To configure settings or keys for Elasticsearch case creation:
Continue from Step 4 of the preceding Create an Elasticsearch case in Nuix Workstation.
In the Case details section of the Create a new case pane, click the Advanced Settings link. The Advanced Settings window opens.
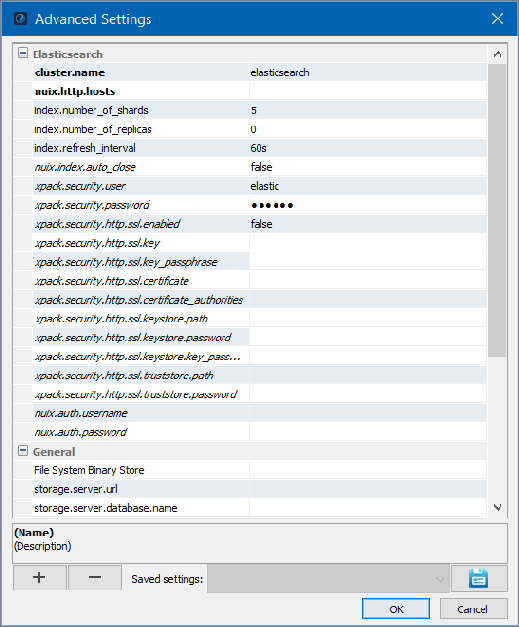
Modify values for the following keys, as required:
| Key |
Action |
| cluster.name |
(Mandatory) Enter the name of the cluster configured in Elasticsearch. To learn more, refer to cluster.name in the Elasticsearch documentation. |
| nuix.http.hosts |
(Mandatory) Enter the hosts or IP:port addresses to communicate with the cluster through HTTP, separating each with a comma. This list is a load-balanced list. Other nodes may be discovered in the cluster. Example: 10.10.10.1:9200,10.10.10.2:9200,10.10.10.3:9200 |
| index.number_of_shards |
Enter the number of shards in the case index. (Default = 5.) It must be large enough for the expected size of the case as increasing it later requires re-indexing the case. You cannot change this after creating the index. As a result, you must choose according to the expected future size of the case index. |
| index.number_of_replicas |
Enter the number of shard replicas. (Default = 0 for fast indexing performance). You can increase this number after evidence ingestion, but it is not modifiable via Nuix APIs after creating the case. Use Elasticsearch APIs to do so. |
| index.refresh_interval |
Respecify the refresh interval for the indexing speed, (default = 60 seconds), to increase or lower this for real-time searching during ingestion. The default provides a good trade-off between fast ingestion and the availability of items in the search during the ingestion. You can set a shorter interval, but this might affect the ingestion speed. Options are 1s (one second), 30s (thirty seconds), or 2m (two minutes). However, after ingestion this automatically resets to 60s. |
| nuix.index.auto_close |
Set to 'true' to close or 'false' (default) to leave open the case indices on the Elasticsearch cluster when you close the case in Nuix Workstation. This reduces usage on the cluster but does not work well in a multi-user environment where access to case indices is shared. See the following Close Elasticsearch indexes section for more details. |
| xpack.security.user |
Enter the X-Pack user name to enable security. Note: The password is not included here as Elastic documentation recommends. Instead, it is securely stored in xpack.security.password. |
| xpack.security.password |
Enter the X-Pack password for the user. |
| xpack.security.http.ssl.enabled |
Set this to true to enable SSL connections to nodes running X-Pack. |
| xpack.security.http.ssl.key |
Enter the SSL key file for this client's identity in PEM format. It must be signed by the cluster's trusted CA to allow the cluster to trust Nuix Workstation. |
| xpack.security.http.ssl.key_passphrase |
Enter the passphrase to the key within the keystore. |
| xpack.security.http.ssl.certificate |
Enter the SSL certificate for encrypted communication. |
| xpack.security.http.ssl.certificate_authorities |
Enter the path to the SSL CA file for this client's trusted CAs in PEM format. This CA will have signed the cluster's certificates allowing Nuix Workstation to trust the cluster. |
| xpack.security.http.ssl.keystore.path |
Enter the path to the keystore. |
| xpack.security.http.ssl.keystore.password |
Enter the password to open the keystore. |
| xpack.security.http.ssl.keystore.key_password |
Enter the password to extract the key from the keystore. |
| nuix.http.auth.username |
Enter the authenticated user's user name for X-Pack to use that is different from the X-Pack credentials. |
| nuix.http.auth.password |
Enter the authenticated user's password that is different from the X-Pack credentials. |
Note: X-Pack Security Transport settings are no longer required.
Press Enter and click OK.
Nuix Workstation adds the case's GUID as a property to each item. This item is available in the corresponding Simple case or in the Compound case. (A Simple case cannot view the items created in other Simple cases in the same Compound.)
Note: A unique feature of Nuix Workstation Elasticsearch cases is that they are shared by default and do not need Nuix Server to share them.
How settings update
When you create a case, its settings store in the case manifest file (.fbi) allowing you to open Elastic cases in the same way as other cases in Nuix Workstation. The settings for cluster and store are retrieved from the case manifest.
The elastic_search_settings key takes a map of settings that pass through to Elasticsearch node configuration. Values typically set via the Elasticsearch YAML file can be set here. If Elasticsearch security is enabled, the password credential setting is added to elastic_search_settings.
Because the settings are stored in the case manifest so that the case be opened from multiple computers, ensure that the defined settings are appropriate to each local computer. For example, hostnames should be resolvable from any computer that needs to open the case. Other valid Elasticsearch settings, such as network.host and http.port, do not apply to another computer and should not be set.
Recommended: Make the case folder a Nuix Management Server shared folder that is on a network share path.
Specify the binary store
To specify the binary store:
Specify the location of the binary store.
Currently, the binary store uses the filesystem-backed store in conjunction with some data stored in Elasticsearch.
Set this up to be a network-accessible shared folder.
Cases can share the same folder. The binary is deduplicated by the MD5 hash.
If you do not specify a binary store location, it defaults to: <case folder>/Stores/BinaryStore
Close Elasticsearch indexes
When Nuix Workstation closes a case, it does not close the associated Elasticsearch index. If you create a lot of cases, a large number of open indices can end up consuming resources such as RAM in the cluster nodes. Set the property nuix.index.auto_close to true when creating the case to close the indices when the case is closed.
Note: It is not recommended to set nuix.index.auto_close to true if multiple users access the same case.
If you choose to leave the indices open (default), you can still close the Elasticsearch indices using external tools mentioned in the Elasticsearch documentation. Closed indices use no cluster resources other than disk space.