Check success or failure of OCRed items
After you perform OCR, you may want to do one or more of the following:
View successfully and failed OCRed items
Check the slip sheet generated for a failed OCRed item
View successfully and failed OCRed items
The top two are the most practical of the four ways you can find and review the success or failure of items you have OCRed. To check your processed items OCRed correctly, do any of the following:
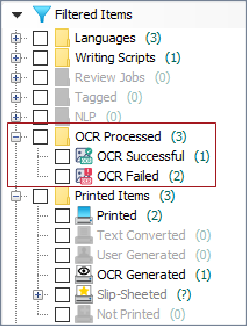
In the Document Navigator’s Filtered Items pane, expand the OCR Processed folder to see the following folders:
OCR Successful with a green icon and the number of successfully OCRed items in brackets.
OCR Failed with a red icon and the number of unsuccessfully OCRed items in brackets.
Search on data in the Results view using either of these flags, as appropriate:
flag:ocr_successful flag:ocr_failed
In the Document Navigator pane, expand the Evidence folder to list individually OCRed items:
Each successfully OCRd item with a green icon.
Each failed OCR 'corrupt' item with a red icon.
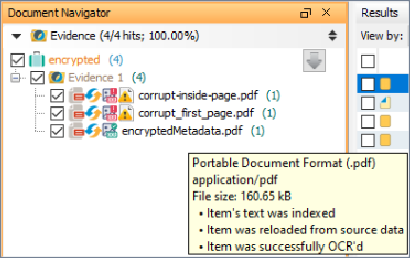
Hover over an item to see a tooltip, or select an item to view its details in the Review pane's Metadata tab.
Locate the default cache folder in your OCR case directory or one you defined to store items post OCRing. For details, see Locate the most recently generated OCRed items in Set OCR cache options.
Nuix Workstation v9.10 and later does not automatically generate a summary report of successful and failed OCR items. If you wish to generate this report when running OCR on a simple case, then set the processor to run with this switch: -Dnuix.ocr.useExportProcessor=true
This switch only applies where the load-processing framework is used for OCR, when configured to automatically run named entity extraction, near de- duplication, text summary, and so on, over the OCR detected text.
To identify OCR-generated items:
In the Document Navigator’s Filtered Items pane, expand the Printed Items folder to see if any items list under OCR Generated.
The number in brackets matches that of the number against OCR Successful under the OCR Processed folder.
To identify irregular OCRed items:
In the Document Navigator’s Filtered Items pane, navigate to the Irregular Items > Text Updated filter category.
Check the slip sheet generated for a failed OCRed item
A slip sheet is automatically generated for any item that cannot be rendered as a printed image by the imaging process that is part of the OCR process. This occurs, for example, for a database file, a sheet in an Excel spreadsheet, a container or a zip file. If you wonder why a certain file type that you have OCRed did not produce a PDF, then do the following to check the reason. (You can also do this before the printed image is passed to the OCR processor, so then you would have no need to pass those items to the OCR processor as their slip sheets explain there is no content in those items that requires OCR processing.)
To generate and view the slip sheet for a failed OCRed item:
From the Results pane listing OCRed items, right-click one or more items and select Slip Sheet.
The slip sheet opens as a PDF detailing the reason the file type could not be printed as a PDF image.