Customize an OCR Profile
This section covers:
What is an OCR Profile?
How to customize an OCR Profile
How to create or update an OCR template
How to set rules for an OCR template
Results observed from different OCR Optimization settings
What is an OCR Profile?
OCR profiles are customized OCR setting templates you can use to perform OCR. You are most likely to use the default OCR Profile that ships with Nuix Workstation as it covers most options relating to items that require to be OCRed. However, when you need to be more specific, for example to only OCR TIFF files, you tailor your own OCR Profile. You can configure multiple OCR profiles per OCR job across diverse types of files according to different rules. These profiles provide control over what type of OCR you want to perform during processing.
In Nuix Workstation you access an OCR profile from the Global Options. Each OCR profile has its own OCR template as well as rules for processing items to be OCRed, and cache settings (where and how to store the OCRed items).
The default OCR profile is based on settings for the most common use case scenario when trying to retrieve text from an item.
You can configure and use multiple OCR Profiles for different file types according to rules that match items with a specific OCR template. When you perform OCR during or after ingestion, you must select an OCR Profile that defines how the items are processed.
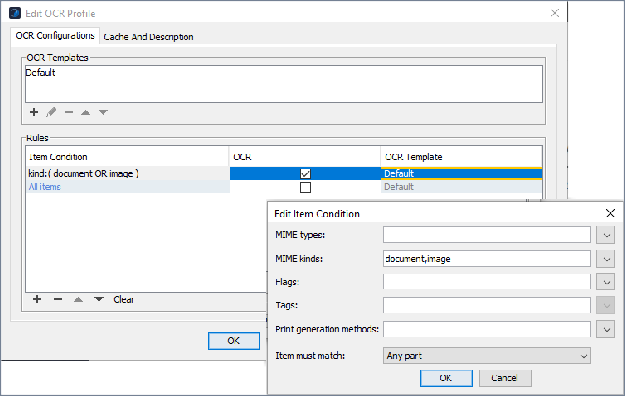
The Add OCR profile dialog and the Edit OCR profile dialog has two tabs:
OCR Configurations tab: To access the Edit OCR template dialog in which you define conditions and rules for one or more OCR templates.
Cache and Description tab: To define how to cache the OCR data and describe the OCR Profile.
Customize your OCR Profile
Language selection is important. Emojis or other symbols, might be taken as a Japanese character instead of just a symbol.
If there is a lack of text in some items, it is useful to tag them as "Candidates for OCR", as they most likely contain many pictures or photos. It is useful to OCR photos.
To customize your OCR Profile:
From the File menu, select Global Options.
From the Global Options window, select the OCR Profiles option.
In the Global Options window:
Select its scope as either User or Local Computer.
As relevant either:
Click the plus (+) sign to open the Add OCR profile dialog.
Click the Edit (pencil) sign to open the Edit OCR profile dialog.
Select the OCR Configurations tab to update or create OCR templates as follows:
Under OCR Templates leave the default OCR Profile template that Nuix Workstation provides, edit it or use it to create a custom OCR Profile. To edit it, select it, click the Edit icon, and in the Edit OCR template window update details as required.
See the following topic Create or update an OCR template for details.
Under Rules define the conditions for items you want to OCR in a table to match them with the default OCR template or a specific OCR template. By default, there is one all-items OCR rule, pointing to the relevant OCR Profile template.
See the following topic Set rules for an OCR template.
Select the Cache and Description tab to set caching options. See Define caching options for an OCR Profile.
You can also click the following buttons at the bottom of the Add or Edit OCR Profile dialog:
Move: To move the profile to a different scope.
Duplicate: To make a copy of the selected profile.
Import: To import a valid XML file which represents a profile.
Export: To export the selected profile to XML format.
Create or update an OCR template
To create or update an OCR template:
Open the Add OCR profile window and select the OCR Configuration tab. See the previous topic Customize your OCR Profile.
Select OCR Template and click Edit to open the Edit OCR template dialog.
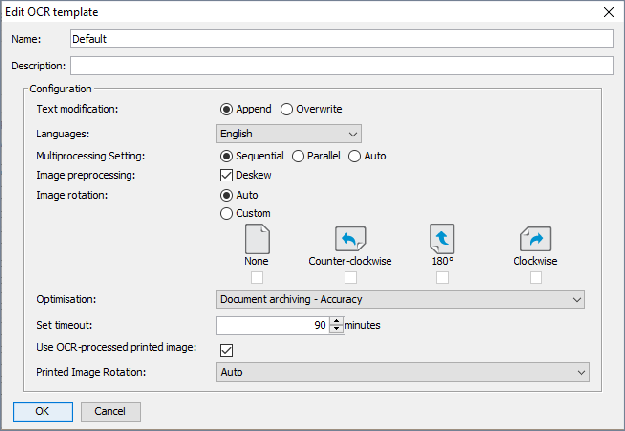
Enter or update the following Configuration Options as required:
Text Modification: Select Append to append the new text to the item's existing text or Overwrite to overwrite the item's existing text with the new text.
Languages: If you select Append, select one or more languages to be recognized and append their text to the default English text. Know that fewer languages provide better quality results.
Multiprocessing Setting: Select one of the following three modes:
Recommended: First run smaller files in Sequential mode with all your Workers; then run larger files in a second batch in Parallel mode using fewer Workers.
Sequential: To process pages in a sequence. (Default).
Hint: Use if you have many small documents, because each single Nuix Worker OCRs only one document at a time.
Parallel: To process pages in parallel on multiple threads.
Hint: Use if you have many larger documents, because each single Nuix Worker spawns FREngine processes (one per physical core) and each of those processes one page of each document. Therefore, on a large multi-core machine, this setting can speed up OCRing of large documents with many pages as it parallelizes at a page level.
Warning: Consider reducing the number of Nuix Workers in Nuix Parallel Processing Options to avoid competing for resources with ABBYY threads.
Auto: To prompt ABBYY FineReader to auto-detect if to use Sequential or Parallel as the multiprocessing setting. This depends on how many available physical or logical CPU cores in your computing system, and how many pages each documents contains. For more details, see the ABBYY documentation.
Image Preprocessing: Select to deskew any misaligned images during preprocessing.
Image Rotation: Select how to rotate an image item in the required direction for text extraction:
Auto: For ABBYY to auto-correct the orientation. If this option fails to restore the right orientation, then use the Custom option.
Custom: To rotate an item Clockwise, Counter-clockwise, 180o, or leave as is.
If you select multiple rotations for that item to undergo OCR processing in one process, then the Text view displays the appended text for each rotation, per the following example image:

None: (For no rotation)
Optimization: Select the appropriate setting.
|
Option |
Function |
Benefit |
|
Book archiving - Accuracy |
To create an electronic PDF library. Requires high processing speed, good visual quality, and small size of resulting PDFs. The highest recognition accuracy is not a critical parameter for this option. |
Provides better quality and detects font styles. |
|
Book archiving - Speed |
Expedites document analysis and recognition. |
|
|
Document archiving - Accuracy |
To create an electronic archive of PDFs. It requires high processing speed, good visual quality, and a small size of resulting PDFs. The highest recognition accuracy is not critical for this option. |
Detects the maximum amount of text on an image, including text embedded in the image; but does not perform skew-correction nor detect fonts and styles. |
|
Document archiving - Speed |
Expedites document analysis and recognition. |
|
|
Document conversion - Accuracy |
To convert documents for content reuse, for example in editable formats such as an RTF or DOCX. This option provides the highest recognition accuracy and precise document reconstruction. However, each error in characters or layout means additional work during the verification and correction step. |
Provides better quality and detects font styles. |
|
Document conversion - Speed |
Expedites document analysis and recognition. |
|
|
Text extraction - Accuracy (Recommended default) |
To extract text for field detection and document classification. |
Detects all text on an image, including small text areas of low quality, but does not detect pictures, tables, fonts, and styles. |
|
Text extraction - Speed |
Expedites document analysis and recognition. |
|
|
Text extraction for field detection and documents classification - Accuracy |
To extract text for field-level recognition. Use this option for recognizing short text fragments. This option is not often used. |
|
Set timeout: Set the number of minutes you estimate would take to extract text from the items you want to process. The default is 90 minutes, but you can even set '0' which means that no timeout value is used to process the item to completion.
Warning: However, if an item takes longer to process than the time specified, the OCR process will fail.
An OCR template specifically to process documents may require a larger timeout than an OCR template for images due to the number of pages that each document may have.
Use Native: Enabled by default to produce PDFs. However, disable to generate PDFs of native image items that you can later directly annotate or redact. This ensures that these items do not convert to a different format when embedded in a PDF sent for OCR.
(However, a vnd.djvu image, for example, when sent in its native format can result in a loss of information when it converts and embeds in a PDF.)
Use OCR-processed printed image: Select only if you want to use the printed image (PDF) generated by OCR in the Preview pane on the Printed Image tab. If not selected, the item's printed image stays 'as-is'.
Printed Image Rotation: Select None, unless you selected the previous option. Then, select the rotation of the final PDF (if relevant, ensuring it matches what you selected for extracting text in Step 3e). A No Matching Rotation warning appears if there is no match.
Click OK.
Go to Set rules for an OCR template.
Set rules for an OCR template
The table of rules in the Edit OCR template dialog’s OCR Configuration tab defines the kinds of items you want to OCR and which OCR template (the default one or a custom one) to match against each of those items. Each ‘match’ is called a condition. The rules are a set of conditions to be run in a set order.
As an example, you may want a rule for documents and a rule for images. An OCR template that you associate with documents may include a larger timeout due to the number of pages that each document may have, whereas an OCR template for an image will not need a large timeout. However, you may want to specify multiple page rotations for images when you know the image orientation for text may be inconsistent (for example, as is common with passport images).
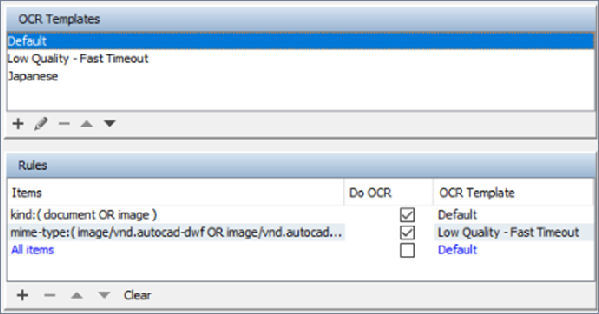
Example set of rules:
The following three rules define the order for determining what OCR template should be applied to each item listed, where only one OCR template is applied to an item:
OCR only documents and images with the default template
kind: (document OR imageOCR Default
OCR CAD drawings with a faster speed
mime-type: (image/vnd,autocad-dwf OR image/vnd.autocad OCR Low Quality-Fast Timeout
Ignore everything else.
All itemsno OCR Default
To define conditions and rules against one or more OCR templates:
Open the Add OCR profile window and select the OCR Configuration tab. See the previous Create or edit an OCR Profile section.
Select OCR Template and under the Rules table, click + to open the Edit Item Condition dialog. See the previous image under Create an OCR Profile.
The Item Condition column defines conditions for how to apply a given OCR template to an item.
Select one, some or all of the following item types or kinds:
MIME types
MIME kinds
Flags
Tags
From Print generation methods, select the method that suits all the item types or kinds you select.
From Item must match, as relevant select Any part or All parts.
Click OK when all conditions are set.
Select the OCR checkbox against each ‘kind’ of condition you defined in Step 1.
If an item fulfils the conditions of the "item condition" and you select the OCR check box for the rule, then the corresponding OCR template is selected and applied to the item. Go to Define caching options for an OCR Profile.
Results observed from different OCR Optimization settings
The following table details the expected results of different OCR optimization configurations. It is recommended that you test OCRing a few items to ensure the results are satisfactory before performing OCR on large datasets.
|
OCR Profile |
Optimization setting |
Result |
|
OCR Profile (Out-of-the-box setting) |
Append - Text Extraction - Accuracy |
Extracts text and detects text on images, even of low quality, if the need to detect pictures, tables, fonts, a styles is not a concern. Note: First-time implementations of Nuix Workstation v9.10 and later automatically default to this setting. I upgrade from a previous version, you need to manually select this recommended setting. |
|
Modified OCR Profile |
Append - Document archiving - Accuracy |
Geared for speed, allows almost all text to be captured and be searchable in the native documents, but do allow you to format the text in exactly the same way as the original. If you want to review only the extracted text, this is not the best option. |
|
Overwrite - Document archiving - Accuracy |
While also geared for speed, does not omit any text from the original native item but the formatting will not the original native item. |
|
|
Overwrite - Document conversion - Accuracy |
Extracts all the text and matches the formatting of the original native item, however it is not as fast or as a as the default setting. |