Redact and export individual items with new markups
This section covers how to do the following:
Redact an individual item with new markups, or edit existing markups
Add a new markup in an individual item
Edit existing markups in an individual item
Highlight content in an individual item
Save new or modified markups in an individual item
Export the redacted item
Use the Printed Image tab of the Preview pane to create new markups on an individual item. You can also edit existing markups, highlight content, and save the markups.
Redaction toolbar

Use the redaction tools on the Printed Image tab, described in the following table:


For more information about the Preview pane and the Printed Image tab, see Preview PDFs of individually marked up items.
Redact an individual item with new markups
To redact an individual item with new markups:
From the Filtered Items pane, select the Markup Sets folder and one or more of the redaction set folders.
From the items in the Results pane, select an individual item (for example, an email).
In the Preview pane, select the Printed Image tab.
A PDF view of the item appears, showing previously redacted items if there were any.
Decide if you want to use the same markup set (in the example shown, the Redaction 1 markup set that applies the Confidential tag), or another markup set if one was previously used.
Otherwise, see Add a new markup set in an individual item for how to add a new one.
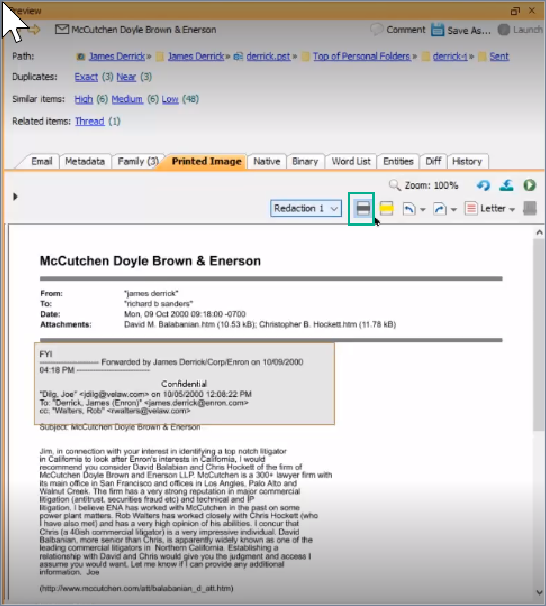
Click the Add Redaction button in this tab's toolbar.
On the PDF image, drag your mouse over any area you want to redact with the same markup set. In the example, using the Redaction 1 markup set to apply the Confidential tag to it.
Click Save Markup Changes to apply them and save the changes to the PDF.
Add a new markup set in an individual item
To add a new markup set in an individual item:
Click Create Markup Sets.
In the Markup Set dialog, specify the markup text you want to add.
Set the format for the markups.
Click Save Markup Changes to apply them and save the changes to the PDF.
This adds the new markup set to the list of options in the Markup Set options lookup.
Edit existing markups in an individual item
To edit existing markups in an individual item:
In the Printed Image tab on the Preview pane, click on an existing applied markup, and do any of the following: Right-click the markup and select Remove to delete it.
Grab its edges to resize the markup area to show less or more redacted information.
Click the Save Markup Changes button to save the changes to the PDF.
Highlight content in an individual item
To highlight content in an individual item:
In the Printed Image tab on the Preview pane, click the Add Highlight button.
Select the markup set you want to use.
Drag and drop the highlights onto the page or pages.
Click the Save Markup Changes button to save the changes to the PDF.
Save new or modified markups in an individual item
Before you save new or modified markups in an individual item, you can also do the following: Change the layout of the PDF using the Rotate Left or Rotate Right buttons.
Change the page size by using the menu next to the Rotate buttons. Set the zoom level for the PDF.
Click Regenerate to regenerate the PDF from the native file, which replaces the currently stored PDF of that item.
To save new or modified markups in an individual item:
After performing any of the changes described on this page in the Printed Image tab on the Preview pane, click the Save Markup Changes.
This saves the changes to the PDF.
You can then export the PDF.
See Export redacted items for details.