Add account types as an evidence source
As a network location source from which to extract data, you can add evidence from any of the following account types:
Apple iCloud
Box, individual or enterprise Dropbox
Google Drive
Microsoft Office 365
Also see Add Microsoft 365 data exported out of MS Purview portal.
Microsoft OneDrive Slack Account
Twitter Historical
For each, you must provide the appropriate credentials such as the access key, secret key, and bucket along with the path to the network location, and their endpoint. This section details how to connect to these account types in alphabetical order.
Add an Apple iCloud account as an evidence source
When you extract data from an Apple iCloud account, this includes being able to extract iCloud drive files, iOS backup, and ubiquity data. Two Factor Authentication is supported for iCloud data, but not iOS backups. You receive the two-factor authentication code on your device. To connect to and extract source data from your Apple iCloud account:
From the Add Case Evidence window, click Add to open from the Add/Edit Evidence dialog.
Click the Content field's Add button and select Add Network Location, then Add Apple iCloud Account.
In the Apple iCloud sign-in dialog, enter your account and password information.
Click Authorize.
Click Test Connection to ensure your connected to the server works.
If the connection is good, click OK.
Add a Box account as an evidence source
To connect to and extract source data from an individual or enterprise Box account:
From the Add Case Evidence window, click Add to open from the Add/Edit Evidence dialog.
Click the Content field's Add button and select Add Network Location, then Add Box Account.
Select either Individual Box Account or Enterprise Box Account.
In the Box sign-in dialog, enter your Box sign in details.
Click Authorize once you are ready to authenticate.
Set up a Developer token for a Box account
To set up a Developer token for your Box account:
Sign up for a developer account at https://app.box.com/developers/console.
Create an Enterprise App there, using the OAuth 2.0 with JWT authentication option for Server authentication. This allows you to retrieve folders from your Box account with a Developer token.
In the Advanced Features section, enable Perform Actions as Users and Generate User Access Tokens.
Click Save.
Next, generate a Certificate to allow your browser to download the config.json file.
Note: Store the config.jsonfile you create securely, as you cannot re-download it.
Sign into your Box account.
From the Admin Console, go to Enterprise Settings and select the Apps tab to authorize your new app. You are prompted to supply an API key.
In the config.json file, next to ‘clientID’, enter a value for the API key.
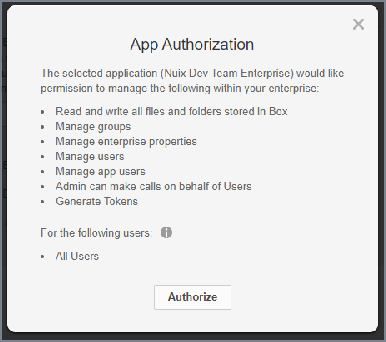
The App Authorization window opens with details that your setup should match.
Once you have checked that it does, click Authorize.
Add a Dropbox account as an evidence source
You can add either a team account or an individual account when you connect to a Dropbox account. To connect to and extract source data from a Dropbox account:
From the Add Case Evidence window, click Add to open from the Add/Edit Evidence dialog.
Click the Content field's Add button and select Add Network Location, then Dropbox Account.
To add a Dropbox team account:
Select the Add Team Account option to open the Dropbox authentication page.
When ready to authenticate, click Allow to open the login page.
Enter the team administrator credentials, and sign in.
In the Pre-Filter Evidence panel, a list of all the accounts in the team appears.
Select the accounts you want to ingest and click OK.
To add a Dropbox individual account:
Select the Add Individual Account option to open the Dropbox authentication page.
When ready to authenticate, click Allow to open the login page.
Enter the team administrator credentials, and sign in.
In the Pre-Filter Evidence panel, only the individual account lists.
Click OK to proceed.
Add a Google Drive account as an evidence source
To connect to and extract source data from a Google Drive account:
From the Add Case Evidence window, click Add to open from the Add/Edit Evidence dialog.
Click the Content field's Add button and select Add Network Location, then Google Drive Account.
In the Google sign-in dialog, enter your Google sign-in details.
Click Allow once ready to authenticate.
Add a Microsoft Office 365 Account as an evidence source
You can connect to and extract source data directly from a Microsoft 365 instance hosted on Azure and retrieve data from multiple Microsoft sources, including Teams, Exchange Online, and SharePoint and OneDrive for Business.
Nuix Connector for Microsoft Office 365 Guide
This guide details information about the connector and the Azure tenant configuration process. To use this feature, an Azure Global Administrator must pre-
configure your Azure tenant to enable authentication and specify the appropriate API data permissions.
Also see Add Microsoft 365 data exported out of MS Purview portal.
Recommended: To avoid reduced performance and loss of data from connection throttling, do not use more than four Workers when ingesting data from Office 365.
If ingesting a single Exchange mailbox, to ensure the best performance, reduce the total number of Workers to a maximum of two.
To add a Microsoft Office 365 instance as an evidence source:
From the Add Case Evidence window, click Add to open from the Add/Edit Evidence dialog.
Click the Content field's Add button and select Add Network Location, then Microsoft Office 365 location.
In the Microsoft Office 365 Location dialog, specify details for the connector on these tabs:
Credentials tab
Specify Users/Team Names tab
Additional Filters tab
The Additional Filters tab allows you to specify filters to apply to the data being retrieved from Microsoft Office 365.
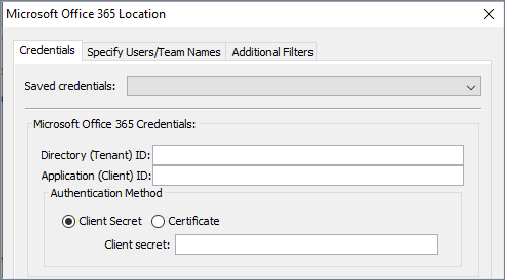
Credentials tab
On the Credentials tab, to configure connection details for the connector:
In Saved credentials, enter the application details that were generated for the Nuix authentication application when it was registered in the Microsoft Azure portal. (Contact your Azure Global Administrator if you do not have this information.)
Or, if the credentials for this connection were previously saved, select them from the Saved credentials menu.
In Directory (Tenant) ID, you must enter the ID of the Azure Active Directory (AAD) tenant where the authentication application was registered.
In Application (Client) ID, you must enter the ID of the registered authentication application.
As the Authentication Method, select either of the following options:
Client Secret: To provide the authentication key string associated with the Application (Client) ID.
Certificate: To provide a PKCS#12 based private key certificate with a .PFX or .P12 file extension, and password.
Note: Passwords and other secrets are protected via:
javax.crypto.spec.PHEKeySpec to generate a java.security.Key javax.crypto.Cipher (using AES/CBC/PKCS5Padding transformation, BC provider) And, Base64 encoded for storage.
The PBEKeySpec uses a randomly generated salt, and a master password which you can set using this SystemProperty: nuix.data.keystoreProtectionPassword
A default password is provided, but you should change the password for full security.
Select the services and associated data types to ingest using the connector:
| Service |
Data Type |
Description |
| Teams |
Team Calendars |
Retrieve Teams calendar data from all teams that a specific user is a member of. Note: If selected, you must provide credentials for a Microsoft Teams user to retrieve calendar data. |
| Team Channels |
Channel data such as chat messages and attachments from all public channels within a team. Note: User emoji reactions to chat messages are included as child items of the parent message. |
|
| User Calendars |
Individual user calendar data from the members of a team. |
|
| User Chats |
Chat messages from one-on-one or group conversations that take place outside of a public channel. Note: See the following Limitations on private chat data section for additional information. |
|
| Exchange Online |
User Emails |
Individual user mailboxes. Tip: Select Extract from mailbox slack space when configuring your data processing settings to also retrieve lower-level folders from the mailbox. |
| User Contacts |
Personal contacts that have been saved by individual users. |
|
| Organizational Contacts |
Contacts created by an administrator are shared with all users in an organization. Also known as Mail Contacts within Exchange. |
|
| SharePoint and OneDrive for Business |
User Sites |
Collect data from Personal SharePoint sites including subsites, lists, and drives. |
| Team Sites |
Collect data from Team SharePoint sites including subsites, lists, and drives. |
|
| Group Sites |
Collect data from Group SharePoint sites including subsites, lists, and drives. |
For all services, traditional and modern OneDrive for Business attachments are included as child items of the parent item.
Note: The retrieval of SharePoint list attachments is not supported.
Choose a license model to use. (Only required if a Teams data type is selected for ingestion):
For detailed information on the following Microsoft licensing models, refer to the Licensing and payment requirements for Microsoft Teams APIs in Microsoft Graph. For more information on pricing, contact your Microsoft account representative.
| Licensing Model |
Description |
| License model A |
Requires Microsoft E5 license types. Restricted to applications performing security and compliance. Seeded capacity of 800-1600 requests (based on endpoint) per month. Nominal fee charged for usage beyond the seeded capacity. |
| License model B |
No required license type. Restricted to applications not performing security and compliance. No seeded capacity. A nominal fee is charged by Microsoft for usage. |
| Evaluation (Not recommended) |
No required license type. Seeded capacity of 500 requests (for all endpoints) per month. Once seeded capacity is exceeded, no further requests can be made. |
Tip: Click Save Credentials to store the provided credentials to a profile for later reuse. If Certificate-based authentication is selected, only the path to the certificate on the local file system and associated password is saved. The certificate file is not stored within the profile.
Click Test Connection to verify the connection details.
If the connection is good, proceed to define filters on the remaining tabs of the connector (per the subsections on tabs that the follow). Then click OK when all tab information is complete, and you are ready to load the data.
Limitations on private chat data
Due to restrictions in how private chat data is retrieved using the Microsoft Graph API, certain limitations exist when determining the recipients of specific messages in a chat. Limitations include:
Chat and conversation IDs are only generated when a new chat is initiated. The generated ID is persisted for the entire life of the chat, regardless of whether participants are later added or removed.
The 'To' communication metadata property, which identifies the participants of a chat, represents only the list of participants that are included in the chat at the time of ingestion. Due to this limitation, the following must be considered:
New participants who are added to an existing conversation are identified in the metadata as a chat recipient. However, based on the chat history settings that were selected when adding the new participant, they may or may not have been granted access to view messages that were sent prior to them joining the chat.
Tip: The Earliest Visible Message Date metadata property identifies the timestamp of the earliest message within a conversation that a participant has access to. The value represents either the date on which a participant was added to the conversation, or an earlier date if the user was granted access to all or a portion of the conversation's history. The order of values corresponds with the listed order of communication participants.
Participants who left a chat after receiving messages are not identified at all in the metadata as recipients.
Workaround:
To establish a complete view of recipients and verify who received messages from a private chat conversation, you must examine the specified private conversation from the /Users/<userName>/Chats directory of each suspected participant.
For example: To verify if John saw a specific private chat message, you must examine messages located in /Users/John/Chats. Looking at the same chat but from a different participant, (by examining, for example, /Users/Jane/Chats), may not properly confirm if John saw a specific message because Jane's chat history may be incomplete and reflect only a portion of the conversation due to the limitations previously noted.
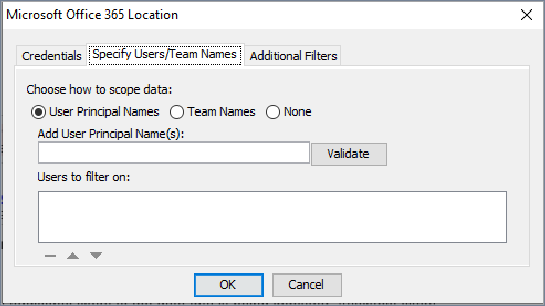
Specify Users/Team Names tab
This tab allows you to narrow the data that is retrieved from the Microsoft Office 365 connection by filtering on specific user names and or Team names.
To filter the data that is retrieved from the Microsoft Office 365 connection by User names or Team names, or none:
Select the Users/Team Names tab and select one of the following as your filter type:
User Principal Names: Retrieve data, including teams and channels, of specified users only.
Note: A User Principal Name (UPN) is the name of a Windows Active Directory system user in the format of an email address. For example, john.doe@domain.com.
Team Names: To retrieve data from specified teams only.
None: To use no Filter, and to retrieve all data, default).
Based on the filter you select, enter a semicolon-separated list of either UPNs or Team names in the Search field. If multiple UPNs are provided, all teams and channels that contain at least one of the specified users will be returned.
Note: You cannot filter SharePoint data by UPN.
Click Validate to verify the entries and add them to the filter. If any names are invalid, the connector specifies which values it was unable to find.
Tip: You can view a complete list of available User and Team names prior to starting your ingestion by initially selecting None as the filter option and OK to exit the connector configuration. Proceed to the Pre-Filter Evidence view to view the results. Nuix Imager can also be used to preview the data set.
Once validated, click OK to return to the Add/Edit Evidence dialog or proceed to the next section to define additional filters on the remaining tab of the connector.
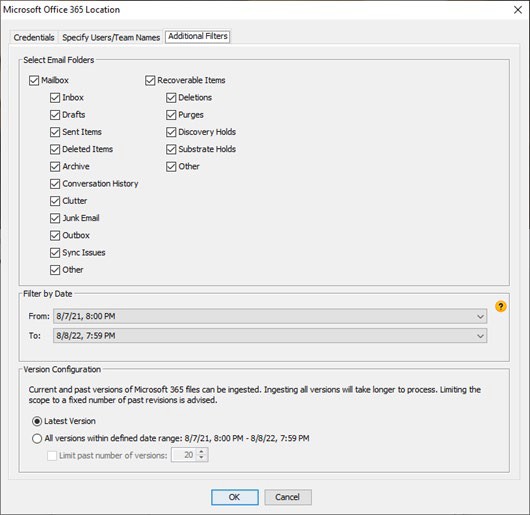
Additional Filters tab
To apply additional filters to the data you want to ingest:
Select the Additional Filters tab, and complete the following:
In Select Email Folders, specify which Exchange Online mailbox folders to retrieve: (Also see the following Select Email Folders section for more information.)
In the Filter by Date section, to retrieve only items with a Last Modified date within a data range: (Also see the following Filter by Date section for more information.)
Expand the From and To fields to view the calendar selectors.
Use the calendar selectors to specify a starting and ending date.
In the Version Configuration section, select either of the following options to filter the file versions you want in the ingestion:
(Also see the following Version Configuration section for more information.)
Latest version if you only want to ingest the latest version of a file or attachment, (default).
All versions within defined date range per the date range you set in the preceding step, and optionally, select the Limit past number of versions check box to restrict the number of retrieved versions to a specified number.
Click OK.
Select Email Folders section
Note: If you did not select the Exchange service on the Credentials tab, this filter will not affect any data.
The following mailboxes currently cannot be collected:
In-Place archives included in user mailboxes using the Microsoft Graph API.
Inactive mailboxes using the Microsoft Graph API.
However, can you extract data from inactive mailboxes using the Microsoft Security & Compliance Center, and then ingest it.
See the Microsoft topic: Search and export the contents of an inactive mailbox for more information.
Filter by Date section
Note: If a Last Modified date does not exist, the item's Creation Date is used. The filter defaults to one year, starting 365 days prior to the current date. If retrieving calendar data, the date range cannot exceed five years (1825 days).
This filter applies only to the following Office 365 item types: Exchange mail messages
Teams chat messages
Calendar events (filtered by scheduled event start time)
Resources from SharePoint and OneDrive for Business
After an ingestion, verify that the date range correctly filtered files by checking that only files with a Last Modified date within the range were ingested. If the range does not capture all the files you wanted, then modify the date range, update the From and To values in the Filter by Date section of the Additional Filters tab.
Version Configuration section
This filter applies to all files and attachments retrieved from Microsoft 365 in which versions are maintained, including data from SharePoint, OneDrive for Business, and Teams.
After ingestion is complete, the following version related metadata is included on all applicable items, which you can view and query in the case:
| Metadata |
Value |
Description |
| Flag: versioned |
boolean |
Indicates that multiple versions of the selected item exist and have been ingested. |
| Flag: current_version |
boolean |
Indicates if an item is the most recent version. Determined at the time of ingestion. |
| Property: Version Age |
integer |
Identifies the version of the selected item in relation to the latest known version. A value of 0 represents the latest version. Each increment of 1 indicates a subsequent older version. Warning: If the data in a case is updated by reloading the source data or scanning for new child items, the Version Age of an item changes if newer versions of that item are found. |
| Property: Version Group ID |
string |
A unique identifier used to link all versioned items from a single original document. The Version Group ID value is derived from the original item's ID value. |
| Property: Version Value |
integer |
Identifies the exact version of the selected item based on source data. Note: Microsoft 365 uses a basic sequential numbering method (1.0, 2.0, 3.0) when assigning version values. Other data sources may assign non-readable values, such as a hash, when defining this value. |
The following are example queries you can use after ingestion to locate versioned items in a case:
| Example Query |
Description of Results |
| flag:versioned |
Returns all items that have multiple versions. |
| flag:(versioned AND current_version) |
Returns the latest version of each item that has multiple versions. |
| flag:(versioned AND NOT current_version) |
Returns all versions of an item except for the latest version. |
| integer-properties:"Version Age":(0 to 10) |
Returns the most recent version (indicated by 0) and the previous 10 versions. |
| properties:"Version Value:2.0" |
Returns all items that have a version value that matches the value specified in the query (2.0). |
| properties:"Version Group ID:<GROUPIDGUID>" |
Returns all versions of an item, including the original, that match the group ID specified in the query. |
When finished, click OK to return to the Add/Edit Evidence page, or continue to review your selections on the previous tabs.
Add a Microsoft OneDrive account as an evidence source
To connect to and extract source data from a Microsoft OneDrive account:
From the Add Case Evidence window, click Add to open from the Add/Edit Evidence dialog.
Click the Content field's Add button and select Add Network Location, then Microsoft OneDrive Account.
In the Microsoft sign-in dialog, enter your Microsoft sign in details.
Click Allow once you are ready to authenticate.
Add a Slack account as an evidence source
Connect to your Slack account and extract data from all workspaces, including public and private messages, attachments, files within the organization, and reactions.
Prerequisites
A Slack Enterprise Grid plan
A Slack account with Organization owner privileges
Initial installation of the Nuix Slack connector app must be performed by a Slack organization owner. Users who utilize the connector must also be Slack organization owners.
See https://api.slack.com/enterprise/discovery/workspace-setup#setup for details about Discovery API access.
Nuix Connector for Slack Guide
To use this feature, the Nuix connector app for Slack must first be installed in your Slack Organization by an administrator with Owner-level privileges. See the
Nuix Connector for Slack guide for more information about the connector and the Nuix Slack app installation process.
Important: To use the Nuix Connector for Slack, your license must be enabled with the Slack License feature.
To add a Slack account as an evidence source:
From the Add Case Evidence window, click Add to open from the Add/Edit Evidence dialog.
Click the Content field's Add button, select Add Network Location, then Add Slack Account.
Select either of the following login options:
Select an existing Slack account to connect to a previously saved Slack account, then:
Select a profile to use from the stored credentials menu and click Connect.
(The option to connect to an existing account only appears if you have previously stored Slack credentials.)
Go to the following Configure the Nuix Connector for Slack to apply data collection filters section to complete the configuration of the connector.
New Slack Login to connect to a new Slack account, and:
When an external browser window opens, enter your Slack Workspace URL if not already logged in.
Click Continue.
The Slack OAuth 2.0 Authorization Framework authenticates your Slack account.
Complete the authentication process using one of the methods provided in the sign-in dialog to access your Slack Owner-level account. (Recommended: Use a dedicated Slack account when using the connector for discovery purposes.)
The Nuix Connector for Slack requests permission to access the Slack account.
Ensure you grant permissions to the Slack account and not an individual workspace.
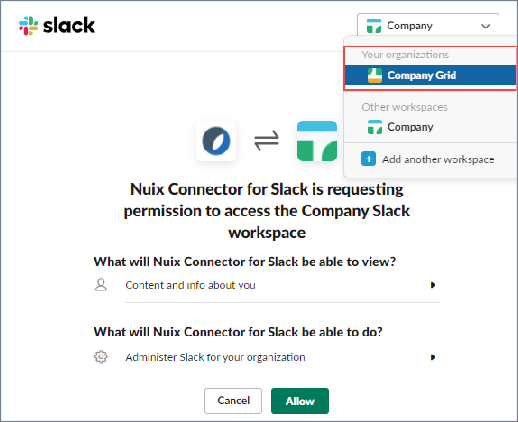
To grant permissions to a different area, expand the selection menu and select your account from the list.
Review the permissions that are being requested, then click Allow.
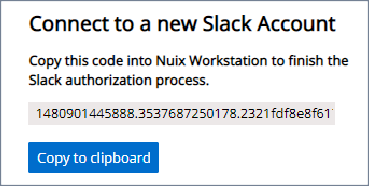
When the Slack authorization process generates an authentication code, click Copy to clipboard.
This code expires within 10 minutes and can only be copied once.
Paste the code into the Temporary Authorization Code dialog and click Submit.
If you submit the authorization code successfully, details about the Slack account appear with the option to store the credentials for later reuse. If your credentials are not stored, you must retrieve a new temporary access code each time you use the connector.
Click Save And Continue to proceed to the following Configure the Nuix Connector for Slack to apply data collection filters section.
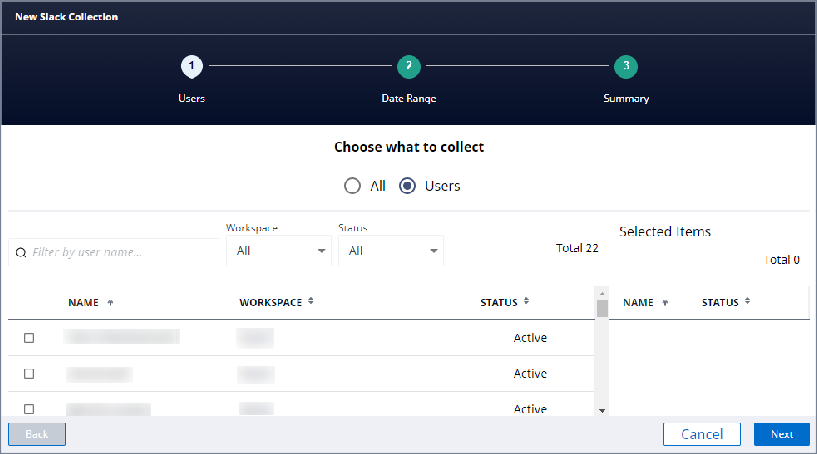
Configure the Nuix Connector for Slack to apply data collection filters
The Nuix Connector for Slack provides configurable filters to help narrow the scope of data that will be ingested into the case. To configure the Nuix Connector for Slack:
Choose to include all users or scope the results to specific Slack users and click Next.
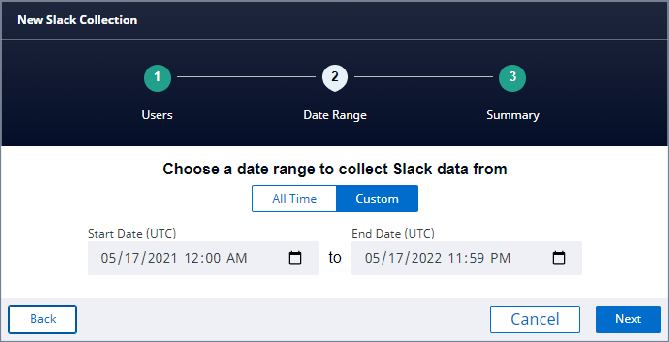
Select All Time to retrieve all available data OR Custom to retrieve only the items from the specified UTC date range; and click Next.
Note: Date filtering only applies to messages and files in the workspace.
Review your selections on the Summary page and click Finish to return to the Add/Edit Evidence page.
Add a Twitter Historical account as an evidence source
A Twitter Historical account allows you to manually ingest a static copy of the exported posts in a Twitter account, but if new posts are added these cannot updated. See the following Add a real-time Twitter feed section for that information.
Note: To add a Twitter Historical account as an evidence source, you must first create a Twitter account, app and access token to provide you with your own API key.
Connecting to this account allows you, approximately, to retrieve a list of up to the latest 3,200 tweets.
Create a Twitter app and access token
The following are links to help you create a Twitter account, app and access token:
To register your own Twitter developer account, go to: https://developer.twitter.com/
To create your own app, go to: https://developer.twitter.com/en/docs/basics/authentication/guides/access-tokens
To obtain an access token, go to: (https://developer.twitter.com/en/docs/basics/getting-started, which covers steps 1,2 as well) To add a Twitter Historical account as an evidence source:
From the Add Case Evidence window, click Add to open from the Add/Edit Evidence dialog.
Click the Content field's Add button and select Add Network Location, then Twitter Historical account.
In the Add Twitter Historical Data dialog, enter the following:
Your Twitter account details.
Consumer Key, Consumer Secret, Access Token, Access Token Secret, and Screen Name.
Click Test Twitter Connection to check if your internet connection to Twitter is working, your credentials are authorized, and if the screen name you provided is valid.
If the connection is good, click OK.
Add a real-time Twitter feed
See Add a Kafka Broker as an evidence source section in Add server types as an evidence source for these details.