Configure operational settings
This section details settings for how you operate in Nuix Workstation. You access them from two panels in the Global Options window:
The second panel, containing the Configuring Connections option. It covers how to:
Manage Nuix Discover accounts
Manage remote collections
The third panel, containing options to configure the following settings:
Saved Searches Search Macros Launching
Memory
A Hot Folder
Credentials
Reports

Configure Connections
Select the Configuring Connections option to manage how the user accounts of available services, like Nuix Discover can connect to Nuix Workstation.
Manage Nuix Discover accounts
You can add, import, and export multiple Nuix Discover user accounts to connect to Nuix Workstation. To add a Nuix Discover account:
Navigate to Global Options and select the Configuring Connections option.
In the Nuix Discover tab, click the plus (+) sign to add an account.
Select one of the following for the scope for the new entry: User, Local Computer or Case.
In the Add Nuix Discover account window, enter the following details:
| Field |
Description |
| Name |
Enter the user name or a brief description of the Nuix Discover account. |
| API Token |
Enter the API token required to connect to Nuix Discover. This token allows Workstation to communicate and push data to the Nuix Discover instance. It contains the Nuix Discover URI as well as Nuix Discover user credentials. The type of access that is presented to Nuix Workstation is dependent on the permissions and configuration of the Nuix Discover user that are present in the token. |
| Discover URI |
The API Token provides the value in this field. You can use it to verify that the token is for the expected Nuix Discover server. |
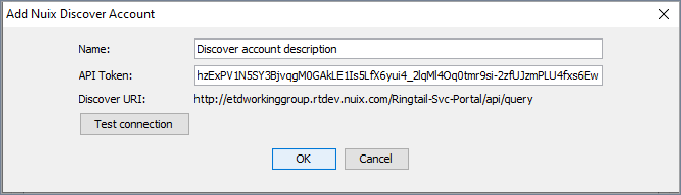
Click Test Connection to test the connection between Nuix Workstation and Nuix Discover.
Click OK to save the settings.
Manage remote collections
Configure the server to remotely connect to while adding case evidence. You can add, edit, or remove the collections server. To add and configure a collections server:
Navigate to Global Options and select the Configuring Connections option.
In the Remote Collections tab, enter the following details:
In Host, enter the hostname of the computer or the server URL where the collections server is running.
In User, enter a valid username to connect to the collections server while adding case evidence.
In Password, enter the associated user account password.
Click Test Connection, to test the connection between Nuix Workstation and the collections server.
Note: To connect to the Enterprise Collection Center (ECC) endpoint through Nuix Workstation, ensure you set the flag 'server.high-level-api.enabled' to True in ECC Server properties. For more details, see the Enterprise Collection Center Administration Guide.
The accepted format for the collections server URL is:
HTTP: http://hostname.domain:80
HTTPS: https://hostname.domain:443
Search for previously used Search syntax
Nuix Workstation allows you to save the search syntax of commonly used queries, for easy reuse. To re-use a Saved Search:
From the Global Options window, select the Saved Searches option, and click the plus (+) sign.
Select the search query you want to re-use.
Note: You can only import a Saved Search in Nuix's own export format.
Search for a macro
To search for macros to facilitate a repeatable process for identifying relevant items and screening them for sensitive information prior to exporting:
From the Global Options window, select the Search Macros option, and click the plus (+) sign.
Use the macros with the ${macro} syntax in search queries. For example:
$"Context Groups/Communication Activity/Call Activity"
Note: You can only import a Search Macro in Nuix's own export format.
Set a default email application to always open your emails
To set the default application to use when opening email messages in the Native tab in the Preview pane:
From the Global Options window, select the Launching option, and click the plus (+) sign.
Select one of the following format options:
EML: Standard message format (RFC822/MIME)
Note: On most Windows systems this setting defaults to using Outlook Express*.
MSG: Microsoft Outlook individual files
NSF: HCL Notes, HCL Domino and IBM (Lotus) Notes mailboxes
Regardless of the format of the source email message, Nuix Workstation uses the appropriate native application to match the email format you select here.
*If you have not configured that program, you are prompted to do so, but you can close the configuration windows and Outlook Express still displays messages.
Configure memory
To configure the amount of RAM made available to Nuix Workstation:
From the Global Options window, select the Memory option, and click the plus (+) sign.
Adjust the amount of RAM based on the circumstance or current task being performed.
16GB of RAM is sufficient for most operations. 32GB is recommended if working with large datasets and performing operations like finding top-level items or de-duplicating.
It is not uncommon to increase the Memory to 90GB or more depending on your hardware.
If you change the setting, restart Nuix Workstation for the changes to take effect.
Note: This option eliminates the need to use the command line switch.
It is important to balance the amount of memory you allocate to Nuix Workstation and to Nuix single Workers for processing and exporting operations. For information on allocating application memory for better performance, see the Nuix Workstation Installation Guide section titled 'Allocate Memory (RAM) for Better Performance'.
Note: Memory is not reserved when Nuix Workstation launches. Instead, it is set as a maximum threshold of the Java Virtual Machine used by the Nuix Workstation.
If set to a particularly high value for your hardware, reset it to a lower value prior to loading or exporting data.
Set a Hot Folder location for imported images
To automatically import images to a 'Hot Folder' location in which to save them:
From the Global Options window, select the Hot Folder option, and click the plus (+) sign. The default Hot Folder is located at:
c:\users\<user name>\AppData\Local\hotfolder.
To change the entry in this field, browse to the required location and click Open.
Because Nuix Workstation automatically checks this folder for new content at a set interval, set the time period (in seconds) that Nuix Workstation will wait before checking for updates.
Load or import pre-saved credentials
The Credential store manages connection and authentication information for a variety of data sources and streams, for example for Slack, Amazon and MS Graph. You can share these credentials without needing to expose sensitive passwords.
To load or import and share pre-saved credentials:
From the Global Options window, select the Credentials option, to open the Global Options dialog.
A list of all pre-imported credentials managed by the credentials store displays, if there are any. Credential items are prefixed by their type.
Click Import to navigate to the keystore of other credentials you need.
Once imported, configure the scope of a credential item, and then you can duplicate and move it between scopes.
Note: Modules that use the Credentials Store, such as the Exchange Web Server connection dialog, only show items specific to that module.
Import or export Nuix Report Templates
Nuix Report Templates (.nrt files) generate reports in different formats, and each format uses a different template to produce the required output. To import an .nrt file into Nuix Workstation:
From the Global Options window, select the Reports option, and click the plus (+) sign.
Select the Import link and browse to select either of the following .nrt files:
Case Summary
Investigator Report
Once imported, it becomes visible in the Reports menu (and is available in your instance of Nuix Workstation until you remove it).
To export an .nrt file for generating reports:
From the Global Options window, select the Reports option, and click the plus (+) sign.
Select the Export link and select either the Case Summary or the Investigator Report.
Define how you want a report to be processed and by providing all of the required resources required for the report generation by container applications. Supported formats include: CSV, HTML, PDF, and XLS.
See Use Nuix Report Templates for more information on these reports.