Mark up pages for redaction or attention
This section covers how to:
Add, edit or remove a Markup Set
Redact items in bulk
Markups are attached to pages of a PDF to either highlight an area or mark it for redaction. They allow you to redact sensitive content in a dataset:
On individual files
Using a list of words and phrases to bulk redact across a dataset
Add, edit or remove a Markup Set
To add, edit or remove a Markup Set to enable redaction:
Select the Items menu, Markup, then Edit Markup Sets.
In the Markup Sets dialog:
Click + to add a Markup Set, and specify its name, description, and redaction text.
Click the Edit icon to edit an existing markup set.
Click the Remove icon to remove a selected Markup Set.
Click OK to save the changes.
Redact items in bulk
To process bulk redactions of items, you can combine a Word List, a Named Entity and a Markup Set. You simply select those features and create a new Markup Set or use an existing one, and then specify the required PDF settings for the redaction.
Note: Because bulk redaction is based on pattern matching in the text found, it is wise to test how your redaction works on two or more documents to identify any variants of the words that you want to include.
To markup and process multiple items simultaneously:
Import the desired Word List - otherwise enable all items to be processed with Named Entities.
Select the Items menu, Markup, then Bulk Redaction to open the Bulk Redaction dialog.
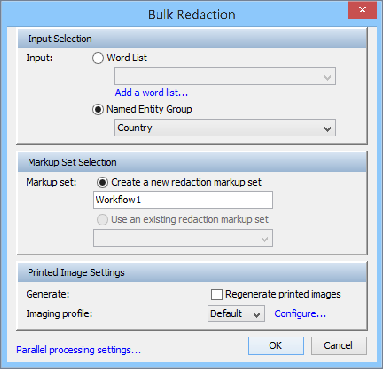
Select one of these Input types to use for pattern matching when redacting:
Word List, then select the relevant Word List from the menu.
Named Entity Group, then select the relevant Named Entity Group from the menu.
Select either of these Markup Set options:
Create a new redaction markup set, then enter a name for it.
Use an existing redaction markup set, then select one from the menu.
Select either of these Printed Image Settings to use when generating printed images in bulk redactions:
Regenerate printed images: To force new PDFs generated by Nuix Workstation to replace the PDFs in the Nuix PDF print store. (By default, disabled.) If you imported custom PDFs into your case, this option replaces them.
Imaging profile: To select the default or a customized one from the menu; and, if needed, click Configure to manage the profile through Global options.
Click OK to proceed with the bulk redaction.
When cases have documents with partially covered redacted text and you attempt to OCR, Nuix Workstation allows a check to minimize how many times you need to re-OCR. However, try to manually adjust redaction boxes when looking in the PDF viewer to ensure any redacted text is removed.
Note: Should a Worker not progress to process a bulk redaction job due to timing out after 10 minutes (600 seconds, being the default Worker watchdog timeout), and produce a TimeoutException error, use the following switch to override this time limit by changing the timeout to one hour:
Dnuix.processing.worker.timeout=3600