Federated authentication
The purpose of this section is to learn what settings you need to configure in the Microsoft Azure Active Directory Federation Services (AD FS) identity provider to create an application for Single Sign-on (SSO) login authentication for Nuix Adaptive Security users. This section is written for an advanced Nuix Adaptive Security user or IT support person who is responsible for the Active Directory and server configuration. This section assumes that this user has some knowledge of the internal security workflow, including the identity provider.
Overview
Nuix Adaptive Security supports SSO authentication using Microsoft Azure Active Directory. This allows administrators the ability to manage access, define group memberships and roles, enhance security, and monitor user activity.
This section will discuss the following topics:
Setting up Active Directory Federation Services
Creating an Azure Application
Saving the Open ID Connect metadata document
Setting up Authentication
Creating the Certificates
Configuring Tokens
Creating Azure Groups Manually
Creating Azure Groups using PowerShell
Using Federated Authentication in the Nuix Adaptive Security application
Refer to the Microsoft Azure Active Directory documentation for more information about user management services.
Authentication upgrade considerations
Before installing or uninstalling federated authentication, review the following upgrade considerations:
If you are running Nuix Adaptive Security with local authentication and you upgrade to federated authentication, then all local users are locked.
If you are running Nuix Adaptive Security with federated authentication and you upgrade and select local authentication, and there are no enabled admin users, then all users with the admin role are enabled.
Note: This will affect users even if federated authentication is not in use. If Nuix Adaptive Security does not have any unlocked admin users, all of them will be unlocked on the next reboot or restart of the identity service.
The admin password reset function in the installer will create the admin user if it is not present. This is used to restore the admin user if you accidentally remove it or if you have an installation where you never had local authentication enabled.
Set up Azure active directory federation services
First, you will set up the Microsoft Azure active directory and create an Azure application. This creates a service that is used by Nuix Adaptive Security. You will create the unique identifications that are required for setting up the Nuix Adaptive Security application. The role mappings are defined in Azure.
Create an Azure application
The Azure application is used for provisioning users.
To create an Azure application for Nuix Adaptive Security:
Log in to the portal and navigate to Azure Active Directory.
Select App registrations.
Add a new registration by selecting + New registration.
Add a unique name, such as Nuix Adaptive Security.
Use the default setting for Supported account types.
Use the default setting for Redirect URI.
Select Register.
On the Overview screen, copy the following IDs and save them for later.
Application (client) ID
Directory (tenant) ID
Object ID
Save the Open ID Connect metadata document
OpenID Connect will work with the token, discussed in Configure tokens, to allow the client to verify the identity of the user.
To save the Open ID Connect metadata.
In the Microsoft Azure Application, select Endpoints to open the Endpoints window.
Select to copy the OpenID Connect metadata document. You will need this for the Nuix Adaptive Security installer.
For example: https://login.microsoftonline.com/a00035bc-d628-4788-97c4-bbfbf70f3e7a/v2.0/.well-known/openid-configuration
Store it in a safe place.
Set up authentication
Azure authentication will manage the users and their roles for Nuix Adaptive Security.
To set up authentication:
In the Microsoft Azure Application, select Authentication on the left side under Manage.
Select + Add a platform.
Under Configure Platforms, select Web.
Under Redirect URIs enter "https://localhost:5003/signin-oidc".
Check both Access tokens and ID tokens.
Select Configure.
Under Web:
Select Add URI and enter "https://adaptive:5003/signin-oidc".
Add a URI for every public IP and DNS name that is used by the Nuix Adaptive Security Endpoint Server.
Select to + Add a platform.
Select the Mobile and desktop application.
Click Add URI and add http://localhost.
Check the redirect URI box for: https://login.microsoftonline.com/common/oauth2/nativeclient.
Select Configure and Save.
Create application secrets
You will need your certificates and client secrets for the Nuix Adaptive Security installer. Store these items in a safe place. When the certificate expires, you will have to run the Nuix Adaptive Security installer to update the client secret.
To create the certificates:
In the Microsoft Azure Application, select Certificates and secrets on the left side.
Click + New client secret and enter a description.
Select an option under Expires.
Select Add.
Under Client secrets, copy the Value column.
Important: This is the only time you will be able to get this value. Store this secret in a safe place. You will need this value for the Nuix Adaptive Security installer.
Configure tokens
The tokens are used to synchronize the user accounts to the Azure Active Directory.
To configure the tokens:
Select Token configuration on the left side.
Select + Add groups claim.
Under Select group types to include in Access, ID, and SAML tokens, check all of the boxes.
Under Customize token properties by type.
Click on ID and select sAMAccountName.
Click on Access and select sAMAccountName.
Click Add.
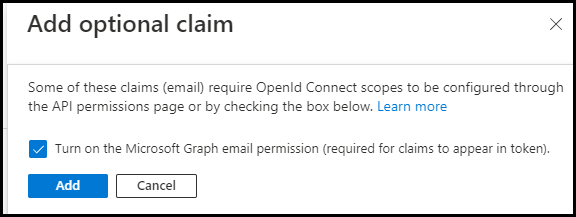
Click on + Add optional claim.
Under Token type select ID.
Under Claim select email.
Click Add.
Check the box to Turn on the Microsoft Graph email permission (required for claims to appear in token)., and click Add.
Azure groups
You will need Azure groups to specify your roles. You may choose to use your organization’s existing groups or create new ones specifically for Nuix Adaptive Security. The only required group is the admin role. For more information about roles, see Role-Based Access Control in the Nuix Adaptive Security Administration Guide.
There are two ways you can create your Azure groups: manually in Azure Active Directory or using PowerShell.
Create Azure groups manually
This is used to specify the Active Directory groups.
To create Azure groups:
Log in to the portal and go to Azure Active Directory.
Under manage, click on Groups.
Click on + New Group.
Leave "Group type" as Security.
Add a descriptive group name. For an Admin group, it is important to keep track of this name as it will be needed by the Adaptive Security installer.
(Optionally) Assign members to the group.
Click on Create.
You will return to the Groups page. If it is the admin group, it is important to keep track of the "Object Id" as it will be needed by the Adaptive Security installer.
Create Azure groups using PowerShell
You can run the following PowerShell to automate creating groups. PowerShell is used to specify the Active Directory groups. Nuix Adaptive Security users must be assigned to one of these groups. Each group name matches a possible Adaptive Security role.
$admGroup = New-AzADGroup -DisplayName Adaptive_Admin -MailNickname Adaptive_Admin
$apiGroup = New-AzADGroup -DisplayName Adaptive_APIDeveloper -MailNickname Adaptive_APIDeveloper
$anaGroup = New-AzADGroup -DisplayName Adaptive_Analyst -MailNickname Adaptive_Analyst
$opeGroup = New-AzADGroup -DisplayName Adaptive_Operator -MailNickname Adaptive_Operator
$sanaGroup = New-AzADGroup -DisplayName Adaptive_SeniorAnalyst -MailNickname Adaptive_SeniorAnalyst
$audiGroup = New-AzADGroup -DisplayName Adaptive_Auditor -MailNickname Adaptive_Auditor
$moniGroup = New-AzADGroup -DisplayName Adaptive_Monitor -MailNickname Adaptive_Monitor
$inveGroup = New-AzADGroup -DisplayName Adaptive_Investigator -MailNickname Adaptive_Investigator
# Print names and Ids that will be needed by Nuix Adaptive Security installer (admGroup) and the rest for the Web UI
Write-Host $admGroup.DisplayName $admGroup.Id
Write-Host $apiGroup.DisplayName $apiGroup.Id
Write-Host $anaGroup.DisplayName $anaGroup.Id
Write-Host $opeGroup.DisplayName $opeGroup.Id
Write-Host $sanaGroup.DisplayName $sanaGroup.Id
Write-Host $audiGroup.DisplayName $audiGroup.Id
Write-Host $moniGroup.DisplayName $moniGroup.Id
Write-Host $inveGroup.DisplayName $inveGroup.Id
# Example of adding a user to a group
Add-AzADGroupMember -MemberUserPrincipalName unit_tester@nuixazuregmail.onmicrosoft.com -TargetGroupDisplayName Adaptive_Admin
Set up the server installer
You will enable federated authentication during the server installation.
To enable federated authentication, set up the server installer:
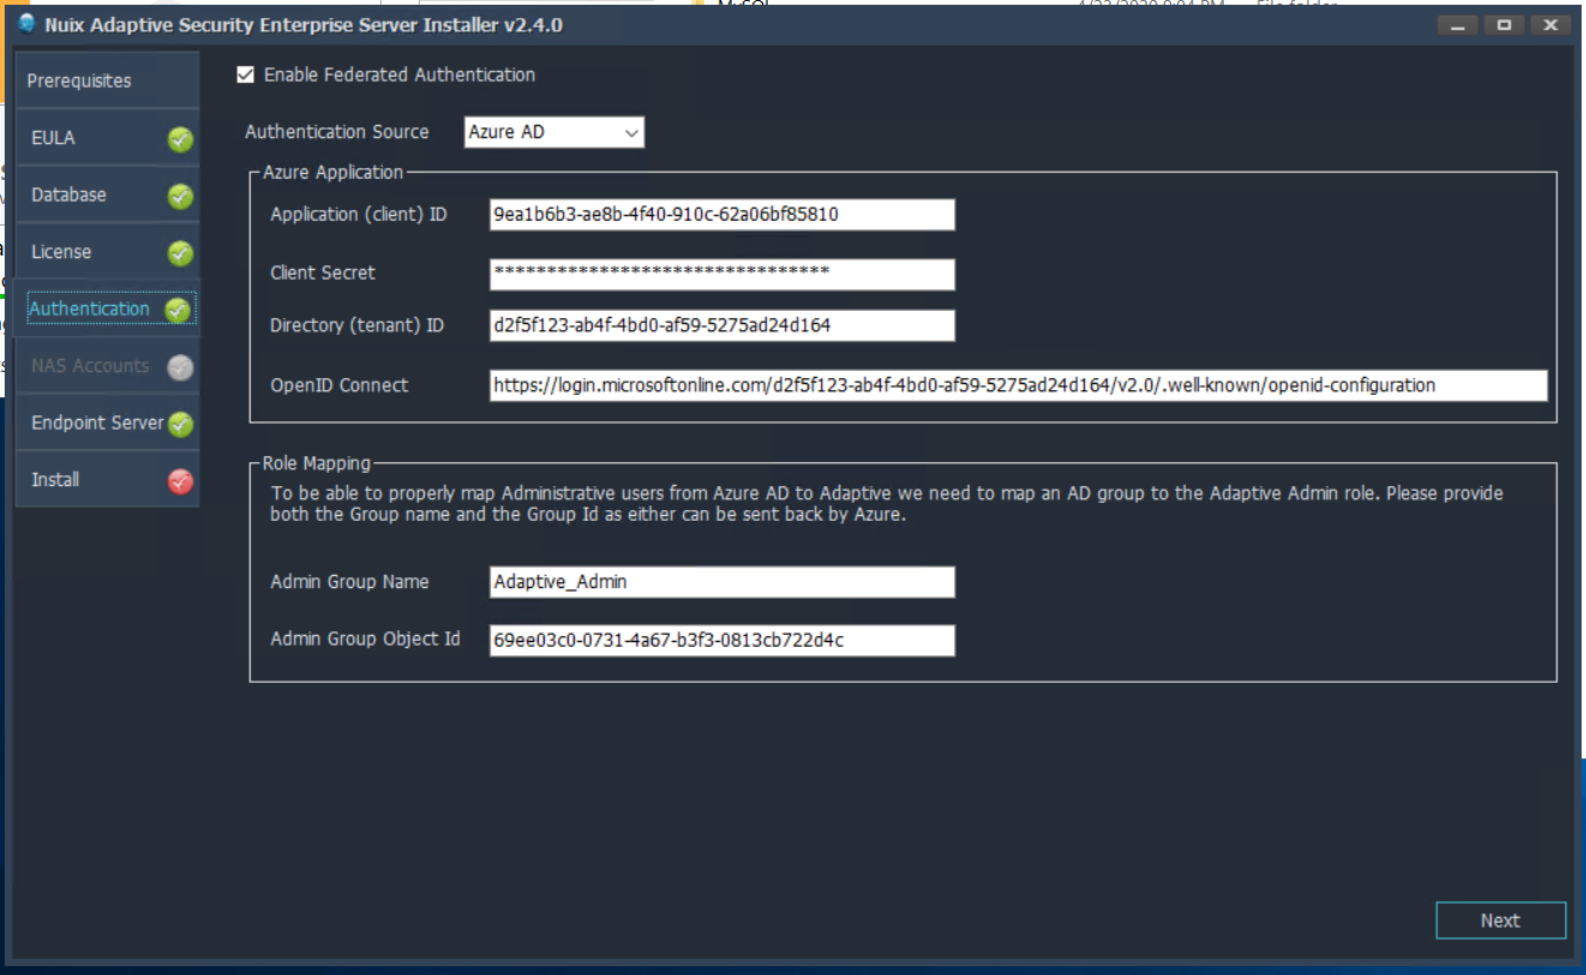
Select the Authentication tab and select the Enable Federated Authentication check box.
Add the Azure Application Information.
Application (client) ID
Client Secret
Directory (tenant) ID
OpenID Connect
Enter the Role Mapping for the Adaptive Admin role.
The ability to manually add NAS Accounts is disabled in the installer after the federated authentication is enabled.
Configure the Nuix Adaptive Security endpoint server for federated authentication
When federated authentication is enabled, you will not be able to edit users under Manage Users or manage the account settings for the user. When you use federated authentication, the ability to set up roles locally is disabled.
For more information about roles, see Role-Based Access Control in the Nuix Adaptive Security Administration Guide.
Note: You cannot use the same user name for a federated authenticated user and a local user. This will result in an error when you try to log in to the application.
To configure the Nuix Adaptive Endpoint Server Web UI for federated authentication:
Log in to the server Web UI and navigate to Configuration > Federated Authentication.
You will see your role mappings. You can add or edit your role mappings.
Use federated authentication in the Nuix Adaptive Security application
After you configure the Nuix Adaptive Security Endpoint Server for federated authentication using the Microsoft Azure Active Directory, you can then log in to the application using federated authentication.
To enable federated authentication in the Nuix Adaptive Security Application:
In the Nuix Adaptive Security Login window, enter the server IP address. Once the server is set up with federated authentication, the application will automatically detect it.
You will then log in using your organization’s login credentials.
Once the authentication is set, the server and application are bound to the federated authentication.
Note: If you are running the application on a Windows Server, you may need to click to add a few exceptions before you can log in using your organization’s credentials.