Post-Processing activities
Reviewing job statistics and logs
Examining logs & reports
Whenever a collection, extraction, deletion or survey is performed using Nuix Collector or the Collector Wizard, various logs and reports will be generated in the Logs folder. The specific logs and reports are selected in the Wizard or manually configured in the JobFile.
If necessary, additional reports and logs can be generated after the collection has finished processing, as follows:
Run the Report Generator utility.
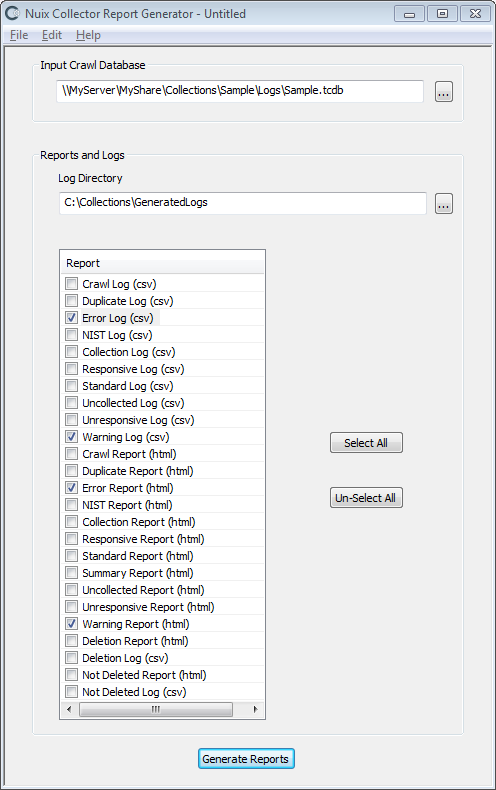
At Input Crawl Database, specify the Titan CLI Run Status Database (a .TCDB file) from the corresponding Logs sub-folder
At Log Directory, specify an output folder where the generated log files and/or reports are to be saved.
Specify which log files (CSV files) or reports (HTML files) you wish to generate:
CSV: Log file. Can be loaded into Excel, a text editor or a database for analysis and reporting
HTML: Report file. Viewable and printable from a web browser
Standard Logs and Reports:
The following standard log files and formatted reports are included in Nuix Collector Suite:
| Log or report |
Description |
| Summary |
A summary of all job processing activity. |
| Crawl |
Lists the files accessed during the crawl phase. |
| Folder |
Lists the folders accessed during the crawl phase. |
| Responsive |
Lists files which met all the applicable selection criteria. This is the primary report for a Survey. |
| Unresponsive |
Lists files that did not meet all the collection criteria and were excluded. |
| Undetermined |
A listing of the files in which responsiveness could not be determined (in some cases the Advanced Search feature cannot search the text within a given file). These files are collected or added to the survey in case they are responsive. |
| Collection |
Lists files collected. Also produces a Collected with Errors report or log, listing files that were collected but experienced an error during collection. |
| Collected with Errors |
Lists files collected that have errors. |
| Uncollected |
Lists files which should have been collected based on the selection criteria, but could not be collected due to one or more errors. |
| Duplicate |
Lists files which were excluded from processing due to being internal or external duplicates. |
| NIST |
Lists files that were excluded from processing due to being recognized as belonging to the set of files in the NIST hash database. |
| Standard Files |
Lists files recognized as part of a known set of files and not collected. |
| Deletion |
List files and folders which were deleted. |
| Not Deleted |
Lists files and folders which should have been deleted based on the selection criteria, but could not be deleted due to one or more errors. |
| Volatile Information |
Details regarding the operating system, processes, network settings and other information on the computer running Nuix Collector. |
| Volatile Information Warning |
Lists any warnings regarding volatile information which could not be collected. |
| Warning |
Lists warnings detected during processing. |
| Error |
List of any errors with particular files, including errors during re-tries. |
Reviewing error logs
Review the details of each error as follows:
Wait for the collection to complete.
Locate the error log or report, located at the Log Directory you specified in the Collection Wizard or JobFile.
If the collection did not produce an error report or log, then run the Report Generator utility to produce one; for details, see topic Examining Collection Logs & Reports, above.
Open the CSV error log file, using Microsoft Excel or a text editor, or import the CSV error log file into a database. Open the HTM error report in your web browser.
Review the errors.
Investigating and resolving errors
When performing a collection, errors for a small number of files are common. Typically errors occur because a few files have special security permissions and are inaccessible, or incorrect login credentials were specified for a share. Files may also be unavailable due to being open for exclusive use by another application. Disk corruption on the original disk or destination disk can also cause collection errors.
If you determine that the errors encountered by a Collection warrants taking further action, you can resolve the cause of the errors and then restart the failed or cancelled Job or Collection. Resolving the cause of the errors may require:
Adjusting file permissions on source files and folders (which may alter the file attributes of the files and folders involved – for eDiscovery collections, consult with your legal counsel before taking such action).
Altering the user credentials used to access a particular input source folder.
Addressing hard disk corruption.
Other actions, depending on the type of error. Contact Nuix Support if you need assistance resolving a particular error.
A deletion job will abort whenever any error is encountered. See the bullet points, above, for possible causes of a deletion error. The deletion job can be rerun once the issue is resolved.
Investigating and resolving failures
Collections and other kinds of processing jobs can fail for various reasons, including input source folders going offline, processes crashing, physical disk failures, etc.
You can resolve the cause of the failure and then restart the failed job. Resolving the cause of the failure may require:
Reviewing error logs for the failed jobs to determine at what point the failure occurred and the nature of the failure.
Reviewing the Windows Application Event log. The log may contain entries detailing why the failure occurred.
Restarting a failed file collection
When a file collection or survey fails, you can often restart the job at a point close to where it last left off, as follows:
Remedy the conditions which triggered the problem. For details, see the topic Investigating and Resolving Failures, above.
Run Nuix Collector.
From the File menu, select Resume. Locate the folder containing the logs for the collection which failed. Select this folder and open it.
The failed job will be restarted from a point near where it left off, if possible. Otherwise, the job will restart from the beginning. A Resume log (or report) will be generated whenever a job is restarted. The Summary Report will indicate the date and time of each restart.
Note: Portable Collector file collections which fail can also be restarted by re-running Portable Collector and adding the following command line parameters: /resume "path-to-collection-logs-folder" The path to the collection logs folder must specify the primary logs folder or directory where the .cdb file is located.
The ability to resume a failed file collection is limited to certain scenarios:
Performing a file collection where at least one input source is a directory.
Advanced search (full-text search) is not used.
The folder where logs and the crawl database from the first collection attempt is accessible.
The collected data and logs are not being saved to an Amazon S3 bucket or Azure blob storage container.
Failed SharePoint collections cannot be restarted; they must be launched from the beginning; see topic Rerunning Jobs.
Rerunning jobs
When a collection fails, has errors, or was cancelled, you can re-collect the files by restarting the collection, from the beginning, as follows:
Delete any files collected by the collection job from the job's specified Destination.
Delete any logs generated by the collection job from the job's specified Logs folder.
If the previous collection failed or registered errors, remedy the conditions which triggered the problem. For details, see the topics Investigating and Resolving Errors and Investigating and Resolving Failures, above.
Run Nuix Collector.
From the File menu, select Open. Locate the Collection JobFile and open it to re-run the collection.
An alternative to re-running a previously run job is to define a new job which would process only the files which experienced errors during the previous job. This can be done by creating a FileList based on the contents of the previous job's Error Report XML file. This option is suitable when the original job completed (i.e.: did not fail), but encountered errors when processing one or more files.
Reviewing collections with Evidence Browser
Evidence Browser allows easy review of file collections, including collections saved as a FileSafe or other evidence file. For details, see topic Importing Source Files, within section Evidence Browser Reference.
Navigating extra-long file paths
NTFS volumes support path lengths over 30,000 characters; however, File Explorer (or Windows Explorer) is limited to viewing paths with a maximum length of 260 characters.
Nuix Collector and Evidence Browser can save paths that exceed File Explorer's limits. Below are some possible ways to circumvent this File Explorer limitation:
Use brief names when specifying the Description within Collector Wizard or when manually editing a JobFile's <OriginalLocation> tag.
Set the collection's Description (or <OrginalLocation> text) to a single space. This will effectively skip the creation of a folder level for Description.
Search and analyze the collection using Nuix Workstation (licensed separately). Nuix Workstation supports extra-long file paths.
Use SUBST (a Windows command-line utility) or an NTFS Junction Point to map a lengthy folder's parent folder to a drive letter or a shorter path, respectively. The parent folder could also be accessed as a share.
Rename the parent folders to have shorter names.
Use a third-party utility to browse long paths.
Extracting the JobFile from a FileSafe
All FileSafe files contain an embedded copy of the JobFile which was used to produce the FileSafe. You can extract this JobFile to examine the settings which were active when the FileSafe was produced.
To extract a JobFile from a FileSafe:
Launch the Extract JobFile Utility, by clicking Start > All Programs > Nuix > Nuix Collector > Tools > Extract JobFile.
Click the browse button to the right of the JobFile field. An Open dialog appears.
At the bottom of the Open dialog, in the Files of type field, ensure Job Files (*.Mfs01) is selected, so the dialog will list FileSafe files.
Locate and open the FileSafe whose embedded JobFile you wish to examine.
In the Output File field, specify the name of the new JobFile file to save, then click Extract. This will copy the embedded JobFile from within the FileSafe and save it as an unencrypted XML JobFile.
To examine the XML JobFile which you extracted:
Run the Collector Wizard.
From the File menu, click Open JobFile and select the JobFile you extracted from the FileSafe.
Navigate through the Wizard to examine the various settings in the JobFile.
You can also open the JobFile directly in a text editor or XML editor.
JobFile encryption
JobFiles may contain login IDs and passwords for access to network shares and SharePoint sites. Such login information is visible to anyone who examines the JobFile. JobFiles may be encrypted to help safeguard these IDs and passwords. But encrypted JobFiles must first be unencrypted before they can be reviewed or edited.
Warning: Encrypted JobFiles may be unencrypted by anyone with access to (1) the JobFile, and (2) Nuix Collector Suite programs and utilities.
Note: An unencrypted JobFile contains plain text, with an .XML filename extension. An encrypted JobFile contains encrypted text, with a .MJF01 filename extension. Nuix Collector Wizard can load encrypted or unencrypted JobFile templates. The Wizard can also save a JobFile in encrypted or unencrypted form. Nuix Collector can execute encrypted or unencrypted JobFiles. Portable Collector on Windows can only execute encrypted JobFiles. Portable Collector on Linux and macOS can execute encrypted or unencrypted JobFiles.
Encrypting an XML JobFile
XML JobFiles can be encrypted to help safeguard any IDs or passwords within.
Warning: Encrypted JobFiles may be unencrypted by anyone with access to (1) the JobFile, and (2) Nuix Collector Suite programs and utilities.
To encrypt an XML JobFile:
Launch the Create JobFile Utility, by clicking Start > All Programs > Nuix > Nuix Collector > Tools > Create JobFile.
Specify the unencrypted JobFile in the Xml File field.
Specify a new file name in the Job File field. This file should have a .MJF01 filename extension.
Click the Create button to create the new, encrypted JobFile. The original unencrypted XML JobFile is not changed.
Decrypting an encrypted JobFile
Encrypted JobFiles created by the Collector Wizard can be decrypted so they can be reviewed and edited.
To decrypt an encrypted JobFile:
Launch the Extract JobFile Utility, by clicking Start > All Programs > Nuix > Nuix Collector > Tools > Extract JobFile.
Click the browse button to the right of the JobFile field. An Open dialog appears.
At the bottom of the Open dialog, in the Files of type field, ensure Job Files (*.Mjf01) is selected, so the dialog will list encrypted JobFiles.
Locate and open the encrypted JobFile you wish to examine.
In the Output File field, specify the name of the new JobFile file to save. This file should have a .Xml filename extension. Click Extract. This will create a copy of the encrypted JobFile, saved as an unencrypted XML JobFile.
To examine the XML JobFile which you extracted:
Run the Collector Wizard.
From the File menu, click Open JobFile and select the JobFile you extracted from the FileSafe.
Navigate through the Wizard to examine the various settings in the JobFile.
You can also open the JobFile directly in a text editor or XML editor.
Extracting collected files
If you saved the results of the collection as a FileSafe, you can later extract some or all the native files from within the FileSafe. To extract native files from a FileSafe using Nuix Collector, see topic Evidence Files. To extract native files from a FileSafe using Evidence Browser, see topic Extracting a Collection.
Examining collected files
Use Evidence Browser, included in Nuix Collector Suite, to review the contents of a FileSafe, or to extract native files from a FileSafe. For details, see the following topics in the Evidence Browser Reference section of this guide:
Searching and analyzing collected files
Use Nuix Workstation or other Nuix eDiscovery products (licensed separately) to search and analyze collected files. Contact Nuix for details.