Post-collection activities
Reviewing collection results in Admin Console
From the Dashboard Panel, statistics show the total bytes collected, as well as the total number of files collected. These statistics include the counts for running Collections which have completed their crawl phase, as well as for Collections that were run for a time and then cancelled. As a consequence, the totals shown in the Dashboard may be higher than the amount of data saved in your Destination folders.
From the Cases and Collections Panel, each completed collection will show the number of errors and warnings that were logged during the collection process.
Reviewing error and warning notices
For each Collection Job, an error count and warning count will appear in Administration Console's Dashboard panel and Cases and Collections panel. If the job's error count or warning count is 1 or more, you can review the details of each error or warning as follows:
From the Cases and Collections panel, right-click the Case or Collection, then then choose Error Log or Warning Log (select a specific Job if prompted to do so).
Review the errors or warnings.
To determine the cause of any error or warning, review the Error Log and Warning Log files or reports from the Collection job; for details see topics Locating Collected Data, Logs and Reports and , below.
Locating collected data, logs and reports
Each task in a collection will run separately on the specified ECC Client computers. Tasks which collect data will save this data to a unique destination path. Tasks which generate crawl databases, log files or reports will save these items to a unique log path. The location of these folders depends on the task type, the Destination type and location, and the specified log path for each task. Below are some example locations for collected data, logs and reports, for various task types.
Data and log folders for each task type
Collect task, or collect and delete task
(Includes file collection, RAM Capture and Volatile Information collection)
The Crawl database, the log files and the reports are saved to the path:
{destination location}\{case name}\{collection name}\{custodian name}\Logs\{target name} {DateTime}
For example:
C:\MyLocation\Sample Case\Sample Collection\Sample Custodian\Logs\Sample Target 08-21-18 14-30-00
When the collected files are saved as Native Copies, the destination folder for the collected data is:
{destination location}\{case name}\{collection name}\{custodian name}\Native Copies\{target name} {DateTime}
When the collected files are saved as a FileSafe, the destination folder for the collected data is:
{destination location}\{case name}\{collection name}\{custodian name}\FileSafe
Within the above folder a FileSafe file will be saved with the name {target name} {DateTime}.mfs01. Large collections may have multiple spanned FileSafe files (one for each FileSafe "segment" as described under topic FileSafe Filenames).
The {destination location} for a Collect or Collect and Delete task can be a local folder, a UNC path, an Amazon S3 bucket URL, or an Azure Blob Storage container URL.
Survey task or delete task
The Crawl database, the Logs files and the reports are saved to the following path:
{destination location}\{case name}\{collection name}\{custodian name}\Logs\{target name} {DateTime}
Survey tasks and Delete tasks do not collect any data.
Launch command task
Launch Command tasks do not collect any data directly. The particular command or script may generate output or copy data to a specified location.
Launch Command tasks do not generate log files other than the errors and warnings visible within Administration Console. The warnings for a launch command task may contain non-warning status information as well.
Disk image task
The Logs files are saved to the following path:
{destination location}\{case name}\{collection name}\{custodian name}\Logs\{target name} {DateTime}
The disk or volume image files are saved to an Images folder within the specified Destination location folder:
{destination location}\{case name}\{collection name}\{custodian name}\Images\{target name} {DateTime}
Large disk or volume images may be saved in multiple spanned E01 files, or in a set of DD files with numbered filename extensions (one for each image "segment").
Network capture task
Network Capture tasks do not generate log files.
Captured network packets are saved to a PCAP file in the following folder:
{destination location}\{case name}\{collection name}\{custodian name}\Native Copies\{target name}\Network Traffic Capture {DateTime}
Deploy task and relocate task
These tasks do not generate any log files, nor do they collect any data.
Note: The {custodian name} will be "Unassigned" for any Targets that are unassociated with a Custodian.
The above folder scheme allows you to distinguish between data collected by different tasks. The time-stamp applied to filenames and folders will distinguish a first collection attempt from any subsequent Restart attempts.
Destination folders for various target types
Certain Target data locations or URL's require translation to produce a reasonable sub-folder at the destination. The following table illustrates:
| Target location |
Destination sub-folder |
| C:\MyFolder |
...\C_\MyFolder |
| \\MyServer\MyShare\MyFolder |
...\MyServer\MyShare\MyFolder |
| http://sharepoint.xyz.com/Profiles/MyProfile |
...\sharepoint.xyz.com\Profiles\MyProfile |
FileSafe filenames
For Collections that save in FileSafe format, the resulting FileSafe file is named:
{Target Name}_YYYY-MM-DD-hh-mm-ss(day of week).MFS01
If the FileSafe is large enough, it may span multiple segments. Each segment will be saved into a separate file, with the segment number indicated by the filename extension, as follows:
{Target Name}_YYYY-MM-DD-hh-mm-ss(day of week).MFS01
{Target Name}_YYYY-MM-DD-hh-mm-ss(day of week).MFS02
{Target Name}_YYYY-MM-DD-hh-mm-ss(day of week).MFS03
...etc.
Examining collection logs & reports
When certain kinds of collection tasks are run, a Logs folder is created. To see which kinds of tasks create log folders, and to find where these folders are located, see topic Locating Collected Data, Logs and Reports. Each Logs folder contains the CSV log files and HTML reports that the task generated. For a description of each available log and report see topic Available Logs and Reports.
File-oriented collection tasks also save a "Crawl Database" in the Logs folder for the task. A Crawl Database is comprised of two files: one file with an extension .DB and another file with the extension .TC.mcd01. This database contains all the file and folder-related metadata and logging information for the task.
Note: The Crawl Database does not include the contents of the collection, only the metadata (e.g. filenames, folder names, M.A.C. times, file sizes, file content hash values, etc.). The two crawl database files for each collection should be retained for as long as the collected data is kept.
After a collection task completes, log files and reports can be generated from the crawl database and reviewed as follows:
Run the Report Generator utility, available in the bundled edition of Nuix Collector.
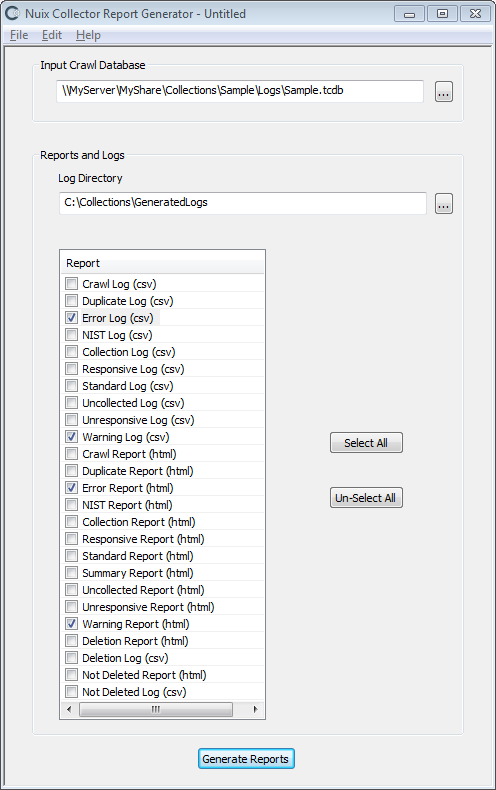
At Input Crawl Database, specify the crawl database .TCDB file, from the corresponding Logs sub-folder.
At Log Directory, specify an output folder where the generated log files and/or reports are to be saved.
Specify which log files (CSV files) or reports (HTML files) you wish to export:
| File |
Description |
| CSV |
Log file. Can be loaded into Excel, a text editor or a database for analysis and reporting. |
| HTML |
Report file. Viewable and printable from a web browser. (see Note below) |
Note: HTML report files for large file-related collections or surveys may exceed the capacity of a web browser to display the HTML report file. CSV log files can be imported into spreadsheets or databases which can handle larger amounts of data.
Available logs and reports:
| Name |
Description |
| Crawl |
Lists files crawled (i.e. files considered for inclusion in the collection or survey) |
| Folder |
Lists the folders accessed during the crawl phase. |
| Collection |
Lists files collected |
| Deletion |
List files and folders which were deleted. |
| Not Deleted |
Lists files and folders which should have been deleted based on the selection criteria but could not be deleted due to one or more errors. |
| Volatile Information |
Details regarding the operating system, processes, network settings and other information on the computer running ECC Client. |
| Volatile Information Warning |
Lists any warnings regarding volatile information which could not be collected. |
| Duplicate |
Lists files that were crawled but not processed, because they were identified as duplicate files. A "Duplicate Files Hash Database" is generated dynamically during the collection or survey to track the file content hash values for each responsive file encountered. Files with a content hash value that is already in this database are excluded. A collection or survey employing de-duplication can begin with an empty duplicate files hash database, or with a database that includes file content hash values from a previous collection or survey. For details see topic Advanced File Selection and Exclusion. |
| Error |
Lists errors detected during processing |
| NIST |
Lists files that were crawled but not processed, because they were identified as belonging to the NIST hash set. This set, or "NIST Hash Database", holds the file content hash values for millions of known OS and application files (i.e. files known to not contain any data of interest for a typical collection). For details see topic Advanced File Selection and Exclusion. |
| Standard Files |
Lists files that are part of a known, user-created set of files and are not processed |
| Summary |
Summary information for the task, along with processing statistics |
| Uncollected |
Files not collected |
| Undetermined |
A listing of the files in which responsiveness could not be determined (in some cases the Advanced Search feature cannot search the text within a given file). These files are collected or added to the survey in case they are responsive. |
| Unresponsive |
Files or resources that were crawled but not processed, because they did not meet all the selection criteria. |
Note: The Summary Report includes a column called Total Time. The value in this column will be less than the job duration shown in the ECC Admin Console. ECC Admin Console shows a duration for each job (from Start or Submit time to End time) which includes the time required for log and report generation. The Summary Report Total Time value excludes time required for report generation.
Collection errors, cancellations and failures
Investigating and resolving collection errors
Collection errors for a small number of files are common. Typically errors occur because a few files have special security permissions and are inaccessible, or incorrect login credentials were specified for a share. Files may also be unavailable due to being open for exclusive use by another application. Disk corruption on the original disk or destination disk can also cause collection errors.
If you determine that the errors encountered by a Collection warrants taking further action, you can resolve the cause of the errors and then restart the failed or cancelled Job or Collection. Resolving the cause of the errors may require:
Adjusting file permissions on target files and folders (which may alter the file attributes of the files and folders involved – for eDiscovery collections, consult with your legal counsel before taking such action).
Altering the user credentials used to access a particular Target location.
Addressing hard disk corruption.
Other actions, depending on the type of error. Contact Nuix Support if you need assistance resolving a particular error.
Investigating and resolving collection failures
Collections can fail for various reasons, including targets going offline, ECC Clients restarting, collection processes crashing, physical disk failures, etc.
You can resolve the cause of the failure and then restart the failed Collection or Jobs. Resolving the cause of the failure may require:
Reviewing error logs for the failed collection jobs to determine at what point the failure occurred and the nature of the failure.
Reviewing the Windows Application Event log on each ECC Client computer whose job failed. The log may contain entries detailing why the failure occurred.
Restarting collections or jobs
When a collection or collection job fails, has errors, or was cancelled, you can re-collect the files by restarting the cancelled, failed or finished collection jobs, as follows:
If the previous collection/job failed or registered errors, remedy the conditions which triggered the problem. For details see topics Investigating and Resolving Collection Errors and Investigating and Resolving Collection Failures, above.
Locate the Collection or Jobs within the Cases and Collections panel. Hold down the Ctrl key and then right-click each Collection or Job, then choose Restart.
Jobs that are restarted from the Finished tab will restart from the beginning. Jobs that are restarted from the Failed tab will attempt to restart from a point near where the job left off when it failed (if this is not possible the failed job will be restarted from the beginning).
An alternative to restarting previously run collections or jobs is to define a new Collection (and possibly new Targets or Selection Criteria) to process the items which experienced failures, errors or cancellations during the previous collection attempt.
Note: When a Collection is restarted, the schedule start time and other settings cannot be changed. If you need to reschedule a cancelled or failed Collection, copy the Collection and change its scheduled start date. See topic Copying Collections.
Reschedule or re-run a previous collection
Collections which have already finished can be copied to new collections with new start dates. This allows failed or cancelled collections to be rescheduled. Copying a collection also allows successful collections to be re-run. For details see topic Copying Collections.
Reviewing collected items
To locate FileSafe files, Native Files, disk and volume images and other collected data, see topic Locating Collected Data, Logs and Reports. The following guidelines may assist in reviewing collected data.
Keeping collected data in a forensically-defensible state
It is best to configure Collection tasks to save collected files to a FileSafe for eDiscovery cases and other situation where the files must be kept in a forensically-defensible state. FileSafe files keep the files along with their metadata intact. If you collected native copies of files, note that these files may not have all their metadata intact, and may lose additional metadata if transferred to volumes with certain kinds of file systems.
The crawl database stores each file's original creation, modification and last access dates and times. Retain the crawl database, logs and reports together with the corresponding collected data. See topic Examining Collection Logs & Reports, above, for details on examining the logs held within the Collection's crawl database.
Gathering locally saved data
Mobile computers and remote PCs may not be connected to the network at the time that a scheduled collection begins. But these disconnected PCs will still be able to run ECC collections, so long as the following conditions are met:
The Collection is configured to save to a local destination folder.
Each ECC Client computer connects to the network sometime after the Collection was configured and submitted, and before the collection is scheduled to start.
There is adequate free disk space on each ECC Client computer's local destination volume.
Each ECC Client computer is running on A/C power throughout the collection (i.e., from the collection start time through the time the collection completes).
When collecting files from EFS-encrypted files and folders: The user must be logged into the PC running ECC Client, using the same User ID as was used when the files and folders were first encrypted. If this User ID is an Active Directory domain account, then cached domain logins must be enabled on the PC; see http://support.microsoft.com/kb/172931 for details.
Once a collection with a local destination completes, any files collected will remain in the specified local destination folder on each ECC Client computer – even after these computers reconnect to the network. The collection administrator must then copy the files in these local destination folders to a designated network destination folder. This can be accomplished in two ways:
Configure the initial collection as a sequence of two tasks: a Collect task to save data to a local destination folder, followed by a Relocate task to move the collected data to a network destination. If necessary, the Relocate task will automatically suspend itself whenever the computer is disconnected from the network. The Relocate task will also automatically re-enable itself whenever the network is again accessible.
– or –
Configure and schedule a secondary Collection to copy the files from the first collection's local destination folders to a network destination. Such collections can be challenging to schedule so that they run when the mobile or remote computers are connected to the network where the new destination resides.
Working with multiple destinations
Nuix Workstation™ supports the FileSafe format and can load multiple data sources (collection destinations) at once. However, if you need to review collected files using products that do not support the FileSafe format or multiple data sources, you may have to gather collected files from multiple destinations into one place.
Scenario: A file collection saved as multiple FileSafe files
A Collection configured to save to FileSafe format will save separate FileSafe files for each Target included in the Collection. The FileSafe files are placed in each Target-level destination folder, e.g.
Destination Folder\{Case Name}\{Collection Name}\{Custodian Name}\{Target Name}
Solution: Use utilities included in Nuix Collector™ to extract files from each FileSafe The extracted files are placed in a similar, corresponding folder structure, e.g.
Extraction Folder\{Case Name}\{Collection Name}\{Custodian Name}\{Target Name}
The use of sub-folders for Case\Collection\Custodian\Target ensures files from multiple Targets will not overwrite each other. An alternative is to exclude the \Collection\ sub-folder level, to consolidate files collected from multiple collections (doing so may trigger file overwrite prompts in certain circumstances).
Scenario: Merging two file Collections: one with a Destination on a network share, and a second with Local Destinations on a set of Laptop computers.
A Collection configured to save to FileSafe format will save separate FileSafe files for each Target included in the Collection. The FileSafe files are placed in each Target-level destination folder, e.g.
Destination Folder\{Case Name}\{Collection Name}\{Custodian Name}\{Target Name}
Solution: Use Nuix Evidence Mover™ (free download available at http://www.nuix.com/default3.asp?active_page_id=305) to copy the local destination folders on each laptop to the Destination folder on the network share. The end result will be a set of Case\Collection\Custodian\Target folders spanning both Collections, residing under the Destination folder on the network share.
Alternate Solution: configure and run a third Collection to gather the local destination folders on each laptop and save them to the Destination folder on the network share.
Searching and analyzing collected data
Nuix Enterprise Collection Center is focused on collecting data. It does not include data search and analysis features. Use Nuix Workstation™ or other Nuix eDiscovery products (licensed separately) to search and analyze collected data.
Nuix Workstation™ and other Nuix eDiscovery products (licensed separately) support the FileSafe format, so FileSafes can be "ingested" by these products without requiring a separate file extraction step. These products also support DD and Encase6 disk image files. Contact your Nuix representative regarding products which can search and analyze RAM image files.
If using other tools to search collected data, you can use utilities included in the bundled edition of Nuix Collector™ to extract files from a FileSafe.
Case maintenance: Closing a case
Old cases which are no longer active can be closed. Closing cases will hide past collection activity from the Administration Console screens, including the Dashboard and the Cases and Collections panels.
To close a case:
Click the  button near the upper-right corner of the screen to access the menu, then select Cases. The Case List Maintenance dialog displays:
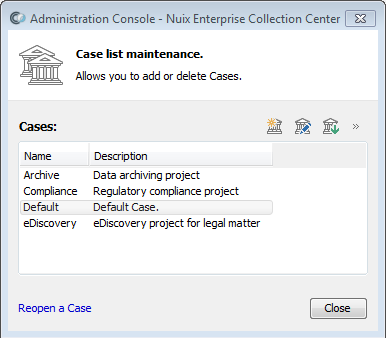
Select the Case you wish to close, then click the Close button (the right-most of the three buttons at the top).
A confirmation prompt will appear. Review the prompt, then confirm or cancel the closing of the selected Case.
Tip: A closed Case can be reopened at any time: click the Reopen a Case link at the bottom of the Case List Maintenance dialog, then select the Case you wish to reopen.
Other administrative tasks
Everyday administrative tasks for a Collections Administrator include:
Adding (configuring) new Collections, as well as Cases, Targets, Custodians and other Collection items
Reviewing Collection Statistics for running and completed Collections
Extracting and reviewing Collection Logs and Reports
Gathering locally collected files
Deleting files collected from unsuccessful Collections
These topics are covered in earlier sections of this User Guide.
Please refer to the separate ECC Administration Guide for details on administering Collection Center, including email notifications, backups, purging log files and other topics.