Advanced collections
Advanced options for collect tasks
Advanced file selection and exclusion
The purpose of this section is to give you a brief overview of the advanced file selection and exclusion features available to ECC, and how to take advantage of them.
File-oriented collection tasks in ECC, such as "Collect" and "Delete" tasks, are driven by the same processing engine which powers Nuix Collector. This processing engine offers some advanced file selection and exclusion features which are not directly available in ECC's New Collection Wizard, including the following:
Multiple <Date> criteria can be added to a Collect task JobFile manually. This allows selecting files with multiple ranges of Creation, Modification or Last Access dates and times.
A FileList or Hash Database can be prepared in advance to specify files to be processed. The FileList or Hash Database can be delivered to each ECC Client computer via a "Deploy" task (added to the collection's sequence, ahead of the "Collect" or "Delete" task).
A NIST Database, Known Files Database and/or Duplicate Database can be prepared in advance to specify files to be excluded from processing. These databases can be delivered to each ECC Client computer via a Deploy task (added to the collection's sequence, ahead of the "Collect" or "Delete" task).
A NIST database contains the hash values of files which are known to the U.S. National Institute of Standards and Technology. This database consists of millions of operating system files, program files, configuration files and other files commonly found in circulation. By employing a NIST database ("de-NISTing"), you can exclude all these known files from processing, thereby focusing on files containing unique data.
A Known Files database (or "Standard Hash Database") contains a list of the hash values of files from a specified source, such as a hard disk containing a fresh corporate image (OS, applications, configuration files but little else). An ECC task can exclude any file which is in the Known Files database, thereby focusing on files containing unique data.
A Duplicate database contains a list of the hash values of files which have already been processed. If another file is encountered with the same exact content (hash value), then that file is excluded from processing. A Duplicate database is generated on-the-fly by an active ECC collection, survey or deletion task that has de-duplication settings enabled in its JobFile. It is also possible to exclude files encountered in a previous collection or survey, by utilizing the Duplicate Hash Database from that prior job. This requires deploying a copy of the previous duplicate hash database file to each ECC Client computer and configuring the new collection or survey to utilize this database for de-duplication.
Advanced file selection and exclusion features sometimes require a Preparation step and a Deploy task, and often requires manually editing the JobFiles for the "Collect" or "Delete" tasks:
Preparation: Refer to the Nuix Collector Suite User Guide for details on preparing the above lists and databases. An edition of Nuix Collector Suite is bundled with ECC; contact Nuix to discuss the specific features available in the bundled edition.
Deploy task: Refer to the following procedures for guidelines for various scenarios.
Manual editing of JobFiles: is described in the topic Advanced JobFile Editing, as well as the Nuix Collector and ECC JobFile Reference document. The JobFile Reference contains full details on the options available within a JobFile (including options not available from the other Wizard pages). Refer to the following procedures for editing guidelines for various scenarios.
Advanced file selection and exclusion scenarios
Embed a FileList or Log file to select files for a collect task
A FileList can be inserted (embedded) into a JobFile, which can be simpler than deploying a FileList separately. A Collection or Crawl log file from a previous Collection or Survey can also be inserted into the JobFile (it will be converted into an embedded FileList automatically).
To embed a FileList or log file directly into each Collection job:
Prepare a FileList containing the full file specifications of all the files to be collected. Or obtain a copy of a Crawl log or Collection log (a .csv file) from a previous collection or survey.
Create a Collection task via the New Collection Wizard.
From the Custodians and Targets page, select the Computers and Locations tab, then select the computers that will participate in the Collection.
While still on the Computers and Locations tab, click the Add... button, then select File List. Open the FlieList (a .txt file) or the log (a .csv file) that you prepared in Step 1. Either one will be incorporated into the JobFile for each ECC Client in this Collection.
Complete the New Collection Wizard.
Reference a FileList to select files for a collect task
A distinct FileList can be deployed to each ECC Client and then referenced. This approach is suggested for very large FileLists, while smaller FileLists can be embedded (see above).
To reference a separate FileList from each Collection job:
Prepare a FileList containing the full file specifications of all the files to be collected. FileLists can be created by manually editing copies of the log files produced by a previous Survey task.
Configure a new ECC Collection consisting of a two task sequence: a Deploy task, followed by a Collect task:
The Deploy task deploys a FileList file (example: FileList1.txt, located on a network share) to each ECC Client computer.
Edit each of the JobFiles for the Collect task in the new collection so they reference their local copy of the FileList file that was deployed, as shown in the following example:
. . .
<CliParameters>
. . .
<Input PreHash="No" CrawlOnly="No">
. . .
<FileLists PreHash="No" PreserveAccessDate="Yes" ExcludeADS="No">
<FileList>{ECC.WorkingFolder}\FileList1.txt</FileList>
</FileLists>
. . .
All Deploy tasks copy their source file or folder to a local folder on each ECC Client computer. This folder can be referred using the variable {ECC.WorkingFolder}. For details see topic The Working Folder.
Tip: The <FileList> tag features optional attributes to specify credentials for accessing a FileList from a network share. You can then specify a UNC path to the FileList file. This way, you do not have to deploy a copy of the FileList to each ECC Client computer. For details see the Nuix Collector and ECC JobFile Reference.
Use a Hash File List to select files for a collect task
A Hash List File is a text file containing MD5 digests of files to be processed. For details on using a Hash List File see topic Selecting Files with a Hash List File.
Use an Extended FileList to select files for a delete task
Files listed within an Extended FileList can specify file attribute values such as the Last Modified Time and the Size. These optional file attributes, when present, will ensure the file is deleted only if its attributes in the FileList match those on the actual file just prior to deletion.
Tip: Extended FileLists can be generated based on a Responsive log file (in CSV format) created by a previous Survey.
Prepare an Extended FileList containing the full file specifications of all the files to be deleted.
The content of an ExtendedFileList file is plain text, encoded in ASCII, UTF-8 or UTF-16 LE. The structure for an ExtendedFileList file is apparent in the following example:
FilePath="C:\Movie Scripts\Annie Hall.txt" CreationDate="2012-12-22T10:48:36-08:00" ModificationDate="2007-08-08T23:59:00-07:00" LastAccessDate="2012-12-22T10:48:36-08:00" FileSize="177032" MD5Hash="65246F43C9C33F2B61798874DFEED291"
FilePath="C:\Movie Scripts\Apocalypse Now.txt" CreationDate="2012-12-22T10:48:36-08:00" ModificationDate="2007-08-08T23:59:00-07:00" LastAccessDate="2012-12-22T10:48:36-08:00" FileSize="188300" MD5Hash="351F4AB053140C244E85733C0E8B0597"
FilePath="C:\Movie Scripts\As Good As It Gets.txt" CreationDate="2012-12-22T10:48:36-08:00" ModificationDate="2007-08-08T23:59:00-07:00" LastAccessDate="2012-12-22T10:48:36-08:00" FileSize="134201" MD5Hash="142680713F89D22D6148C060F4FB67BD"
Note: The above ExtendedFileList example is actually only three lines long; however, this page is too narrow to show the complete lines without wrapping them.
Each line within an ExtendedFileList specifies a single file to be processed. The FilePath value is the full file specification for the file to be processed.
When performing a Deletion, the following additional values may be specified to ensure the file being deleted is the intended file:
| Attribute |
Description |
| CreationDate |
The date (and time) the file was created |
| ModificationDate |
The date (and time) the file was last modified |
| LastAccessDate |
The date (and time) the file was last accessed (not a reliable attribute, as this value can easily change) |
| FileSize |
The size of the file (in bytes) |
| MD5Hash |
The MD5 hash checksum for the content of the file |
If any of the above optional values are specified, ECC's Delete task will check the corresponding value in the file specified by FilePath. If the values all match, the deletion will proceed. But if there is any discrepancy between the values in the ExtendedFileList and the corresponding value in the specified file, then an error will be logged and the file will not be deleted.
Tip: Specifying ModificationDate and FileSize is generally sufficient to ensure the file has not changed since the file was last surveyed. Specifying MD5Hash offers further assurance, but this requires running a survey with pre-hashing enabled, which can take a long time to process.
Configure a new ECC Collection consisting of a two task sequence: a Deploy task, followed by a Delete task.
The Deploy task deploys the Extended FileList file you previously prepared (example: MyExtendedFileList.txt, located on a network share) to each ECC Client computer.
Edit each of the JobFiles for the Delete task in the new collection so they reference their local copy of the Extended FileList file that was deployed, as shown in the following example:
. . .
<CliParameters>
. . .
<Input PreHash="No" CrawlOnly="No">
. . .
<FileLists PreHash="No" ExcludeADS="No">
<ExtendedFileList>{ECC.WorkingFolder}\MyExtendedFileList.txt</ExtendedFileList>
</FileLists>
. . .
All Deploy tasks copy their source file or folder to a local folder on each ECC Client computer. This folder can be referred to in Collect tasks and other tasks using the variable {ECC.WorkingFolder}. For details see topic The Working Folder.
Tip: The <ExtendedFileList> tag features optional attributes to specify credentials for accessing the Extended FileList from a network share. You can then specify a UNC path to the Extended FileList file. This way, you do not have to deploy a copy of the Extended FileList to each ECC Client computer. For details see the Nuix Collector and ECC JobFile Reference.
Use an XML FileList to select files for a delete task
Files listed within an XML FileList can specify file attribute values such as the Last Modified Time and the Size. These optional file attributes, when present, will ensure the file is deleted only if its attributes in the FileList match those on the actual file just prior to deletion.
Tip: XML FileLists can be based on a Responsive log (in XML format) created by a previous Survey; however, XML log files are available only on ECC Clients running Windows. An Extended FileList based on CSV log files is generally a better approach.
Prepare an XML FileList containing the full file specifications of all the files to be deleted. The files should be listed within <File> tags, and each tag must reside on one line in the file. Each <file> tag must contain a FilePath attribute which specifies the full filename of the file to be deleted.
Each <File> tag can optionally include attributes regarding the file to be deleted, such as the CreationDate, ModificationDate, FileSize and MD5Hash. If one or more of these attributes are specified, the Delete task will check that the values of these attributes are still the same before deleting the file. This ensures files are deleted only if they haven't been changed since the time they were added to the XML FileList.
FileLists can be generated by editing copies of the log files produced by a previous Survey task. The JobFile for the Survey task should be edited manually so the attribute GenerateXML is set to "Yes" within the <Logs> tag (available for ECC Clients running Windows only). When the Survey runs it will generate log files in XML format. Such log files contain the various attributes needed for verifying the file has not changed. The Responsive.xml log file can then be manually copied and edited to form an XML FileList.
Configure a new ECC Collection consisting of a two task sequence: a Deploy task, followed by a Delete task:
The Deploy task deploys the XML FileList file you previously prepared (example: XmlFileList2.xml, located on a network share) to each ECC Client computer.
Edit each of the JobFiles for the Delete task in the new collection so they reference their local copy of the XML FileList file that was deployed, as shown in the following example:
. . .
<CliParameters>
. . .
<Input PreHash="No" CrawlOnly="No">
. . .
<FileLists PreHash="No" ExcludeADS="No">
<XmlFileList>{ECC.WorkingFolder}\XmlFileList2.xml</XmlFileList>
</FileLists>
. . .
All Deploy tasks copy their source file or folder to a local folder on each ECC Client computer. This folder can be referred to in Collect tasks and other tasks using the variable {ECC.WorkingFolder}. For details see topic The Working Folder.
Tip: The <XmlFileList> tag features optional attributes to specify credentials for accessing the XML FileList from a network share. You can then specify a UNC path to the XML FileList file. This way, you do not have to deploy a copy of the XML FileList to each ECC Client computer. For details see the Nuix Collector and ECC JobFile Reference.
Tip: Specifying ModificationDate and FileSize is generally sufficient to ensure the file has not changed since the file was last surveyed. Specifying MD5Hash offers further assurance, but this requires running a survey with pre-hashing enabled, which can take a long time to process.
Use a NIST database to exclude files from a collect task
Prepare a current NIST database containing a list of hash values of millions of known non-data files. Refer to the Nuix Collector Suite User Guide for details.
Configure a new ECC Collection consisting of a two task sequence: a Deploy task, followed by a Collect task:
The Deploy task deploys the folder containing the NIST database you previously prepared (example: folder NewNistDb, located on a network share) to each ECC Client computer.
Edit each of the JobFiles for the Collect task in the new collection so they reference their local copy of the NIST database folder that was deployed, as shown in the following example:
. . .
<CliParameters>
<Titan>
<Threads>1</Threads>
<RetryCount>2</RetryCount>
<TemplatePath>..\Templates\CliStatus.db</TemplatePath>
<NistDirectory UseToEliminateMatches="yes">
{ECC.WorkingFolder}\NewNistDb</NistDirectory>
<StdDirectory UseToEliminateMatches="no"/>
. . .
All Deploy tasks copy their source file or folder to a local folder on each ECC Client computer. This folder can be referred to in Collect tasks and other tasks using the variable {ECC.WorkingFolder}. For details see topic The Working Folder.
Use a known files database to exclude files from a collect task
Follow the same general procedure as described, above, for using a NIST database. But modify the procedure to generate a Known Files database, and update the following JobFile entry instead:
. . .
<CliParameters>
<Titan>
<Threads>1</Threads>
<RetryCount>2</RetryCount>
<TemplatePath>..\Templates\CliStatus.db</TemplatePath>
<NistDirectory UseToEliminateMatches="no">..\Hash\NIST
</NistDirectory>
<StdDirectory UseToEliminateMatches="yes">
{ECC.WorkingFolder}\KnownFilesDb</StdDirectory>
. . .
Use a duplicate database to exclude files from a collect task
This option uses a duplicate database generated by a previous Collect, Delete or Survey task. In the new collection, files within the Target folder or drive will be collected only if they were not previously collected, and only one unique copy of each file will be collected. Any other file selection criteria must also be met.
Follow the same general procedure as described, above, for using a NIST database. But modify the procedure to generate a Duplicate Files database, and update the following JobFile entry instead:
. . .
<CliParameters>
<Titan>
<Threads>1</Threads>
<RetryCount>2</RetryCount>
<TemplatePath>..\Templates\CliStatus.db</TemplatePath>
<NistDirectory UseToEliminateMatches="no">..\Hash\NIST
</NistDirectory>
<StdDirectory UseToEliminateMatches="no">
</StdDirectory>
<DupDirectory UseToEliminateMatches="yes">
{ECC.WorkingFolder}\DuplicateFilesDb</DupDirectory>
. . .
Use a new, on-the-fly duplicate database to exclude duplicates from the collect task
This option ensures that if multiple copies of files exist within the Target folder or drive, then only one copy of each unique file will be collected. Any other file selection criteria must also be met.
No Deploy task is necessary. Simply create a collection with a single Collect task, then modify the JobFile as follows:
. . .
<CliParameters>
<Titan>
<Threads>1</Threads>
<RetryCount>2</RetryCount>
<TemplatePath>..\Templates\CliStatus.db</TemplatePath>
<NistDirectory UseToEliminateMatches="no">..\Hash\NIST
</NistDirectory>
<StdDirectory UseToEliminateMatches="no">
</StdDirectory>
<DupDirectory UseToEliminateMatches="yes">
..\Hash\Duplicate</DupDirectory>
. . .
The Duplicate database will be generated as the Collect task runs on each ECC Client computer. The folder ..\Hash\Duplicate is relative to the modules folder within the ECC Client installation folder.
Note: Any duplicate files added to the duplicates database in the specified DupDirectory folder will remain in this database. Subsequent Collect tasks which also use this DupDirectory to eliminate duplicates will skip any file encountered that is already listed in the duplicate database.
To prevent this behavior:
Delete the contents of the specified DupDirectory folder on the ECC Client computers that are participating in the collection, prior to running a new Collect task.
Or specify a unique DupDirectory folder for each Collect task.
Collection of deleted files
On ECC Client computers running Windows, Collect tasks and Survey tasks can also process deleted files from local volumes, so long as (1) the volumes are formatted with the FAT-12, FAT-16, FAT-32 or NTFS file systems, (2) the Include Deleted Files option is enabled within the Collect task's File Selection Criteria, and (3) the deleted files match all the other specified file selection criteria.
Any deleted files collected will be saved into sub-folders DELETED or DELETED+OVERWRITTEN, to distinguish them from regular files. The DELETED+OVERWRITTEN folder is for deleted files whose content has been partially or fully overwritten with other data by the Windows operating system. Such loss of data is unavoidable on Windows computers, because the space occupied by deleted files is freely available to be overwritten with new data.
In some cases, the full path of a deleted file cannot be recovered. Such deleted files will only be collected if the entire volume is being collected. Missing characters in a deleted file path will be replaced with underscores ("_") when saving these files.
Enable or disable collection of deleted files
To enable or disable collection of deleted files:
In ECC Admin Console, run the New Collection Wizard.
In the Wizard's Task page, specify the task type as Collect, Collect & Delete or Survey.
In the Wizard's File Selection Criteria page, select a Saved Criteria. Review the options under Deleted Files. If necessary, click the Edit link then set the Deleted Files options as follows:
| Detail |
Description |
| Include deleted files |
Whether to include deleted files in the survey of collection jobs, in addition to normal files. |
|
|
Note: Deleted files can only be collected from ECC Client computers running Windows and having NTFS or FAT formatted local volumes. |
| Deleted files only |
Whether to include only deleted files in the survey of collection jobs – i.e. excluding normal files. |
In the Wizard's Custodians and Targets page, be sure to select only Targets (or Computers) which run Windows.
It is also possible to enable or disable the collection of deleted files by setting the value of the <CollectDeletedFiles> element to Yes or No within each JobFile, as follows:
<!--
// ****************************************************************
// ********************* INPUT SETTINGS ***************************
// ****************************************************************
-->
<Input CrawlOnly="No" CustodianID="1" CustodianName="Unassigned" ID="4" IsDirect="no" Name="MyComputer" PreHash="No" SlaveName="MyComputer" TargetType="Desktop">
. . .
<FileSystemFeatures Enabled="Yes" UseMFTIndex="No" MFTRecordCacheSize="200000">
<CollectDeletedFiles>No</CollectDeletedFiles>
</FileSystemFeatures>
Note: For the <CollectDeletedFiles> element to be active, the <FileSystemFeatures> element's Enabled attribute value must be Yes.
Manual editing of JobFiles is described in the topic Advanced JobFile Editing, and in the Nuix Collector and ECC JobFile Reference, which contains full details on the options available within a JobFile.
Collection of file system tables and unallocated clusters
On ECC Client computers running Windows, Collect tasks can collect file system tables and/or unallocated clusters from local volumes, so long as the volumes are formatted with the FAT-12, FAT-16, FAT-32 or NTFS file systems. To enable collection of these items, edit each JobFile as follows:
<!--
// ****************************************************************
// ********************* INPUT SETTINGS ***************************
// ****************************************************************
-->
<Input CrawlOnly="No" CustodianID="1" CustodianName="Unassigned" ID="4" IsDirect="no" Name="MyComputer" PreHash="No" SlaveName="MyComputer" TargetType="Desktop">
. . .
<FileSystemFeatures Enabled="Yes" UseMFTIndex="No" MFTRecordCacheSize="200000">
<CollectDeletedFiles>Yes</CollectDeletedFiles>
<CollectMFTs>Yes<CollectMFTs>
<CollectFATs>Yes<CollectFATs>
<GetAlternateMACTimes>No<GetAlternateMACTimes>
<CollectUnallocated>Yes<CollectUnallocated>
</FileSystemFeatures>
The <CollectMFTs> element, when set to Yes, will collect file system tables from the local NTFS volumes specified via the data locations in the collection's targets (those whose computers run Windows). These tables are saved as a set of ordinary files.
The <CollectFATs> element, when set to Yes, will collect file system tables from the local FAT volumes specified via the data locations in the collection's targets (those whose computers run Windows). Supported FAT variants include FAT-12, FAT-16 or FAT-32 file systems. These tables are saved as a set of ordinary files.
The <CollectUnallocated> element, which set to Yes, will collect the unallocated clusters for any local volumes specified via the data locations in the collection's targets (those whose computers run Windows). The unallocated clusters for each volume are saved as a single separate binary file, placed in the target directory or packed within the target FileSafe.
Note: Manual editing of JobFiles is described in the topic Advanced JobFile Editing. The Nuix Collector and ECC JobFile Reference contains full details on JobFile structure and the <FileSystemFeatures> element and child elements.
Unallocated clusters can represent hundreds of gigabytes – or even terabytes – of data on a single volume. The collection's destination directory or FileSafe must reside on a volume large enough to store all this data. Select a destination that has been formatted with a file system capable of storing huge files, such as NTFS or exFAT.
Tip: When collecting unallocated clusters it is recommended practice to select a limited number of targets in each collection. This will help keep the size of the data collection reasonable and avoid overwhelming the local area network with excessive traffic.
Selecting files with a Hash List File
The New Collection Wizard features the ability to specify the MD5 digests (hash values) of files to be collected. But if you have more than a dozen or so MD5 digests, it can be easier to include all the hash values in a separate text file, called Hash List File.
A Hash List File is a simple text file containing one or more MD5 hash values. Only one MD5 hash value (32 characters consisting of hexadecimal numerals only) must appear per line, with no spaces or delimiters. The Hash List File should be an ordinary text file, encoded as ANSI, UTF-8 or UTF-16LE. The latter two Unicode text file encodings require the Hash List File be saved with a corresponding Byte Order Mark.
Once the Hash List File is prepared, a Collection can be configured with two tasks: a Deploy task to deploy a copy of the Hash List File to each ECC Client computer, followed by a Collect task to collect the files represented in the Hash List File. JobFiles for the Collect task must be manually modified to reference the Hash List File as follows:
<!--
// ****************************************************************
// ****************** SELECTION SET SETTINGS **********************
// ****************************************************************
-->
<SelectionSet ID="-806448998">
<Owners>
<Name/>
<SID/>
</Owners>
<Extensions AnalyzeSignatures="No" Mode="Include"/>
<Dates UTC-Mode="No">
<AccessDate/>
<CreationDate/>
<ModificationDate/>
</Dates>
<Hashes HashType="MD5" UseToIncludeMatches="Yes">
<HashList>{ECC.WorkingFolder}\SampleHashList.txt</HashList>
</Hashes>
</SelectionSet>
Excluding alternate data streams
When a Collect task collects files from an NTFS-formatted volume, the task will also collect copies of each Alternate Data Stream (ADS). This behavior can be disabled by manually editing the JobFile for the Collect task and adding an ExcludeADS attribute to the <Directories> tag or <FileLists> tag, as follows:
<!--
// ****************************************************************
// ********************* INPUT SETTINGS ***************************
// ****************************************************************
-->
<Input CrawlOnly="No" CustodianID="1" CustodianName="Unassigned" ID="4" IsDirect="no" Name="MyComputer" PreHash="No" SlaveName="MyComputer" TargetType="Desktop">
<Directories AutoDetectVolumes="AddLocalVolumes" PreHash="No" PreserveAccessDate="Yes" ExcludeADS="Yes"/>
Note: Alternate Data Streams are used by Windows and applications to store various items associated with regular files, such as:
zone identifier for downloaded files
favicons in Internet shortcut files
Collect alternate MAC times
On ECC Client computers running Windows, it is possible to obtain file MAC times (date and time stamps for when each file was last Modified, Accessed and Created) directly from the Master File Table of a local NTFS volume. For systems compromised by malware, these alternate MAC times may be more reliable than MAC times obtained in the normal manner. To enable this feature, manually edit each JobFile for the collection and set the <GetAlternateMACTimes> element to Yes, as follows:
<!--
// ****************************************************************
// ********************* INPUT SETTINGS ***************************
// ****************************************************************
-->
<Input CrawlOnly="No" CustodianID="1" CustodianName="Unassigned" ID="4" IsDirect="no" Name="MyComputer" PreHash="No" SlaveName="MyComputer" TargetType="Desktop">
. . .
<FileSystemFeatures Enabled="Yes" UseMFTIndex="No" MFTRecordCacheSize="200000">
<CollectDeletedFiles>Yes</CollectDeletedFiles>
<CollectMFTs>No<CollectMFTs>
<CollectFATs>No<CollectFATs>
<GetAlternateMACTimes>Yes<GetAlternateMACTimes>
<CollectUnallocated>No<CollectUnallocated>
</FileSystemFeatures>
Note: Manual editing of JobFiles is described in the topic Advanced JobFile Editing. The Nuix Collector and ECC JobFile Reference contains full details on JobFile structure and the <FileSystemFeatures> element and child elements.
Excluding older versions of SharePoint items
SharePoint can store past versions of items. When Collect tasks collect from SharePoint targets, all available versions of each SharePoint item are collected (so long as the item meets all specified selection criteria). Older versions of SharePoint items can be excluded, so only the most current version of each SharePoint item is collected. To exclude older versions of SharePoint items, manually edit each JobFile for the Collect task and add an IgnoreOlderVersions attribute to each <SharePoint> tag, as follows:
<!--
// ****************************************************************
// ********************* INPUT SETTINGS ***************************
// ****************************************************************
-->
<Input CrawlOnly="No" CustodianID="1" CustodianName="Unassigned" ID="72" IsDirect="no" Name="SharePointServer" PreHash="No" SlaveName="MyPC" TargetType="Custom Target">
<Directories AutoDetectVolumes="None" PreHash="No" PreserveAccessDate="Yes"/>
<FileSafes/>
<LogicalEvidenceFiles/>
<FileLists PreHash="No" PreserveAccessDate="Yes"/>
<SharePoints>
<SharePoint Domain="" Password="$dec(NhkZa6bKudALonYkPm+UfOjeq/+bzDFQD46QDaVCrOY=)"
UI-Type="SharePoint" UserName="shpointuser" IgnoreOlderVersions="Yes">https://sharepoint.mycompany.com</SharePoint>
</SharePoints>
Accessing restricted Amazon S3 buckets
If your organization uses AWS S3 policies to limit access to S3 buckets, please note that the account used by Nuix ECC to access an AWS S3 bucket must be granted permissions to perform the following S3 actions:
GetObject
PutObject
ListBucket
ListMultipartUploadParts
ListBucketMultipartUploads
AbortMultipartUpload
DeleteObject
The above actions are typically granted as permissions in the form s3:actionname via an AWS S3 Bucket Policy. It is beyond the scope of this document to describe these policies or how to apply them. See Amazon's S3 Developer Guide for further information regarding bucket policies.
Advanced command launching
When configuring a Launch Command collection in the New Collection Wizard, click the Advanced button to reveal additional options:
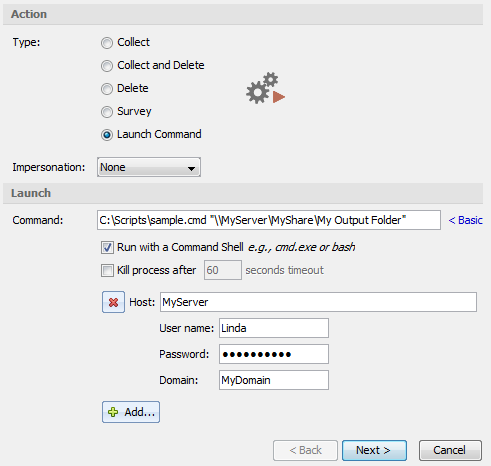
Specify the Launch settings as follows:
| Setting |
Description |
| Command |
Specify the full path to the program or script, along with any command-line options. This is the path to the program or script as seen from each ECC Client computer. Paths which contain spaces must be enclosed within a pair of double quotes. For details on path quoting see topic Command Quoting Rules, below. |
| Note: The current directory for the command is set to the "Deploy folder" on each ECC Client computer. For details see topic The Working Folder. |
|
| Run with a Command Shell |
Runs cmd.exe (on Windows) or bash (on Linux and macOS) to execute the specified Command. This option is intended for running batch files or shell scripts. On ECC Clients running Windows 64-bit, the 64-bit edition of cmd.exe will be run. On Windows 32-bit systems, the 32-bit edition of cmd.exe will be run. |
| Kill process after ___ seconds timeout |
Stops the process if it runs longer than the specified number of seconds. For programs or batch files which take an extended period of time, be sure to specify a sufficient number of seconds, or leave this option unchecked. |
| Add |
Click the Add button and select from the following: Network Credentials - for accessing UNC paths located on a given host. Specify a Host (server) name, a User Name, Password and optional Domain. This will allow the program or script to be executed from a UNC path on the specified host. It will also allow specifying UNC paths within command-line parameters (e.g. Output Folder) which are located on the specified host. Credentials for multiple hosts may be added. |
| File MD5 Checker – provides a way to ensure that the script or program to be run has not been corrupted by malware or other means. Specify the full path to the File to be checked, along with the MD5 hash value of the file. Each ECC Client computer will ensure the MD5 value of the specified file is correct before running the program or script. If the computed MD5 value does not agree with the value entered in the Wizard, then the script will not run. Multiple File MD5 Checker entries can be added, so a script which runs three command-line utilities can have an MD5 check on the script itself as well as each of the three utilities. If any one of the specified File MD5 Checker entries does not match, the program or script will not be run. |
Command quoting rules
The Command field contains a path to the program or script to run, and may also contain paths within one or more command-line parameters. If these paths do not contain any spaces, then no quoting is required. Paths which do contain spaces require quoting as follows:
If the program or script contains path with a space, then a pair of double-quotes is required around the program or script only:
"C:\My Scripts\sample.cmd" \\MyServer\MyShare\MyOutputFolder
If a command-line parameter contains path with a space, then a pair of double-quotes is required around the command-line parameter only:
C:\Scripts\sample.cmd "\\MyServer\MyShare\My Output Folder"
If both the program or script and a command-line parameter contain paths with spaces, then a pair of double-quotes is required around both the program or script and the command-line parameter, as follows:
If the Run with Command Shell option is not selected:
"C:\My Scripts\sample.cmd" "\\MyServer\MyShare\My Output Folder"
If the Run with Command Shell option is selected, an extra pair of double-quotes is required at the very beginning and very end of the Command text:
""C:\My Scripts\sample.cmd" "\\MyServer\MyShare\My Output Folder""
Writing scripts for command launch collections
Handling command-line options for file/folder paths
Any command-line parameter which specifies a file or folder path containing a space must be surrounded by a pair of double-quotes. Ideally, batch files should strip off any double-quotes present, then add the quotes back as needed. For example:
REM Double-quotes stripped from first command-line parameter:
SET LOGPATH=%~1
REM Double-quotes added back when using LOGPATH in a file path
ECHO Saving output to folder %LOGPATH% >> "%LOGPATH%\Status.log"
The above batch file code will handle paths in the first command-line parameter whether or not they are surrounded by double-quotes.
Accessing UNC paths
Scripts can be executed directly from UNC paths. Scripts can also receive command-line parameters which specify file or folder paths residing on a UNC path. Either kind of access usually requires security credentials.
The easiest way to ensure a script can (1) be accessed from a given UNC path, and/or (2) save output to a UNC path, is to add Network Credentials when configuring the Launch Command collection in ECC Administrative Console. This is described in topic Advanced Command Launching, above.
Certain batch file commands, such as cd (change directory), may require having access to the drive letter and folder name where the batch file resides. The pushd command can be used to temporarily map a drive letter to the UNC path where the batch file resides. The popd command reverses the action of the pushd command. These commands are included in the sample batch file at the end of this section.
Reporting script execution status
When a program or script is running on an ECC Client computer via a Launch Command collection, any output sent to the "standard error" device is channeled to the ECC Server so it can be displayed in the ECC Administration Console's Warning Log and Error Log windows. This allows a collection administrator to monitor the status of a running Launch Command job.
In a batch file, you can send messages to the standard error device (and then on to ECC) by redirecting output as follows:
(ECHO INFO: Sample status message, goes to the ECC Warning log) 1>&2
(ECHO WARNING: Sample warning message, goes to the ECC Warning log) 1>&2
(ECHO ERROR: Sample error message, goes to the ECC Error log) 1>&2
(ECHO Anything without INFO or WARNING, goes to the ECC Error log) 1>&2
You can also direct the output of a program to the standard error device; however, this may cause an excessive number of messages to appear in the Error Log in ECC Administration Console. Utility programs which are designed to output messages to the standard error device can have their output redirected back to the console, so that the messages never reach the ECC system, as follows:
C:\MySampleUtility.exe 2>&1
Setting a return code via ERRORLEVEL
The ECC system checks the ERRORLEVEL of a program or script: an ERRORLEVEL of 0 indicates the program or script completed successfully. Any other value for ERRORLEVEL implies a failed execution. Most utility programs set the ERRORLEVEL when they exit. You batch files can check this value and take appropriate action, such as sending a message to the ECC Error log:
tasklist.exe –V >> "%LOGPATH%running-tasks.log"
SET LASTERROR=%ERRORLEVEL%
IF "%LASTERROR%" NEQ "0" ECHO ERROR: TaskList.exe ERRORLEVEL %LASTERROR% 1>&2
The batch file can also set an ERRORLEVEL when it exits. This is the ERRORLEVEL which ECC uses to determine of the run was successful. The following example exits the script with an ERRORLEVEL of 9 if a required command-line parameter was omitted:
IF "%~1" EQU "" EXIT /B 9
Ensuring scripts are non-interactive
All programs and scripts executed via an ECC Launch Command collection must be entirely non-interactive. Batch commands which display text on the console, such as ECHO, will not cause any problem. But any command or utility which prompts the user for input will cause script execution to stop indefinitely, because there is no way for the ECC system to respond to prompts. The following are examples of commands which will trigger prompts:
REM – SET /P always prompts unless fed input from a file
set /P WINDOWSTYPE= Enter Y if running 64-bit Windows:
REM – reg.exe will prompt if the specified output file already exists
reg.exe save HKLM\SOFTWARE "%LOGPATH%\Software.hiv"
REM – copy will prompt if a specified output file already exists
copy "C:\Documents\*.* "%LOGPATH%\Docs\*.*"
Commands such as reg.exe and copy offer command-line parameters to ensure an existing file is overwritten without prompting.
Gathering data generated by a launch command
Scripts run via a Launch Command collection can save their output to text files or other file types in a given output folder. These output files can be gathered by configuring a separate Collect-type collection and running it from ECC Administration Console.
Sample batch file
The sample batch file on the following pages illustrates several conventions for accessing UNC paths, reporting script execution status to ECC, and other scripting aspects described above.
Note: This batch file may not be suitable for your network environment. Be sure to review and revise scripts on a test system before deploying them on your production servers and network.
@ECHO OFF
REM Simple non-interactive script for running on ECC Client computers
REM via an ECC Launch Command collection
REM
REM Saves output to the folder specified by the first command-line parameter,
REM or to a sub-folder of the TEMP folder if no command-line parameter is specified.
REM
REM Logs status and error info to Standard Error (1>&2) so Nuix ECC can track status.
REM
REM Also logs status and error info to a log file in the specified output folder.
REM
REM Exits with ERRORLEVEL 3 if unable to create specified output folder.
REM
REM Example syntax, as specified in the ECC Admin Console Collection Wizard:
REM
REM Command: ""\\MYSERVER\MyShare\My Scripts\Sample.cmd" "\\MYSERVER\MyShare\Output Files""
REM Timeout: Unselected (no timeout)
REM Run with Command Shell: Selected
REM Credentials: Host MYSERVER, with appropriate user Name,
REM Password and Domain to access shares on MYSERVER
REM Last revised 11/08/2019
(ECHO INFO: Running script with command line: %~dpnx0 %*) 1>&2
REM --- Set Environment --------------------------------------------------------
SETLOCAL
IF /i "%~1" EQU "" (SET LOGPATH=%TEMP%\%~n0-%COMPUTERNAME%) ELSE (SET LOGPATH=%~1\%COMPUTERNAME%)
SET RUNLOG=%LOGPATH%\%~n0.log
(ECHO INFO: Saving script output to folder %LOGPATH%) 1>&2
REM --- Establish Output Folder ------------------------------------------------
IF NOT EXIST "%LOGPATH%" MD "%LOGPATH%" & (ECHO INFO: Creating output folder %LOGPATH%) 1>&2
REM --- Exit with ERRORLEVEL 3 if Output Folder is inaccessible ----------------
IF NOT EXIST "%LOGPATH%" (ECHO ERROR: Unable to create output folder %LOGPATH%) 1>&2 & ENDLOCAL & EXIT /B 3
REM --- Establish Run Log in Output Folder -------------------------------------
(ECHO INFO: Running script with command line: %~dpnx0 %*) > "%RUNLOG%"
REM --- Change current directory to the folder where the batch file resides.
REM Creates a temporary mapped drive letter if batch file resides in a UNC path.
pushd "%~dp0"
REM --- Run Four Windows Utilities ---------------------------------------------
:dir_list_root_hidden
SET LASTERROR=0
(ECHO INFO: Running dir C:\ /ah /OGNE) 1>&2
(ECHO [%DATE% %TIME%] Running C:\ /ah /OGNE) >> "%RUNLOG%"
dir C:\ /ah /OGNE > "%LOGPATH%\dir_list_root_hidden.txt"
SET LASTERROR=%ERRORLEVEL%
(SET STATUSTYPE=INFO:) & (IF "%LASTERROR%" NEQ "0" SET STATUSTYPE=ERROR:)
(ECHO %STATUSTYPE% Finished running: dir with ERRORLEVEL %LASTERROR%) 1>&2
(ECHO [%DATE% %TIME%] %STATUSTYPE% Finished running: dir with ERRORLEVEL %LASTERROR%) >> "%RUNLOG%"
:net_share
SET LASTERROR=0
(ECHO INFO: Running net.exe share) 1>&2
(ECHO [%DATE% %TIME%] Running net.exe share) >> "%RUNLOG%"
net.exe share > "%LOGPATH%\net_shares.txt"
SET LASTERROR=%ERRORLEVEL%
(SET STATUSTYPE=INFO:) & (IF "%LASTERROR%" NEQ "0" SET STATUSTYPE=ERROR:)
(ECHO %STATUSTYPE% Finished running: net.exe with ERRORLEVEL %LASTERROR%) 1>&2
(ECHO [%DATE% %TIME%] %STATUSTYPE% Finished running: net.exe with ERRORLEVEL %LASTERROR%) >> "%RUNLOG%"
:missing_command
SET LASTERROR=0
(ECHO INFO: Running MissingCommand.exe ^(an invalid command^)) 1>&2
(ECHO [%DATE% %TIME%] Running MissingCommand.exe ^(an invalid command^)) >> "%RUNLOG%"
MissingCommand.exe > "%LOGPATH%\missing_command.txt"
SET LASTERROR=%ERRORLEVEL%
(SET STATUSTYPE=INFO:) & (IF "%LASTERROR%" NEQ "0" SET STATUSTYPE=ERROR:)
(ECHO %STATUSTYPE% Finished running: MissingCommand.exe with ERRORLEVEL %LASTERROR%) 1>&2
(ECHO [%DATE% %TIME%] %STATUSTYPE% Finished running: MissingCommand.exe with ERRORLEVEL %LASTERROR%) >> "%RUNLOG%"
:task_list
SET LASTERROR=0
(ECHO INFO: Running tasklist.exe -V) 1>&2
(ECHO [%DATE% %TIME%] Running tasklist.exe -V) >> "%RUNLOG%"
tasklist.exe -V > "%LOGPATH%\task_list.txt"
SET LASTERROR=%ERRORLEVEL%
(SET STATUSTYPE=INFO:) & (IF "%LASTERROR%" NEQ "0" SET STATUSTYPE=ERROR:)
(ECHO %STATUSTYPE% Finished running: tasklist.exe -V with ERRORLEVEL %LASTERROR%) 1>&2
(ECHO [%DATE% %TIME%] %STATUSTYPE% Finished running: tasklist.exe -V with ERRORLEVEL %LASTERROR%) >> "%RUNLOG%"
REM --- Change current directory back to its original folder.
REM Unmap any temporary mapped drive letter created by the earlier 'pushd'.
popd
:end
(ECHO [%DATE% %TIME%] %~nx0 Complete. Output saved to folder %LOGPATH%) >> "%RUNLOG%"
(ECHO INFO: %~nx0 Complete. Output saved to folder %LOGPATH%) 1>&2
Advanced deletion options
Task types Delete and Collect and Delete perform deletions as follows:
When a file is deleted, the disk space which the file occupied is rewritten one time with random data.
Sub-folders will be deleted if they are emptied during processing. Sub-folders which were empty to begin with will remain.
Residual entries in the file allocation table – such as filename and created/modified dates – will not be scrambled.
These deletion options can be edited by customizing the JobFiles from the Wizard's final Overview page. For details refer to the Trash tag within the Nuix Collector and ECC JobFile Reference, and the topic Advanced JobFile Editing.
Advanced logging
Collect tasks normally produce a set of CSV log files and HTML reports. The Collect task can be configured to also produce a set of XML log files. Once generated, these XML log files can be manually edited and converted into XML FileLists, or transformed via XSL templates into custom HTML reports. To configure a Collect task to generate XML log files, manually edit the JobFile for the Collect task and set the value of the GenerateXML attribute to "Yes" within the <Logs> tag, as follows:
<!--
// ****************************************************************
// ******************** LOGGING SETTINGS **************************
// ****************************************************************
-->
UTC-Mode="No"
MaxRowsAllowedInReport="5000"
VerboseLogging="No">
The HTML reports generated for file collections can easily exceed 5000 rows (with one row per file crawled or collected). Such HTML reports can be too large for a web browser to load. If a particular collection job or survey would generate an HTML report that exceeds the maximum specified by MaxRowsAllowedInReport attribute value in the JobFile’s Logs element, ECC Client will instead generate an empty report containing an explanatory message, as well as generating the corresponding CSV log file in full.
Note: The default limit when running collections with older JobFiles which lack the MaxRowsAllowedInReport attribute is 5000 rows.
Copying collections
Copying a Collection can be helpful in several scenarios:
Copy a Collection one or more times, and make specific changes to each copy. This is a fast way to make several similar Collections.
Re-run* a previous Collection.
Reschedule* a Collection which you previously had to cancel.
*You are running a new Collection containing settings copied from the previous Collection.
To copy a collection:
From Administration Console's Cases and Collections panel, right-click an existing Collection and choose Copy.
This will open the New Collection Wizard. The settings within the Wizard will be filled out with settings from the original Collection which you copied.
Modify the start date and other settings as needed.
Click Finish from the Overview page to submit the new Collection.
You can also click the Save for later link at the bottom left corner of the New Collection Wizard. This saves your settings as a "Collection Configuration" – a template for creating other Collections. For details see topic Collection Configurations.
Collection configurations
Collection Configurations are named bundles of settings, used as a template for creating new Collections quickly. They are also used as a means of saving a "draft" of a partially configured Collection, or to configure collection-related workflows from within Nuix Adaptive Security.
Creating and managing collection configurations
You can create a new Collection Configuration from scratch, as follows:
Go to Administration Console's Cases and Collections panel.
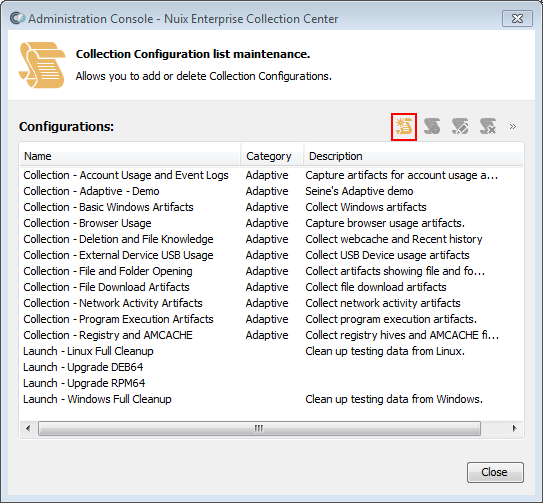
Click the arrow on the right side of the Add Case or Collection button, then click the Manage button to display the Collection Configuration List. Collection Configurations can be added, edited and deleted from this list.

From the Collection Configuration List, click the New Configuration button (shown in a red box, below) to add a new Collection Configuration.
The New Collection Configuration Details dialog is shown. This dialog shares the same features as the New Collection Wizard. For reference see topic Launching the New Collection Wizard.
Fill out the settings for your new Collection Configuration, then click OK to save it. Click Close to exit the Collection Configuration List.
Tip: Each Collection Configuration can be given an optional Category value (to group related Collection Configurations) as well as a Description.
Note: When Nuix Adaptive Security is integrated with Nuix ECC, only Collection Configurations with the category Adaptive will be visible from Adaptive Security.
You can also create a new Collection Configuration from the New Collection Wizard, as follows:
Go to Administration Console's Cases and Collections panel.
Run the New Collection Wizard, by any of the following means:
Click the Add Case or Collection button
Or click the arrow on the right side of the Add Case or Collection button, then select an existing Collection Configuration from the pull-down list
Or right-click an existing Collection and choose Copy.
Click the Save for later link at the bottom left corner of the New Collection Wizard. This saves any settings you have specified in the Wizard as a new Collection Configuration but will not actually run or schedule any job.
Creating a collection using a collection configuration
Once you have saved a Collection Configuration, you can use it as a template for creating and scheduling a Collection. To do so:
Go to Administration Console's Cases and Collections panel.
Click the small arrow on the right side of the New Case or Collection button. From the pull-down list, select the Collection Configuration you wish to use as the basis for your new Collection.
Once the New Collection Wizard appears, review the settings on each "step" or "page" of the Wizard. Be sure the scheduling options are appropriate for this Collection. Save the Collection from the last Wizard page (Step 5).
Your new Collection will either run immediately or be scheduled to run in the future, depending on the settings you specified. The Collection Configuration remains unchanged and can be used to create similar Collections in the future. You can also delete the Collection Configuration if no longer needed; for details see topic Creating and Managing Collection Configurations, above.
Recurring collections
Recurring Collections allow you to configure a collection one time, and have the Collection run repeatedly on a daily, weekly or monthly basis. They are particularly helpful for collecting files on an ongoing basis from designated Custodians' computers or from specific Targets. For legal cases, certain Custodians referred to as Frequently Litigated Custodians are prime candidates for having their files collected via Recurring Collections.
The first time a Collect task in a Recurring Collection runs, it collects every file which matches the file selection criteria for the task. Subsequent runs of the Recurring Collection will collect the files (1) which have been created or modified since the previous Recurring Collection run, and (2) which match the file selection criteria. These subsequent collections are known as incremental collections.
Another way to put this: Recurring Collections trigger multiple "subsequent" Collections, each of which saves collected data into distinct folders at the specified Destination. The first subsequent Collection will likely be the largest and take the most time to complete. Additional subsequent Collections will contain only files which are new or modified since the previous Collection ran (and which match the file selection criteria).
How recurring collections appear in Administration Console
The ECC system will automatically generate and schedule Collection jobs for a given Recurring Collection. Only one Collection job at a time will be generated. The first collection may not appear in the Dashboard panel until after the first recurrence date elapses.
To view each Recurring Collection configuration click the  menu and choose Recurring Collections.
Configuring recurring collections
To configure a Collection as a Recurring Collection, go to the Destination & Scheduling page of the New Collection Wizard, set the Start value to Recurring, and configure the dates, times and intervals to recur. The following example schedules a collection to recur at 5 am on the first Monday of each Quarter:
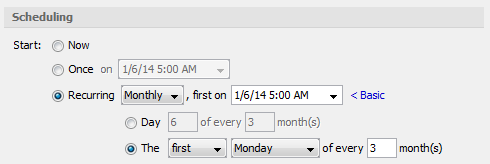
Note: Recurring collections should be kept simple. A sequence type of Simple (single task) must be selected. Configuring a Collect task to collect files is suggested.
For details on configuring Collections, see topic Launching the New Collection Wizard.
You can also create a recurring collection by clicking the  menu and choosing Recurring Collections.
Stopping recurring collections
To stop a Recurring Collection:
Click the  menu and choosing Recurring Collections. The Recurring Collections Maintenance dialog appears:
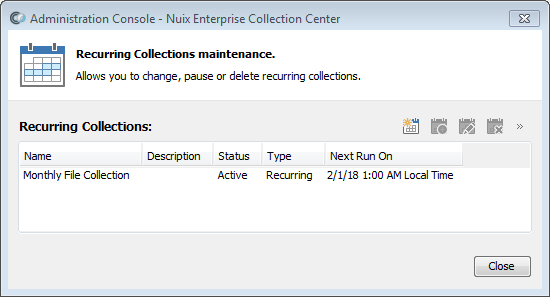
Select the recurring collection, then click the Delete Recurring Collection button in the toolbar.
Advanced JobFile editing
The Overview page of the New Collection Wizard provides access to JobFile editing tools. By clicking the Advanced link, you can perform three advanced tasks:
Click the Edit job XMLs below link to directly edit the JobFiles for each job in this Collection. This allows you to alter any setting. You may need to refer to the topic XML Editing Notes, as well as the Nuix Collector and ECC JobFile Reference document for full details on the options available within a JobFile (including options not available from the other Wizard pages).
Select a different Job XML Template to use for each job in this Collection. For reference see topic Understanding Job XML Templates, below.
Click the Edit link to add, edit, or delete Job XML Templates.
XML editing notes
If you are unsure of your edits to the JobFiles, you can click the Cancel XML edits and revert all changes link to undo all your edits.
While editing the XML of a JobFile, you can use the following keys:
| Key |
Description |
| Ctrl+R |
Find |
| Ctrl+R |
Replace |
| F3 |
Repeat last find |
| Shift+F3 |
Repeat last find in reverse direction |
| Ctrl+Space |
Display a list of JobFile XML elements |
The Wizard's Job XML Editor displays blue wavy lines under any edit you have made. If an edit is invalid, a red wavy line will appear. Hover your mouse pointer over any red wavy lines to see "tool tips" which provide guidance for correcting errors, as shown in the following example:
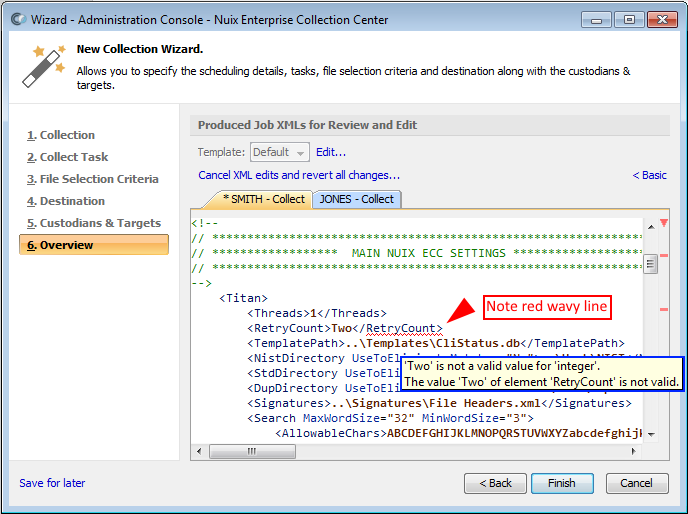
Errors (red wavy lines) shown on Job XML Template entries which you did not modify should be left alone. These error markers are due to the intentional use of Apache Velocity statements within the Job XML Template.
Understanding job XML templates
All the new jobs shown in the New Collection Wizard's Overview page are associated with a Job XML Template. This Job XML Template is a group of additional settings which are not directly accessible in the New Collection Wizard. By selecting a different Job XML Template from the Wizard's Overview page, you change these settings for each job in your Collection.
You can edit Job XML Templates and create new ones for use when configuring future jobs, as follows:
Click the  button near the upper-right corner of the screen to access the menu, then select Job XML Templates. The Job XML Template list maintenance dialog appears.

Note: You can also access this dialog from the New Collection Wizard's Overview page, by clicking the Advanced link followed by the Edit link.
Use the following toolbar buttons to manage templates: New Template, Duplicate Template, Edit Template, Compare and Edit Template, and Delete Template.
Refer to the Nuix Collector and ECC JobFile Reference document for details regarding the XML of a template.
Comparing job XML templates
The Job XML Template list maintenance dialog provides a Compare and Edit Template button, which lets you view two templates side-by-side while editing the template shown on the right. You can compare the unedited version of your template to the edited version. Any differences (edits) are highlighted, as shown in the image, below. You can also compare the template you are editing to any other template, so that any differences are readily apparent.
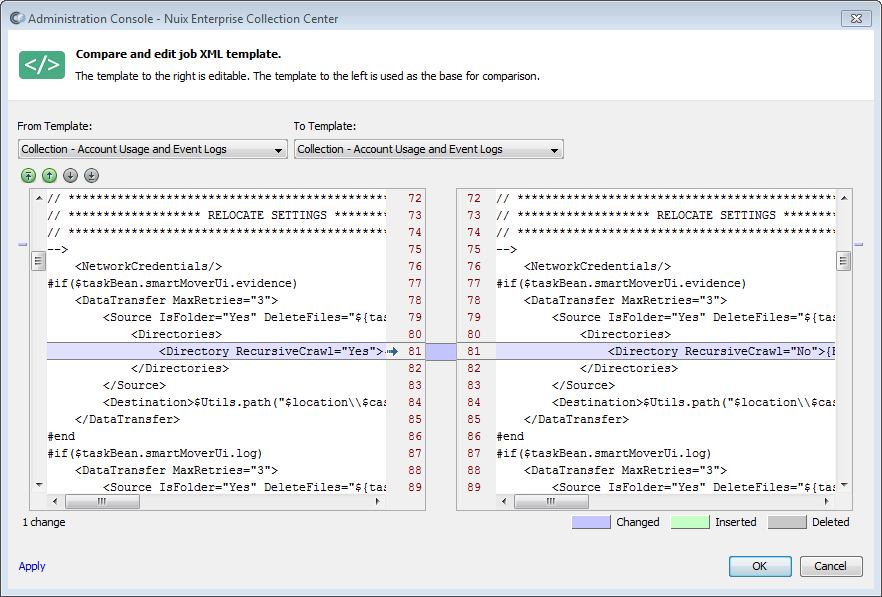
In the Compare and Edit Job XML Template screen, shown above, the two templates being compared have been selected from the From Template and To Template fields at the top. In this case, the same template has been selected for both the From Template and To Template.
The From Template is shown on the left, and is not editable. The To Template is shown at right and is editable. In this example, the RecursiveCrawl attribute value on Line 81 (on the right side) has been changed from Yes to No, so the entire line appears shaded in purple. Inserted lines would appear shaded in green while deleted lines would appear shaded in grey.
The Apply link at the bottom of the screen will immediately save any edits made without closing the screen (such changes are saved even if you later click Cancel).