App management
Select a tab to access the management options for that feature including:
Search Filters - Import and manage search filters.
Workflows - Import and manage workflows.
Custom Links - Integrate with external tools by creating custom links.
Privacy Message - Define a privacy message.
Import search filters
Add and manage search filters using the Search Filters Management window.
To access the Search Filters Management window:
Click Application Management from the global header.
Select the Search Filters tab.
Tip: Nuix Investigate provides default search filters that are pre-installed on the Search Filters Management window.
Warning: The provided search filter has been localized into all supported languages. Deleting or modifying the Search Filter in any way causes all translations to be lost.
It is recommended to download and make changes to a copy of the Custom Searches filter if changes are required.
The Search Filters Management window displays a table that lists all search filters that exist within your instance of Nuix Investigate including custom search filters. The following details and actions for a search filter are available within the table.
Note: The Search Filters Management window is only visible to administrators or users who belong to a group with the Custom Search Filter Manage privilege within the Nuix User Management tool (UMS). See the Nuix Investigate Configuration Guide for additional details on configuring user privileges.
| Table columns |
Description |
| Search filter |
Name of the search filter. |
| Description |
A description of the search filter. |
| Groups |
A list of UMS groups that the search filter has been assigned to. |
| Create date |
The date when the search filter was created. |
| Actions |
Hover over a row within the table to display the following actions. Select to download the search filter .JSON. Select to delete the search filter from the server. Select |
 to assign or reassign a search filter to a specific group.
The contents of the Search Filters Management table can be filtered by search filter name or description using the Filter field. The table can also be sorted by clicking the Search Filter, Description, or Create Date column headers to sort by the contents of either column.
If there are no search filters available on the server, an Import button appears on the screen in place of the Search Filter management table. Once a search filter has been imported, the table becomes visible.
To import a search filter:
Navigate to the Search Filters Management window.
Click Import.
Click Browse to choose a valid JSON search filter to import.
To change or add a description to the workflow, select Replace existing description.
If replacing an existing search filter, confirm the action on the Overwrite warning message.
Click Import.
From the Assign Search Filters pane, decide if the search filter should be restricted to specific groups.
Filters can be assigned to any number of groups or to no groups at all. If a group is not assigned, the filter is available to all users.
Note: Only valid JSON search filters can be imported. If you attempt to import an invalid search filter, a warning appears.
After a search filter has been imported, the search filters table refreshes to reflect the addition and the new filter is available for use within the application to the users who have been granted access. To import additional search filters, click Import on the Search Filters Management window.
See the Search filters section for more information on search filters.
Import workflows
Add and manage workflows using the Workflow Management window.
To access the Workflow Management window:
Click Application Management from the global header.
Select the Workflows tab.
Note: The Workflow Management window is only visible to administrators or users who belong to a group with the Manage Workflows privilege within UMS. See the Nuix Investigate Configuration Guide for additional details on configuring user privileges.
The Workflow Management window displays a table that lists all workflows that exist within your instance of Nuix Investigate. The following details and actions for a workflow are available within the table.
| Table Columns |
Description |
| Workflow |
The name of the workflow. |
| Description |
A description of the workflow. |
| Actions
|
Hover over a row within the table to display the following actions: Select the Download icon to download workflow .JSON template. Select the Delete icon to remove the workflow from the server. |
The contents of the Workflow Management table can be filtered by workflow name or description using the Filter field. The table can also be sorted by clicking the Workflow or Description column headers to sort by the contents of either column.
If there are no workflows available on the server, an Import button is displayed on the screen in place of the Workflow management table. Once a workflow has been imported, the table becomes visible.
To import a workflow:
Navigate to the Workflow Management tab.
Click Import Workflows.
Click Browse to choose a valid JSON workflow template to import.
To change or add a description to the workflow, select Replace existing description.
Click Import.
Note: Only valid JSON workflow templates can be imported. A list of all workflow template requirements can be found in the General Workflow Guidelines section.
After importing a workflow, the Workflows table refreshes to reflect the addition and the new workflow becomes accessible to all users and cases that are available within the configured inventory locations. You can also click the Refresh icon  to refresh the window.
To import additional workflows, click Import Workflows again on the Workflow Management tab. Any number of workflows can be imported and used with your assigned cases.
Tip: You can also add or remove workflows directly to the server by placing them in the following location in your installation:
<installation directory>\Nuix\Nuix Web Review\workflows
When changes are made directly to the server, the updates may not appear immediately on the Workflows Management window. Click Refresh Workflows to check for updates made on the server.
Warning: When adding or manipulating workflow templates directly on the server, ensure that the General Workflow Guidelines for creating a valid JSON workflow template are followed.
Create Custom Links
Custom links are a method that allow investigators to extend the capabilities of Nuix Investigate using customized URLs. With this feature, users can create dynamic, parameter-based URLs to send certain case data to third party external tools and APIs for further analysis. Once a custom link is constructed, it can be run by selecting items or text within the case, then choosing a link to run. Depending on the selections made within the case and the parameters defined in the link, Nuix Investigate generates the URL in real time based on the selected case data and runs the link in a new window.
To access the Custom Links window:
Click the Management  icon from the global header.
Select Custom Links from menu.
Note: Only administrators or Users who belong to a group with the Manage Custom Links privilege can create and manage Custom Links.
The Custom Links window displays a table that lists all custom links that exist within your instance of Nuix Investigate. The following details and actions for a custom link are available within the table.
| Table Columns |
Description |
| Name |
The name of the custom link. |
| URL |
The URL of the custom link. |
| Create Date |
The date when the custom link was created. |
| Description |
A description of the custom link. |
| Label |
A color coded, user defined label that can be applied to custom links for the purpose of categorization. |
| Actions
|
Hover over a row within the table and click the icon to view the following actions: Edit: Select to edit the selected custom link. Duplicate: Select to duplicate the selected custom link. Delete: Select to delete the selected custom link. |
The contents of the Custom Links table can be filtered by labels from the drop-down menu, or by name, URL, or description using the Search field. The table can also be sorted by clicking the Name, URL, Create Date, or Description column headers to sort by the contents of either column.
If there are no custom links available, the Custom Links table will not be visible.
To create a custom link:
Click the New Custom Link button located on the Custom links window.
In the Custom link details window:
Enter a unique Custom Link Name.
Enter the URL to associate with the custom link.
When building a custom link, you can enter a URL in the field by free typing or using parameters. Parameters act as variables that can automatically generate portions of the URL based on your selections.
The following parameters are available:
CaseID: Inserts the unique ID of the currently open case.
ItemID: Inserts the unique GUIDs for all selected items.
ItemName: Inserts the file names of all selected items.
SelectedText: Inserts specific text that is selected from an item.
Clicking a parameter will add its value at the current cursor position.
Important: If a URL includes the SelectedText or ItemID parameters, the length of the URL generated when running the custom link could be very large, causing errors in some browsers. To avoid this issue, ensure that the total length of the URL does not exceed 15,000 characters.
(Optional) Provide a description for the custom link.
(Optional) Create a new label or select and existing label and color to categorize the custom link.
(Optional) Select one or more available groups to limit access to specific users.
Click Create to save the new custom link.
After a custom link is created, it is displayed within the Custom Links table. Right-click on a custom link for options to Edit, Duplicate, or Delete the custom link.
Run custom links
Custom links can be run from the following locations by selecting one or more items or a portion of text:
Grid, Review, or Gallery views
Default Preview pane
Item Metadata pane
To run a custom link that has been added by a user or administrator:
Select one or more items, or a portion of text from any of the previously mentioned locations.
Right-click, then click Run Custom Link from the context menu to display all available custom links.
Note: The list of custom links that are available depends on the current selection.
For example: Custom links that use the Selected Text parameter are only shown if a portion of text is selected.
Choose a custom link from the menu.
Note: Custom links are initially sorted alphabetically. After use, the list becomes sorted by most recently used.
After selecting a custom link, a new window opens using the URL configured in the custom link.
Define a privacy message
In certain scenarios, an administrator may need to prompt users with a privacy message or legal notice prior to their use of the application to inform them of specific policies. These types of messages can be defined on the Privacy Message Management window.
To access the Privacy Message Management window:
Click Application Management from the global header.
Select the Privacy Message tab.
Note: The Privacy Message management tab is only available to administrators.
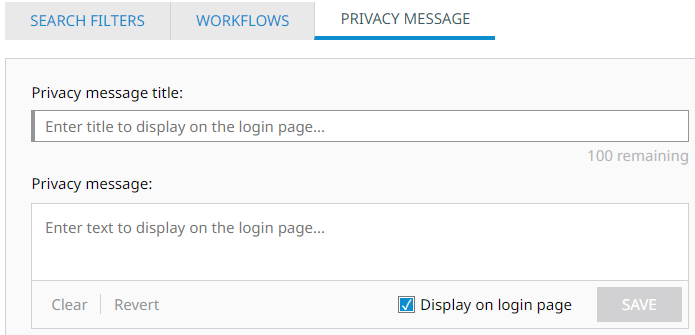
To create a Privacy Message:
Enter a Privacy message title to display on the message window presented to users.
Enter text within the Privacy message field for users to accept.
Additional options:
Clear: Remove all text from the form.
Revert: Reset the privacy message to its previous saved state when editing an existing message.
Display on login page: Select to enable the privacy message.
Click Save.
Once saved, all users who attempt to access Nuix Investigate are presented with the privacy message.
Note: When enabled, the privacy message appears each time a user encounters the sign in window. Once displayed, users must click Accept, agreeing to any terms defined by the message, before proceeding to the sign in window.
To switch off a privacy message:
Clear the Display on login screen check box.
Click Save.