Work with items in bulk
When beginning an investigation or review, the ability to eliminate items of little or no value or identify specific items quickly can help improve the efficiency and effectiveness of your workflow. To achieve this, Nuix Investigate provides tools that allow users to view and process items in bulk. This section describes these features in more detail.
These features are all located within the Alternative Search Methods drawer.
Workflows
Exploration of case data is often completed in a structured manner that includes running sets of queries to cull important case data followed by performing actions on those items to further sort and organize the data. This type of analysis can often be repetitive, and depending on the size of the case, time consuming. To help simplify and streamline this process, use workflows to improve your data processing strategy.
Workflows are a method that you can implement to automate specific tasks. You can configure workflows to perform any of the following activities:
| Activity |
Required UMS privilege |
Description |
| Bulk search and tag |
Tags |
Combine commonly used queries with related tagging actions to quickly search through evidence and apply or remove tags. |
| Bulk item exclusion / inclusion |
Handle Exclusions |
Exclude or include items from view based on specified queries |
| Item security |
Folder Management |
Add or remove items from one or more folders based on specified queries. |
| Bulk custom metadata |
N/A |
Add or remove custom metadata from items based on a specified query. |
| Bulk custom scripts:
|
System Scripts |
Run custom Ruby, Python, or JavaScript scripts against items in your dataset. Scripts must be available on the server at runtime to be used within a workflow. |
Note: To successfully run a workflow activity, the user performing the task must belong to a group within UMS that is assigned the required privilege for the action that they are performing.
Create workflows
Workflows are comprised of nodes that each represent an activity that can be performed against items within a case. Depending on the preferred use for the workflow, several standalone nodes can be defined to perform simple tasks independent of one another, or nodes can be nested together to perform more complicated procedures.
Workflows are defined within properly formatted JSON files that are customized to include the activities that you want to perform. Detailed samples of each supported workflow activity are in Appendix A.
Use workflows within a case
To access workflows within your case, select the Workflows icon from the Alternative Search Method drawer to expand the Workflows pane. Workflows are accessible from all views within the Search & Review workspace.
Once expanded, choose a workflow from the list to display all actions that the workflow can perform. If a workflow name is too long for the table space, an ellipsis appears. Hover over to see the entire workflow name.
The selected workflow can be changed at any time while working within your case.
Run a workflow
After selecting a workflow to run within your case, the nodes associated with the workflow are displayed. Each individual node represents a specific activity that can be performed on the data within your case.
The following actions are available for each node within the workflow depending on the type of activity it is performing.
| Workflow Action |
Icon |
Description |
| Execute all descendant node actions |
|
Runs the activity for the selected node, then advances and runs the next descendant node until all nested nodes have been run. |
| Execute individual node action |
|
Runs the activity for the selected node only. |
| Execute this search |
|
Visible when hovering over a node, this action runs the node’s query and returns items that are responsive without performing the nodes activity. If a metadata profile has been defined by the node, that profile is applied within the Grid View when results are returned. |
| View node information |
|
Visible when hovering over a node, click this icon to view details about the selected node. |


If the activity performed by a node is a non-scripting activity, the node’s query and activity can be run independently of one another. If you choose to perform the Execute this search action, the node’s query runs and any items that are responsive are returned to your current view with no further actions performed. If the node also defined a specific metadata profile, the returned results is displayed using that profile.
Running Execute all descendant node actions or Execute individual node actions performs the specified activity on all items that are responsive to the defined query, however, the current set of results or any effective query that is currently applied are not altered. If a node’s query does not return any results, no action is taken.
Note: Only administrators or users who belong to a group with the Execute Workflows privilege within UMS can execute node actions within a workflow.
Workflow tasks can be performed in any order.
To get started:
Choose a workflow and identify a node to run.
Tip: To view the query parameters and associated activities that are performed by the node, click the View node information icon to open an information dialog for that node.
Choose an action to perform.
Click Execute node query to view the results of the query in your current view. This action can be used to validate that the query returns expected results.
Click Execute all descendant node actions to perform the activity of the currently selected node and all descendant nodes. This action does not return or change the query results in the currently selected view.
Click Execute individual node action to perform the activity of the currently selected node only. This action does not return or change the query results in the currently selected view.
If an action needs to be stopped after it has been started, click the action’s icon while it is running to Cancel the action. This might be necessary if you find that a task is taking longer than anticipated to run.
When a node is running, an animated status indicator appears next to the initially selected node. If a node contains descendants, the name of each child node appears in bold when running to indicate the status of the workflow. When the workflow task completes, a message appears indicating that the process completed successfully. If a task fails, a failure message appears and the node that failed is highlighted within the workflow.
Saved searches
Over time, investigators may find that they have developed several queries that they perform regularly. These could be queries that return a specific group of items, or a set of queries that correspond to a tagging regime that is often used. No matter what the use case is, developing reliable effective queries can be beneficial to an organization when examining case data. Remembering these queries, however, might be difficult.
To help users collect the queries that they use most, Nuix Investigate provides the ability to save searches publicly or privately. Private searches are accessible only to the users who create them. Publicly saved searches, however, enable queries to be shared with other investigators within a case. Sharing queries publicly can enable investigators and reviewers who may not be familiar with a case to quickly find and begin analyzing case data.
Note: The ability to view, save, run, and set default saved searches is managed using group privileges within UMS. Only administrators or users who belong to a group with the Manage Private Saved Searches, Manage Shared Saved Searches, or Manage Public Default Searches privilege within UMS are permitted to save searches.
Save a search
To save a search:
Enter a query into the search box or construct a query using any of the Query Builder Criteria filters.
Note: Saved search queries are limited to a maximum of 5000 characters and a size of 0.1MB due to database restrictions. An asterisk (*) is a valid search that returns all items in the case.
Click the Save Query icon located to the right of the search box.
Note: When saving a search, the active metadata profile, default sort selection, and the view are saved as part of the query. When the saved search is later run, these settings are applied to the result set in the Grid view and the Item Metadata pane.
Choose how the search should be saved:
Private – Visible only to you within the selected case.
Public – Visible to all users that have access to the selected case.
Note: Only administrators or users who belong to a group with the Manage Shared Saved Searches privilege within UMS can create public searches.
Enter a unique name for the search.
Optional: Select Save as Default to have the search run automatically for all users upon opening the case.
If a default search is already configured within the case, choosing to save the current search as default overwrites the existing default with the new search.
Note: Only administrators or users who belong to a group with the Manage Public Default Searches privilege within UMS can set a Public search as default.
Click Save.
Once saved, the query is added to the Saved Searches pane with all other saved searches that exist within the case.
View saved searches
Saved Searches are accessible by clicking the Saved Searches  icon from the Alternative Search Method drawer. Doing so expands the Saved Searches pane and displays all available saved searches, organized by the search type selected during creation.
Tip: For users who need to view and run public searches, but not have the ability to create them, the View Shared Saved Searches privilege can be granted within UMS.
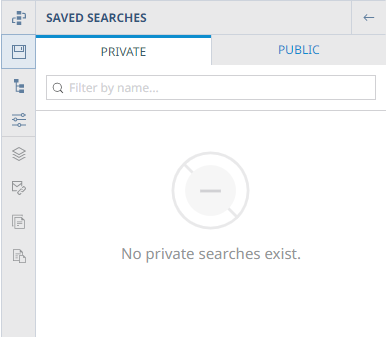
Private: This tab displays all saved searches created using the Private Search type. Privately saved searches are only visible to the users who created them.
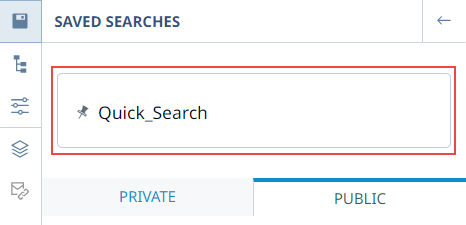
Public: This tab displays all saved searches created using the Public Search type. Users with the appropriate UMS privileges can view and create these types of queries.
Note: Saved searches are case specific and are visible only within the cases in which they were created.
Saved searches display within each tab alphabetically and can be filtered by name to quickly find a specific query. If a case includes a Default Search, it is indicated at the top of the pane above the search type tabs.
Work with saved searches
You can run a saved search by clicking the name of the search from within the Saved searches  pane. When selected, the query associated with the search is added to the query staging area and any results are returned within the view that the original search was saved.
To view details about a saved search without running it, hover over the item to reveal the following icons:
Click Set/Remove as Default Search  to set the selected search as the default query.
The availability of this option is based on your current group privileges.
Click Preview saved search  to display the following saved search details:
Saved search name
Query
Associated metadata profile and sort setting
Deduplication status (True | False)
Creation date of search
Click the Delete  icon to delete the selected saved search.
Note: Publicly saved searches can only be deleted by an administrator.
Directory browser
The Directory Browser and provides a hierarchical view into the folders, containers, and databases that exist within a case. Some item types are categorized as Immaterial Items and are sometimes excluded from search results. However, being able to view and browse the directory structure of your case can help identify important relationships that otherwise would have been difficult to uncover in a flat view of the data.
In general, folders and containers are used to group similar or related items. If a key piece of evidence is discovered in one location, the likelihood of finding other relevant evidence nearby is high. The context that can be gained by understanding how a set of seemingly unrelated items is grouped together within a directory can change the course of an investigation. With the Directory Browser, investigators can navigate the contents of a case using its directory structure or locate a specific item within that structure from Grid view.
Note: The Directory Browser is only available to administrators or users who belong to a group with the Directory Browser group privilege.
Click the Directory Browser  icon from the Alternative Search Method drawer to view the directory structure of your case. The Directory Browser is accessible from all views within the Search & Review workspace if you have the right privileges.
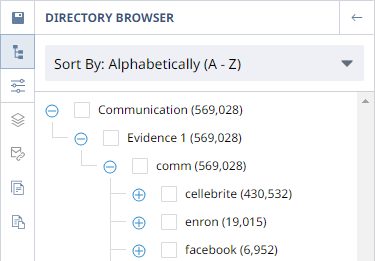
When the Directory Browser pane opens, the top-level containers that make up the case are presented within the browser.
Apply item security
Some data may be unavailable due to item security. Administrators and users with the Item Security - Ignore privilege enabled can view all data.
If a case has not yet been migrated to item level security, you cannot view the Directory Browser.
To apply item security:
If you have the Item Security - Manage privilege, open the Directory Browser.
Click Apply to apply item security to the case.
When item security has been successfully applied, click Load Directory Browser to see the folder structure.
Use the directory browser
When you expand a container, the Directory Browser lists the first 50 top-level containers that exist within that specific container. If additional containers exist beyond that, a Load More indicator appears, allowing you to reveal the next 50 containers.
Displayed within parentheses next to each container name is the total number of descendant children, including the container itself and any pills applied. The item count value is based on the current effective query.
Note: To switch off item counts within this view, an administrator can set Enable item count in directory browser property to False within the Nuix Configuration Utility. See the Nuix Investigate Configuration Guide for more information.
Select the check box next to the container’s name to select the container and its contents.
Note: If you do not have the Ignore Item Security group privilege, some directories may be excluded from your view. An error message may appear to explains.
View items from the directory browser
Select the Sort by list option at the top of the Directory Browser to sort the data by Native Structure Order (order in which the data was processed) or Alphabetically. Changing the sort option resorts the data and collapses all containers.
The contents of a container can be queried by either clicking directly on a container name or by selecting the check box next to one or more containers and then clicking Search.
Clicking on a container’s name within the browser queries all descendant child items of that container and displays the results in the currently selected view. When this action is performed, the check boxes next to the selected container and all child containers become selected automatically to reflect which containers are included in the query.
To view the contents of a subset of child containers, or multiple containers from different parent containers, use the check boxes to select only the containers that are required.
Top level container names are always derived from the case name.
Note: If a query is currently applied within the case that has the Hide Immaterial Items Query Builder criterion enabled, the filtered results are reflected in the Directory Browser
Locate the parent container of an item
While reviewing the items within a case, it may be necessary to identify the parent container of an item within the current result set so that other similar or related items within the case can be located.
To locate the parent container of an item in the result set:
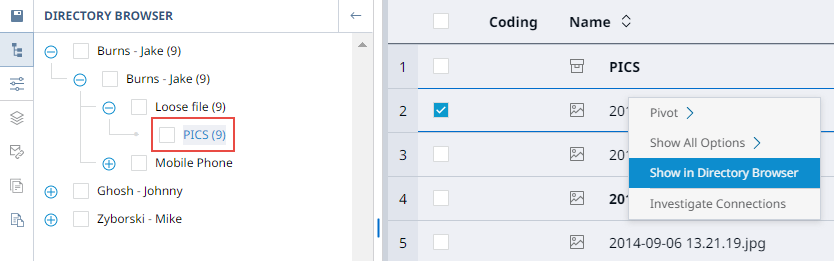
From the Grid view, select an item from the result set.
Right-click on the item and select Show in Directory Browser from the context menu.
The Directory Browser pane opens and highlights the parent container of the selected item.
Search filters
Investigators who make use of Saved Searches may want to add a layer of organization and complexity to improve their search regimes. To establish these types of standard querying practices, Search Filters can be used when assessing case data. Search Filters are collections of predefined queries that are organized into nested hierarchical structures which allow similar or related queries to be grouped together. These groups of queries can then be applied at once, run individually, or combined with other search criteria.
Nuix Investigate provides several default search filters that update dynamically based on the contents of the case. Custom search filters can also be created to curate and share customized collections of related queries that are frequently performed.
While similar in nature to Saved Searches, Search Filters offer the following differences.
Available across all cases
Available to all users
Customizable:
Create custom collections of filters
Can be restricted to specific groups of users
Can change the metadata profile used to display results
Can be easily imported and exported
Use search filters within a case
To access Search Filters within your case, select the Search Filters  icon from the Alternative Search Method drawer to expand the pane. Search Filters are accessible from all views within the Search & Review workspace.
Note: Only administrators or users who belong to a group with the Custom Search Filter View privilege within UMS can see and run filters within the Search Filters tab.
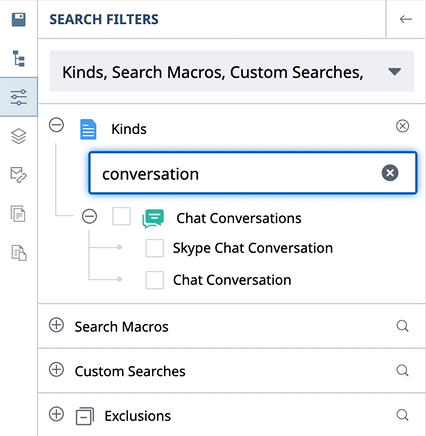
Once the pane opens, all default search filters, and imported custom filters, are available from the Search Filters list at the top of the pane depending on the type of data in the case. If a search filter name is too long for the table space, an ellipsis appears. Hover over to see the entire name.
The search filters are organized by the following categories:
Kinds
Search Macros
Custom Searches
Tags
Exclusions
To use a search filter, expand the Search Filter list and select one or more filter categories to enable within the pane. Nuix Investigate provides several filters which are enabled by default. These filters, along with any others can be switched off by deselecting the check box next to the filter’s name within the Search Filter list.
Note: Search filter selections are preserved within your browser’s cache so that they can be persisted across cases and sessions. Clearing the browser’s cache resets the Search Filter pane to its default selections.
Once enabled and visible within the pane, the search filter can be expanded to display its contents. Each individual filter represents a specific query that can be performed against the items within the case.
Search for specific filters within each category by selecting the category’s search icon and typing in search criteria.
To quickly apply a filter, click on a filter’s name to run the query associated with that filter. If the selected filter is the parent to nested child filters, the queries of all nested filters are joined to the parent query with logical OR operands and applied at the same time.
To apply multiple filters at once, select the check box next to each filter to be applied. If a parent filter is selected, all child filters of that parent are selected automatically. When all required filters are selected, click the Search button within the Form-Assisted search bar to apply the filters within the case and return all items that are responsive.
Tip: Search filters can be combined with other search methods such as keyword search to further narrow the result set. To do so, define all criteria prior to clicking Search to submit the query.
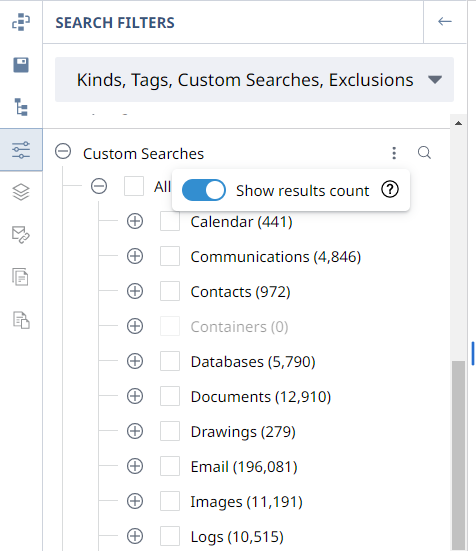
Custom search filters have the option to view counts of the results if you have the Custom Search Filter Counts privilege. Click the menu for Custom Searches and select Show results count to show the counts of each custom search filter. The results include any pills that exist at the time the count is generated.
Tip: Requesting the results count may take some time and can decrease performance. The counts recalculate each time you alter and rerun the search.
Click anywhere outside the context menu to exit.
Default search filters
The following default search filters are included with Nuix Investigate:
| Default search filter |
Description |
| Custom Searches |
The Custom Searches filter is provided as an example to demonstrate the capabilities of creating a custom search filter. This filter can be used as is or you can copy it and create a custom search filter. |
| Default Search Filter |
This filter includes a collection of queries targeting commonly searched items. |
| Mobile Searches |
Investigate Mobile Searches filter is based on data from standard reports. Many of these filters are set up to run with metadata profiles contained in the Mobile Metadata Profile Pack. This pack needs to be additionally downloaded from the download site. |
Custom search filters
Search Filters are comprised of nested filters that each represent a specific query. Each filter, when run, searches within the case and returns only the items that are responsive to the query. Depending on its intended use, a search filter can include individual unrelated filters, or groups of related filters that are nested together.
When nested, the individual child filters can be run independently, or the entire nested group can be run at once by selecting the parent filter. If a parent is selected, the queries of all child filters are combined into a single query using logical OR operands and the results of each filter is returned within the result set.
Search Filters are defined within properly formatted JSON files that can be customized to include all required filters. Using the provided syntax, search filters can contain any number of parent or child nodes. Appendix B - Search Filter Example includes an example search filter JSON that contains a parent node with several nested children.
There are two ways to create a custom search filter. You can copy a default search filter or create a new one in JSON format.
Copy a default search filter
Default search filters cannot be edited; however, you can copy a default search filter and create a new custom search filter.
To copy a default search filter:
Hover over a default search filter and click the Download  icon to download the JSON file.
Make edits to the JSON file.
Optionally rename the JSON file.
Note: If you do not rename the JSON file, the new search filter has ' - Copy ' appended to the end of the name when imported.
Import the file as a new custom search filter. See Import search filters for more information.
Note: The new custom search filter does not replace the original default search filter.
Create a custom search filter
To create a custom search filter:
Create a JSON file with a unique name.
Import the file. See Import search filters for more information.
Optionally create a custom icon for your search filter by adding "icon": "<image>" to the JSON file, where <image> is the name of your image in the format of png, jpg, jpeg, gif, or svg. The image must be in the directory specified in the Config Tool > Services > Investigate property Search Filter Icons Location. See Custom search filter icons for tables of available icons.
When you create a custom search filter, it can indicate what view should open when that filter is run by adding "view": "<view>" where <view> can be any of the following: Dashboard, Grid, Gallery, or Review.
Note: If you select more than one custom search filter in the tree and click the Search button, no view is applied and the user remains on the same view.
After creating a custom search filter, it can be imported using the App Management > Search Filters window. See Import search filters for more information.
Tip: Nuix Investigate provides a default custom search filter named Custom Searches that is pre-installed on the Search Filters Management window. This example demonstrates the capabilities that are available with search filters and can be used as is or downloaded and customized for your specific use case.
Metadata profile logic
When creating custom search filters, metadata profiles can be defined to customize how a filter's results are returned. Metadata profiles can be assigned to any query within the search filter. When a filter is run, the metadata profile assigned to the query is applied to the returned results. If multiple search filters with different assigned metadata profiles are run concurrently, the following logic rules apply:
Selecting a parent search filter applies the metadata profile for that filter.
Selecting a child search filter applies the metadata profile for that filter.
Selecting two child filters under the same parent applies the metadata profile of the parent filter.
Selecting two sub-level child filters under different children that have the same parent applies the nearest common ancestor metadata profile.
Selecting two child filters under different parents applies the Search Default metadata profile.
Selecting two parent filters applies the Search Default metadata profile.
Selecting a node without a defined metadata profile applies the nearest defined metadata profile within the filter’s hierarchy.
If a metadata profile is not assigned to any node within the search filter, the Search Default metadata profile is applied.
Note: If you select a custom search filter that has a metadata profile assigned, you can change the metadata profile by selecting a different one from the list.
Edit a custom search filter
To edit an existing custom search filter:
Hover over a custom search filter and click the Download  icon to download the JSON file.
Edit the JSON file as needed.
Note: Optionally edit the name in the JSON file to create a new search filter.
Import the file to replace the existing custom search filter or create a new one. See Import search filters for more information.
The new filter is created with the same group settings as the original filter. Hover over the new search filter and select the Assign search filters  icon to assign it to a specific group.
Note: Default search filters cannot be edited. See Copy a default search filter for more information.
Delete a custom search filter
To delete a custom search filter:
Hover over a custom search filter.
Click the Delete  icon to remove the search filter from the server.
Note: Default search filters cannot be deleted.
Nuix NLP filters
If a case contains one or more items that were processed using NLP, the Nuix NLP filters tab  appears in the alternative search method drawer.
To search for items that contain NLP data:
Select the NLP Filters tab  to view the Nuix NLP data filter categories available within the case. Categories include:
Dictionaries
Risks
Skill Sets
Expand the categories and select one or more NLP filters to search on.
To view additional features, click the kebob icon within each category to view the following toggleable options:
Show item count: Display an item count of responsive items next to each filter.
Search: Display a search box that can be used to search and find specific NLP filters within the category.
Note: The ability to display item counts is only available if you have the Search Filters > Generate Counts group privilege.
In addition, the following NLP settings are also available to help improve the accuracy of your search.
Relevancy (Dictionaries and Skill Sets only): Increase or decrease the value of this range to change how relevant results are to the selected filters.
Minimum score (Risks only): Filter documents based on how they were scored against defined risk rules. The minimum score can be 0.00 or greater. Documents with a score lower than what is specified will not be shown.
Click Search to view items within the case that match your selected NLP search filters.
Family
Families are relationships that are created when items are extracted from other items. Examples of families include:
A zip file and its contents
Emails that contain attachments
Documents that include other embedded items, such as images or videos
Use the Families pane when reviewing a selected item to identify other related items that might be of interest.
Viewing family items
To view all Family items associated with the selected item:
Open the Families pane.
Select an item from the result set.
Click the Families  icon from the Alternative Search Method drawer.
Note: The Family pane icon is only enabled for items that have related Family items.
The Family pane opens to display a tree view of the Family items with the initially selected item highlighted. If an item is selected within the tree, an asterisk is placed next to the Families icon in the Alternative Search Methods drawer to indicate that selections have been made within the pane. The number of families displayed is configurable by an administrator with the Family Item Limit property. Click an item from the tree to display all items included within the tree in a new browser tab if the Enable New Tab Pivot Searches property is enabled. Click Back to Previous Results, if the Enable New Tab Pivot Searches property is not enabled, to revert the effective query and the result set back to its previous state within the pane.
Note: If you do not have access to an item in a family tree, the item name is obfuscated with RESTRICTED or EXCLUDED.
Note: If you ctrl + click an item from the tree, it opens a passive browser tab and the focus is still on the original search results.
Note: If Hide immaterial items is enabled for the current search, any immaterial items that are a part of the Family are still displayed in the Families pane, but users are unable to click on them to change the effective query. To enable this behavior, deselect the Hide immaterial items check box from the search toolbar.
If a Family contains excluded items but the user does not have the privileges required to view Exclusions, all excluded items contained within the Families pane display with obscured names that are disabled so they cannot be selected.
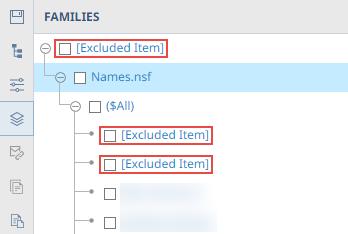
To view items that have been excluded, the user must be granted the appropriate privileges within UMS for viewing Exclusions, or the items must be included back into the dataset.
Threads
When a person responds to an email message, the content of the original message is included along with the response from the recipient. This correspondence creates threads, where each response archives the previous response in chronological order, allowing emails to read like a conversation.
When processing email archives, the ability to identify threads allows reviewers and investigators to view an entire conversation, in the order that it took place, rather than just one person’s response to an email.
Note: Email threads can only be viewed within the Threads pane if the case was processed using the Cluster run
View email threads
To view all threads that are associated with an email:
Select an email item from the result set.
Click the Threads  icon from the Alternative Search Method drawer.
Note: The Threads pane is enabled only if the case includes cluster runs that were generated with the Use email threads option selected within Nuix Workstation.
The Threads pane opens to display a tree view of all emails in each thread with the initially selected item highlighted. If an item is selected within the tree, an asterisk (*) is placed next to the Threads icon in the Alternative Search Methods drawer to indicate that selections have been made within the pane. The number of threads displayed is configurable by an administrator with the Threads Item Limit property.
Click an item from the tree to display all items included within the tree in a new browser tab if the Enable New Tab Pivot Searches property is enabled.
Note: If you ctrl + click an item from the tree, a passive browser tab appears and the focus is still on the original search results.
When an item is an endpoint, an icon indicates the endpoint state. If it has multiple endpoint states, multiple icons are displayed. Hover over an endpoint state icon to see the state name.
| Icon |
Endpoint state |
|
|
Endpoint |
|
|
Endpoint attach |
|
|
Endpoint duplicate, Endpoint duplicate inferred |


Note: The Threads pane has a maximum capacity of 100 items. If the item count of a thread exceeds this limit, a link to Display All Items appears within the pane. Select this link to populate results into the currently selected view instead of the Threads pane.
Duplicates
The Duplicates pane allows you to view all duplicates of the currently selected item. This option is only available if duplicates exist for the selected item. If an item contains more than 100 duplicates, only the total count and a link to view all is displayed. The number of duplicates displayed is configurable by an administrator with the Duplicate Item Limit property. When an item in the pane is selected to view its duplicates, the search opens in a new browser tab.
Note: If you ctrl + click an item from the tree, it opens a passive browser tab and the focus is still on the original search results.
This feature is disabled if more than one item is selected.
Near duplicates
The Near Duplicates pane allows you to view items that are considered near duplicates of the currently selected item. Manually adjust the threshold between 0.5 and 1. The number of near duplicates displayed is configurable by an administrator with the Near Duplicate Item Limit property. When an item in the pane is selected to view its near duplicates, the search opens in a new browser tab.
Note: If you ctrl + click an item from the tree, it opens a passive browser tab and the focus is still on the original search results.