Right-click options before finalizing a Production Set
This section lists all the right-click options you can select to finalize a Production Set from the Results view, and details in particular the following options:
Add Items to Production Set
Create a Production Set by importing a document ID list
Annotate a document ID list
Populate image stores
Generate a slip sheet
Production Set menu on selecting Results set items
The right-click Production Set menu you see when you select items in the Results view, contains the following menu options:
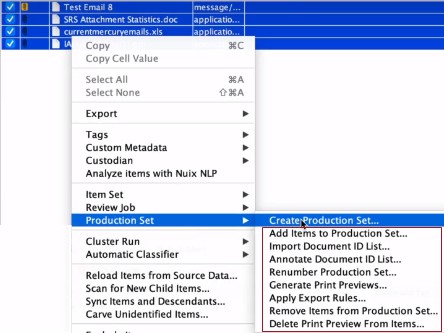
The following table lists these options and summarizes what they allow you to do:
| Option | Action |
| Create Production Set | Select to display the Create Production Set window on which you can define these settings. See Create a Production Set for all these details. |
| Add Items to Production Set | Select to display the Add to Production Set window. See the following Add items to a Production Set section for details. |
| Import Document ID List | Select to open the window in which to import a Document ID list. See the following Create a Production Set by importing a Document ID list section for details. |
| Annotate Document ID List | Select to open the window in which to annotate a Document ID list. See the following Annotate a Document ID list section for details. |
| Renumber Production Set | Select any of the Production Sets you have created from the list, and optionally: Update the document numbering based on the current numbering scheme of the Production Set. Renumber individual items by selecting each and on the Metadata tab, changing its value. Modify the sort order to one of the following types:
|
| Generate Print Previews | To use this option, you must have pre-enabled Print Previews in your settings; then select it to generate a print preview for:
|
| Apply Export Rules | Select to apply pre-set up export rules in your Production Profile (as found in Global Options) to your Production Set items. |
| Remove items from Production Set | Select to display a list of Production Sets from which you select one, and then select the items you want to remove. See the following Remove items from a Production Set section for details. |
| Delete Print Preview From Items | Select to remove the print previews for all items in the Production Set, or Production Set items you selected in the Results view. |
| Populate Stores | Select to populate image stores using an imaging profile. See the following Populate image stores section on this page for more details. |
| Slipsheet | Select to generate a slip sheet for the Production Set. See the following Generate a slip sheet section on this page and Configure other profiles under Set Global Options in the Nuix Workstation User Guide for full details. |
Note: After you export items in a Production Set, the Production Set freezes and you cannot edit it. If you export without the use of a Production Set, each export action is automatically assigned a Production Set. This provides automatic auditing on what has been exported from the case for each export.
Add items to a Production Set
Once the details of the Production Set are entered and you click OK you are given the option to add items to the Production Set. You can add items to the Production Set anytime.
To add items to a Production Set:
Select the items you want to add.
Right-click Production Set and select Add Items to Production Set.
Options that appear on the Add to Production Set window depend on selecting imported numbering. If you do not select imported numbering, this window appears as follows:
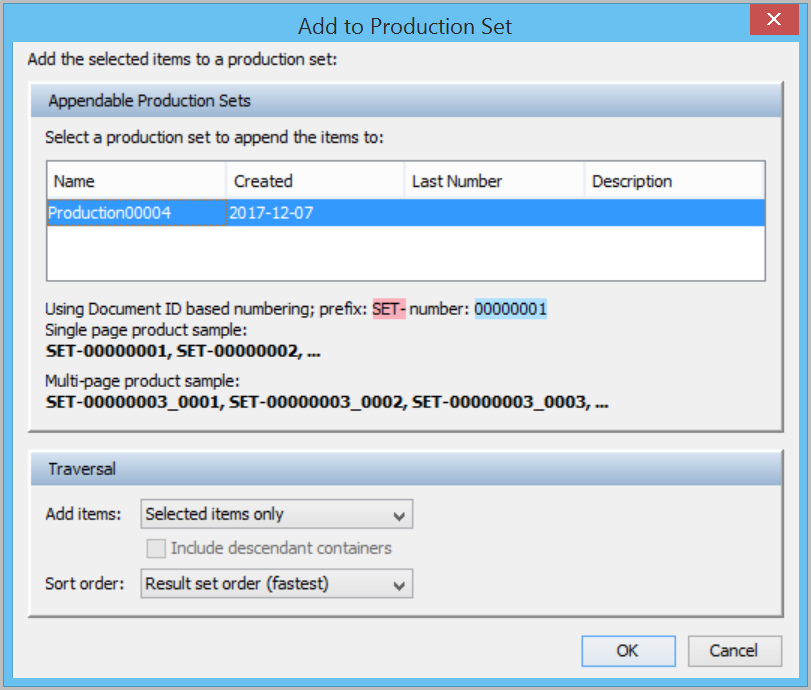
Under Appendable Production Sets, select the set to which you want to add the selected items.
Under Traversal, select one of the following Add items options to traverse through the selected items and add items:
| Option | Action |
| Selected items only | To add only the specific items you have selected in the Results view. |
| Selected items and descendants | To add the specifically selected items including anything below each in the item tree (attachments, embedded items, and so on). |
| Top-level items only | To add only the top-level item of each selected item; which can mean that the selected item may not be added to the Production Set. |
| Top-level items and descendants | To add the top-level item for that item tree and all its descendants for each selected item. |
From the Sort order menu, select one of these options for the order in which you want selected items to be added to the Production Set:
| Option | Action |
| Position sort order (fastest) | Exports the selected items based on their position. Also known as 'Family-level Sort Order', this is the fastest method as it requires no additional sorting. |
| Top-level item date (ascending) | Exports the selected items based on the top-level document’s date, with the oldest document appearing first in the load file. |
| Top-level item date (descending) | Exports the selected items based on the top-level document’s date, with the most recent document appearing first in the load file. |
| Results set order | Exports the selected items in the same order they list in the Results view. |
Click OK.
Once you add selected items to the Production Set, you can apply the Imaging Profile to created printed images (if required) and the Production Profile (or built-in settings).
The added Production Set appears in the Production Sets panel of the Document Navigator.

Create a Production Set by importing a document ID list
You can create or append a Production Set based on a list of document IDs in an existing Production Set. Doing so provides a bulk method of Imported Numbering, useful when there are a large number of items that need remedial attention. If you have a list of Document IDs, from another review tool, either as a file or that is copied and pasted directly into the GUI, then this feature can auto-generate these document IDs into a new Production Set that preserves the numbers.
This means for QA purposes if you have documents that you wish to change in Nuix Workstation once you export the document, you just need the list of document IDs to achieve that.
To create a Production Set by importing a document ID list:
In the Results view, right-click and select Production Set and select Import Document ID List.
Enter appropriate details in the window that appears.
| Section | Action |
| Source production set | From Use, select the PS you want the document IDs to come from. Select Included in document ID list if you want the document ID list to include formatting that defines the Production Set that the document IDs being referred to come from. |
| Target production set | Do either of the following: Click Create new to make a new PS. In Add to existing, select which PS you want to add the selected document IDs to. Only imported unfrozen PSs are available for selection. |
| Document ID List | Do either of the following: In File, add the text file with the list of wanted document IDs (that can have Production Set labels to identify the PS they come from). See the following Document ID list text file format section for details. In the List area, type or paste in your list of document IDs. |
Executing this creates a new Production Set and copies all the items in the list and their numbers from the old PS.
File format of a Document ID list
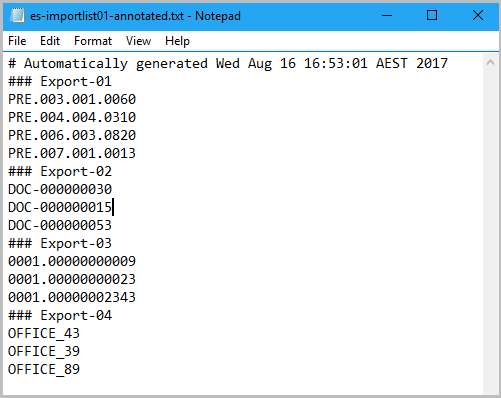
The format of the document ID text file is plain text in a single column of document ID values, that list one line after the other. If you specify the source Production Set, then the text file is just a list of document IDs.
You can then:
Use ### mark to specify a new Production Set name or GUID. Subsequent document IDs come from this Production Set.
Use # mark to specify a comment to be ignored.
If you have the document IDs but do not know which exact Production Sets they come from, then use the following Annotate Document ID list function.
Annotate a document ID list
Often you cannot identify where document IDs come from. The Annotate Document ID List function enables you to query a Nuix case to find out which Production Sets the document IDs of interest could relate to. It takes a list of document IDs, discovers the Production Sets they belong to, and writes the list to a new file. The new file has the suffix ‘annotated’ and is placed in the same folder as the original input file. If any errors are found, they are written to the output file.
To annotate document ID list:
From the Production Set menu, select Annotate Document ID List. The Annotate Document ID List dialog box appears.
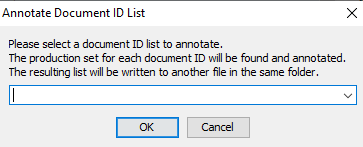
Select and accept a plain text file with a single column of document IDs. Once the annotation is finished a text file is created.
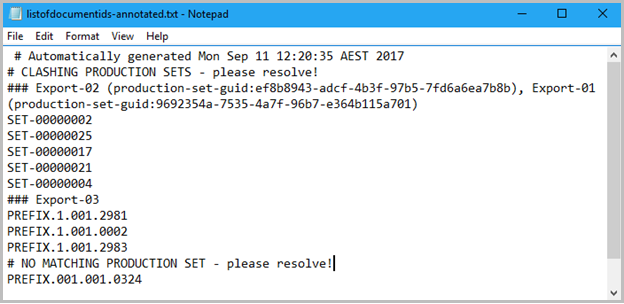
It displays issues such as:
Duplicate document IDs across Production Sets:
Then, for conflicting Production Sets, delete everything except the Production Set name.
Also, delete the Production Set 'GUID' in brackets, that helps to search for the Production Set in Nuix Workstation. Once you resolve the issues, use it with the Import Document ID List function to create a new Production Set.
No matching production sets (that is, no document id) in the case:
Then, edit the text file and use it with the Import Document ID List function.
Remove items from a Production Set
Select the Remove items from Production Set option from the right-click Production Set menu to delete items from a Production Set by selecting the set from the menu.
Populate image stores
Select the Populate Stores option from the right-click Production Set menu to populate image stores. The procedure for using this is the same as that detailed in the Populate Image Stores section of How profiles work with Production Sets.
Generate a slip sheet
Select the Slipsheet option from the right-click Production Set menu to select an imaging profile to apply a slip sheet to your items. You can select one from the drop-down menu or select Imaging options to create a new profile. For more details about imaging profiles and creating slip sheet templates, see Configure other profiles under Set Global Options in the Nuix Workstation User Guide.