Create a Production Set
A Production Set is the outcome of using a Production Profile, and allows you to reuse that Production Set on other Nuix Workstation installations to produce the same output.
Create a Production Set
To create a Production Set:
Right-click selected items in the Results view and select Production Set > Create Production Set. The Create Production Set window opens with three tabs:
General tab, on which to name and describe the PS.
Numbering tab, on which to define one of five numbering schemes to number documents or items in your set.
Imaging and Production tab, on which to apply the numbering settings and wanted imaging and production profiles to a set of items.
The following sections detail how to complete the information on these tabs.
On completing tab details, click OK.
A prompt asks you if you want to add items to the Production Set.
For details, see Add items to a Production Set in Right-click options before finalizing a Production Set and Add items to a Production Set in Manage Production Sets.
Define general information for a Production Set
To define general information for a Production Set:
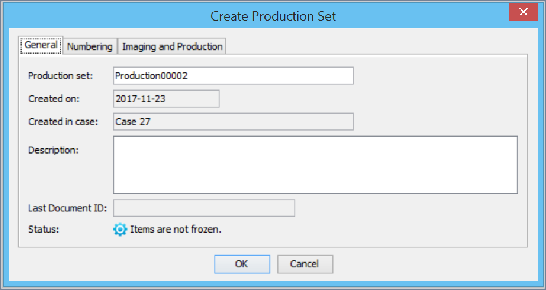
On the General tab of the Create Production Set window provide (or modify) general information about your Production Set, as follows:
In Production Set, enter a memorable name or one that complies with a naming convention.
If you add a number to the name (for example, Test 01), the next Production Set you create follows that numbering sequence.
In Description, enter a brief description of the Production Set to make it easier to identify quickly.
In Status, select frozen or unfrozen.
If you right-click the Production Set once created, and select Freeze Production Set Items, it displays Items are frozen.
Click OK to auto-generate these other settings:
Created on: The date you created the set, in the YYYY/MM/DD format.
Created in case: The name of the case in which you created the set.
Last Document ID: Number of the last item in previous Production Sets, for example: DOC-00001.
Go to the following Define numbering for a Production Set section.
Define numbering for a Production Set
On the Numbering tab of the Create Production Set window, set rules at document or page level for one of the following numbering schemes:
-
Standard
-
Advanced
-
Continued
-
Formatted
-
Imported
All schemes employ one or more of the following fields:
| Field |
Action |
| Document ID (default) |
Sequentially assigns a (9) nine-digit number, with an alphanumeric code prefixed to each document. Allows for a legal export of up to 999,999,999 items. If exporting from a Production Set, use the numbering from the PS and disable this option. |
| Box, Folder, Page |
Sequentially assigns a (9) nine-digit number to each document. Allows for a legal export of up to 999,999,999 items. |
| Folder, Page |
Sequentially assigns a (6) six-digit number to each document. Allows for a legal export of up to 999,999 items. |
| Page |
Sequentially assigns a (3) three-digit number to each document. Allows for a legal export of up to 999 items. |
| Prefix, Box, Folder, Page |
Same as the Box, Folder, Page option with the text string in the Prefix field at the beginning of the document number. |
| Prefix, Folder, Page |
Same as the Folder, Page option with the text string in the Prefix field at the beginning of the document number. |
| Prefix, Page |
Same as the Page option with the text string in the Prefix field at the beginning of the document number. |
See the following subsections for how to define numbering for each of the five different schemes.
Warning: Numbering settings and Export Output settings have the following restrictions:
Standard numbering is compatible with all the export types, except Ringtail.
Advanced numbering requires the Export Type to be Ringtail.
Formatted numbering does not work with any Export Type, and then you should disable Export Output settings.
You must renumber the Production Set once you print all items. However, if you export data multiple times, you can continue the numbering where it left off on the last export.
The Example numbering in each of the different schemes allows you to see what the numbering looks like for each option. A multi-page product sample is also available for all options except the Advanced scheme.
In the Production Set, you can control:
The sort order of Document IDs.
How documents are added (using a completely new PS, an existing PS that is not yet frozen or as the next Production Set in a rolling production series.)
The Document IDs to have any prefix and number combination (except for rolling prefix numbers when the padded page count is exceeded).
From the Production Set Navigator, you can export the Production Set as is.
Warning: After generating PDFs and verifying them, it is important for any further exporting of images (TIFF or PDF) that you do not select to regenerate PDFs. Doing this overwrites the PDFs in the print store with the PDFs created during that activity.
Set 'Standard' numbering for a Production Set
To set 'Standard' numbering for a Production Set:
Open the Create Production Set window, select the Numbering tab, and the Standard scheme.
In Numbering, select one of these methods, as detailed in the preceding Define numbering for the set section:
Document ID
Box, Folder, Page
Folder, Page
Page
Prefix, Box, Folder, Page
Prefix, Folder, Page
Prefix, Page
Leave the Document ID as this is set by default to SET-000000001 or change this to a pre-established numbering scheme, or create a custom one.
Set 'Advanced' numbering for a Production Set
To set 'Advanced' numbering for a Production Set:
Open the Create Production Set window, select the Numbering tab, and the Advanced scheme.
In Numbering, select one of these methods, as detailed in the preceding Define numbering for a Production Set section:
Box, Folder, Page
Folder, Page
Page
Prefix, Box, Folder, Page
Prefix, Folder, Page
Prefix, Page
Leave the Document ID as this is set by default to DOC-000000001 and you cannot change it.
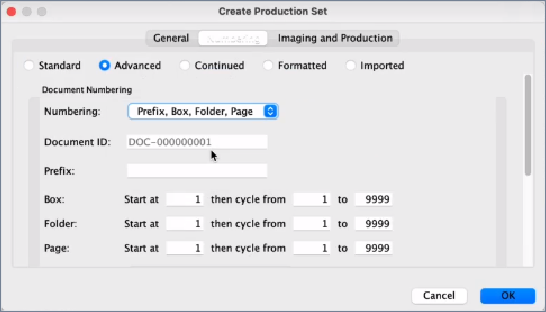
Set Prefix if using any of the Prefix options (Prefix, Box, Folder, Page; Prefix, Folder, Page; Prefix, Page); otherwise greyed out by default.
Leave all settings against Box, Folder, and Page set to Start at 1 by default, then cycle from 1 to 9999; otherwise set to numbers of up to seven (7) digits.
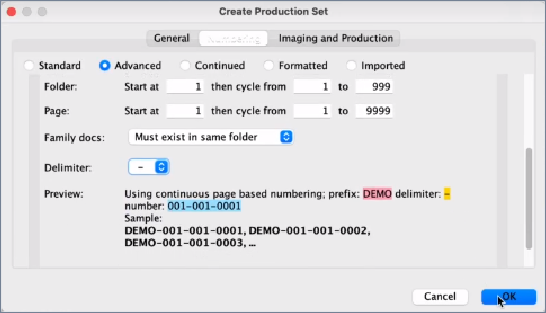
Against Family Docs, set to either Must exist in same folder or Can exist in multiple folders.
Select a Delimiter for how to divide up your number sequence. For example, by hyphens. The Preview provides a sample of how all your selections work.
Click OK to open the Add Items? dialog prompting you to add the selected items to the named PS.
Click Yes to open the Add to Production Set window.
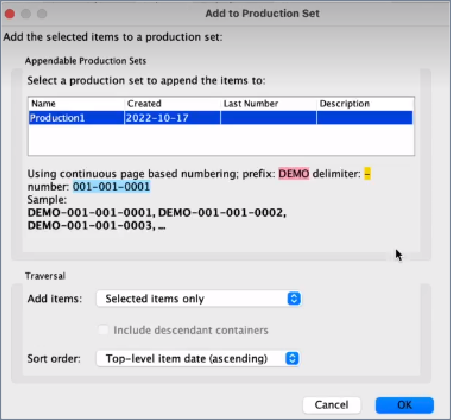
Define or change the Traversal options (see Add items to a Production Set in Right-click options before finalizing a Production Set for details) and click OK.
This creates the Production Set in the Document Navigator under Production Sets; with items showing their Document IDs in the Results view.
You can now, for example, export this numbered Production Set as a Legal Export to Promote to Nuix Discover. See Export a numbered Production Set to Nuix Discover for details.
Set 'Continued' numbering for a Production Set
To set 'Continued' numbering for a Production Set:
Open the Create Production Set window, select the Numbering tab, and the Continued scheme. This option displays the list of the Production Sets you have created.
Select one to see what the numbering will look like through the single and multi-page product samples contained in the box.
Set 'Formatted' numbering for a Production Set
The default Formatted Document ID is the same as a Document ID but with the ability to format it. A formatted Document ID number "CASE-123.456.789" represents the same name as a (plain) Document ID number "CASE-123456789" but with improved readability.
In formatted Document ID numbering:
You have more flexibility on the page part of the number, so you can number pages in a PDF as "CASE-123.456.789-01" instead of "CASE-123456789_0001".
You can also leave the suffix off the first page.
The number part can additionally parse any of the following characters: space, full stop/period, comma, underscore, or dash.
Only one formatting character can exist between any two consecutive digits, so 1.2 is ok but 1..2 is not.
Any combination of formatting characters is allowed - they do not have to be all the same.
To set 'Formatted' numbering for a Production Set:
Open the Create Production Set window, select the Numbering tab, and the Formatted scheme.
In Numbering, leave the default Formatted Document ID which you cannot change.
Leave the Document ID as this is set by default to DOC-000000001; otherwise customize.
In Page, select to insert a symbol ( ), ( _ ), (,) (-) or have nothing before your page numbers. Then page numbers default to 0001, but you can customize this too.
Select Include on first page to number the first page of your Production Set; otherwise clear the setting.
Set 'Imported' numbering for a Production Set
To set 'Imported' numbering for a Production Set:
Open the Create Production Set window, select the Numbering tab, and the Imported scheme.
In Numbering import the number either from the Item Number (metadata) or another Production Set. Your imported ID’s will be converted to Formatted Document ID’s.
In Page numbering select to insert a symbol ( ), ( _ ), (,) (-) or have nothing before your page numbers. Then page numbers default to 0001, but you can customize this too.
Select Include on first page to number the first page of your Production Set; otherwise clear the setting.
Define imaging for a Production Set
On the Imaging and Production tab you apply the numbering settings and imaging and production profiles to a set of items. Once you apply the setting, you can then image the items using the Production View.
To define imaging for a Production Set:
Open the Create Production Set window, and select the Imaging and Production tab.
Define options as follows:
| Options |
Action |
| Printed images |
To use an imaging profile, select Imaging profile. It allows you to select a customized imaging profile from the list. Click the Configure option to manage the imaging profile through Global Options. Select the box next to Do not export natives of slip-sheet items to prevent natives of slip-sheet items from being exported. |
| Production Settings |
To use a production profile for exporting, select Production profile. It allows you to select a production profile from the list. Click Configure to manage the production profile through Global Options. Internal settings allow you to set stamping and Markup Settings, Image Export Settings, and Text File Export Settings. See Manually set production settings for more details. Select None if you choose not to use a production profile. |
| Parallel processing settings |
Configure the number of workers (based on your license), the amount of memory you want to allocate and the temp directory that should be used for the Imaging/Production tasks (if chosen). Also, you can configure an external worker machine if available |
Edit a Production Set
When you need to modify an existing Production Set, you select it to open the Edit Production Set window and see the same tabs and fields as on the Create Production Set window. See the proceeding Create Production Set section for details.