Configure GUI settings
You access all GUI-related settings in this section from the top panel of the Global Options window. It allows you to configure global settings for the following:
Search settings
Document Navigator pane settings to show item counts
Results pane settings
Context settings
Preview pane settings
Tagging settings
Default Tabs settings

Set global Search settings
The Search settings you access from Global Options allow you to dictate how all your future searches are conducted, that is what items and which fields to include in any search. The options you select then remain in place and in effect for all cases until you update them.
To set search settings from Global Options:
Go File > Global Options.
From the top panel of the Global Options window, select the Search option.
The following options appear allowing you to specify settings for the data you want to include in or exclude from searches, and the resemblance threshold for working with near duplicates:
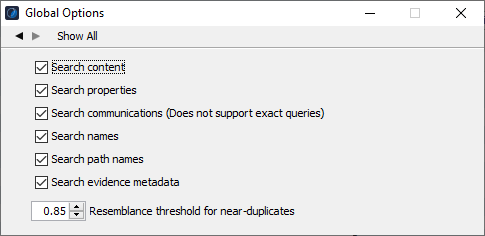
Select any of the following check boxes to define how you want to define your future searches:
| Option |
Action |
| Search content |
Select to search the content or text of indexed documents. |
| Search properties |
Select to search the properties of indexed documents. |
| Search communication (Does not support exact queries) |
Select to search communications that include or exclude communications metadata in the search results. For example, if you enter 'XYZ' in the Search bar, this returns results that include communications with 'XYZ' in the To, From, Cc, Bcc, and Sender fields. Note: This option is independent of the communication metadata present in the item 'properties'; and while not supporting exact queries, it lets you search for your query without using single quotes ('). |
| Search names |
Select to search the Name field of indexed documents. |
| Search path names |
Select to search on the Path Names field of indexed documents. |
| Search evidence metadata |
Select to search the evidence metadata or user-defined data section of indexed documents. |
| Resemblance threshold for near- duplicates |
Set a resemblance value for the level of similarity needed to find near-duplicate documents. The value ranges between 0 and 1, with 1 targeting almost identical documents. (Default value = 0.85.) |
Configure item count updates in Document Navigator pane settings
From the Global Options window, select the Document Navigator option to open a window in which you enable automatic updates of item counts of any item you select. The number of check boxes you select then can influence how quickly the case opens up and performs.
To set item count updates for MIME-types that list in the Document Navigator:
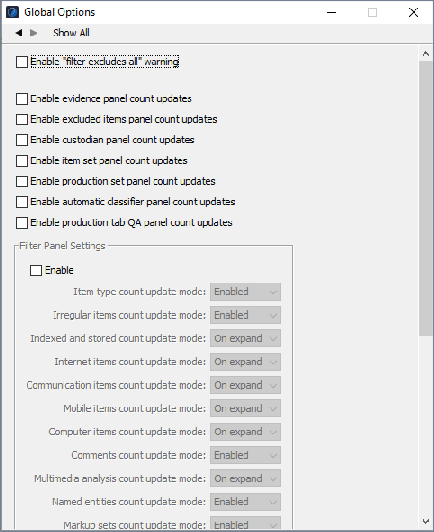
Under Filter Panel Settings, select Enable to activate the Item Count Update mode for the items contained in this pane, such as irregular items, comments, and named entities.
For each type of filtered item, select one of the following update modes:
Enabled
On expand
Disabled
Note: All enabled item counts run queries against the data. The more counts you enable, the longer results take to return. This can make the main user interface slow. Only work with item counts you really need and leave the rest set to On expand or Disabled.
Configure Results pane settings
Select the Results option to manage how Nuix Workstation presents large datasets in the Results pane by setting viewing limits. You can select options to enable:
The Show Ancestry and Annotation column check box
The Show immaterial items in results check box.
The Viewer Limits section allows you to manage large datasets when viewing items in the Results pane to make review and analysis tasks more manageable. You can set the following maximum values:
Results table row limit: To change the number of items you want to appear in the Results table (Default maximum = 1,000,000, and default minimum = 10,000.)
Increase the number for very large datasets. If you have more items than the maximum defined limit, this status message appears at the bottom of the table: Displaying X items, truncated from Y.
Networks node limit: To change the number of nodes to appear in the Networks view. (Default = 500 items; minimum = 10 and maximum = 10,000.) After the Networks view opens, adjust it to show more or fewer nodes based on your system speed.
Under Map View, enter the URL of the offline maps tile server. To install Offline maps, see the Map View section.
Configure Context settings
Select the Context option to configure the Context graph and Workbench limits, customize analysis links between items, and the text against vertices.
Context Graph Options: Set the width and height of icons in the graph using values between 16 and 500; or use thumbnails as item icons in the Context tab.
Context Workbench Limits: Set the maximum number of items to appear in the Context view by setting a Context table row limit and the threshold to group nodes in the graph.
Custom Analysis Links: Set and enable custom analysis links between items.
Custom File Type Display Text: Add display text for vertices.
To add an item that defines a MIME-type to automatically link in the Context Graph:
Click the plus sign (+) to open the Analysis Links dialog.
Select the MIME-type and Metadata Group (Nuix-defined Metadata, Communication Metadata, or Properties).
Select your Metadata Type from one of the Nuix-defined Metadata fields in the menu.
Repeat this process for a second MIME-type metadata and click OK to add these entries to the existing list.
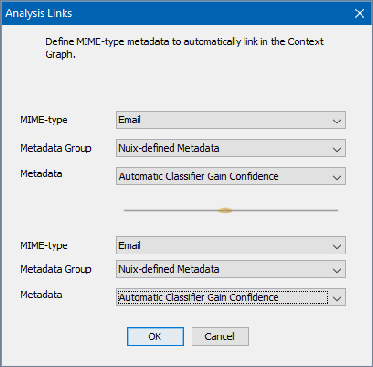
To edit an entry, select it and click Edit to modify details in the Analysis Links dialog. Click Import/Export to import and export the custom analysis links.
For more details, see More Context tab options from Global Options in Context tab.
Configure Preview pane settings
Select the Preview option to set options for viewing items in the Preview pane.
| Option |
Description |
| Enable duplicates, similar and related counts |
Calculates and displays the number of duplicates when showing items in the Preview pane. |
| Enable cluster counts |
Calculates and displays the number of clusters when showing items in the Preview pane. |
| Show data runs in metadata |
Displays a metadata field called 'File Cluster' which lists the clusters that a file was recovered from. |
| Enable native viewer |
Select to enable the use of a native viewer (external application) to view an item. A warning acknowledges the risk and responsibility of authorizing third-party external applications to open items in their native format. This i system may be prone to malicious files and you are solely responsible for any damage caused by opening files with third-party external appl launched from Nuix Workstation. To confirm you want to enable this feature, click OK. It overrides the setting to use the native viewer by de set. |
| Break phrases into words when highlighting |
Highlights individual words rather than whole phrases. |
Configure tagging settings
Select the Tagging option to configure if family and duplicate counts display when the Tagging dialog appears.
Select the Enable family and duplicate counts option to control the counts on the Review and Tag panel. This helps Nuix Workstation perform better.
Configure settings to display default tabs
Select the Default Tabs option to set the tabs that appear by default when a new case opens in Nuix Workstation. You can select any of the following tabs to display by default:
| Option |
Description |
| Workbench |
Hosts the primary tasks of excluding, filtering, and searching for data in the case. You can also analyze data, preview individual items, and tag from here. By default, set to display when you open a case. |
| Context |
Allows you to visualize the data links between files in the case. |
| Statistics |
Displays information about the processed and irregular files by file type, including number, processed, corrupted, and encrypted, and a percentage of each file type encountered. |
| Fast Review |
Allows you to create jobs that can be batched together for review by investigators. For each job, you can specify tags and words to highlight. You can then associate items with each job, and those items are presented in a linear fashion for tagging. |
| Search and Tag |
Allows you to search processed data using queries and tag the results for future reference. |
| Production |
Enables you to create a new production set. |