Configure Metadata Profiles and their templates
Like the other profiles you can access and use from the Global Options window, the options detailed in this section facilitate repetitive processes and allow you to achieve a faster overall user experience.
The following table summarizes what you can do in this section:
| Global Option |
Icon |
Details how to... |
| Custom Metadata Templates |
|
Configure a Custom Metadata Template Apply a Custom Metadata Template to an item |
|
Metadata Profiles |
|
Create a Metadata Profile Import one Export one |
|
Metadata Import Profiles |
|
Create a Metadata Import Profile, defined by the following as its source data: A Concordance load file A CSV or TSV file An XML file A JSON file A database (also mapping its columns and values) Import metadata using a Metadata Import Profile |
|
Metadata Export Profiles |
|
Configure export rules for a Metadata Export Profile |


Also see Work with metadata for the following:
Kinds of metadata, and the operators to use
How to add a scripted Metadata Profile
How to view metadata
How to search on metadata item properties
How to add, edit, delete, and search on nested metadata
How to import a Metadata Profile by running an API script
Also see Appendix E: Metadata unavailable for upfront processing for additional information.
How to work with Metadata Profiles and Metadata Templates
You can save, store, and share Metadata Profiles and Custom Metadata Templates using the import and export functions. The following are scenarios of when you would import or export a Metadata Profile:
To reuse one or more profiles across different computers. For example, displaying metadata for Fast Review jobs.
To facilitate consistent views for specific file types. For example, emails, files, internet caches.
To align with specific client metadata requirements such as Legal export or Summary reports.
To provide case-specific documentation, when included as a client deliverable to demonstrate process.
Metadata Profiles and Custom Metadata Templates are stored in the following directories:
Windows Vista/Windows 7
%AppData%\Nuix\Metadata Profiles
%AppData%\Nuix\Custom Metadata
Windows 2000/XP
%UserProfile%\Application Data\Nuix\Metadata Profiles
UserProfile%\Application Data\Nuix\Custom Metadata
Each profile or template is stored as a *.profile file. These files are portable and can be used on any system running Nuix Workstation.
Create a Custom Metadata Template
Select the Custom Metadata Templates option to add custom metadata fields you wish to see regularly in the Results pane to reflect the information you want to search on in your case data. This is useful when you want to name categories of data according to your company's naming conventions or your particular investigation's requirements.
You can create custom metadata fields or custom metadata templates for ease of use when bulk coding. These are user-defined metadata properties that you can create for storing additional user-created metadata in your case. You can modify or update these values at any time when working on a case.
For further information, see the other subsections of this section, sections related to working with custom metadata in Items menu and Work with metadata. To create a Custom Metadata Template:
Go to File, select Global Options then select the Custom Metadata Templates option.
At bottom left of the Global Options dialog, click the plus (+) sign to add a template.
As the available Scope of the profile, select Case, User, or Local Computer.
Click OK to open the Add Custom Metadata Template Field dialog.
Click the plus sign (+) to add the fields as follows: In Field name, name the field according to your requirement.
In Data Type, define the kind of data to be entered in the metadata field as one of the following:
Integer
Float
Date
Text
Boolean
In Values, specify the value for the selected data type or select Unrestricted - Options to add multiple values.
In Default value, select a default value if you prefer the field to hold a preset value instead of no value or be blank. or
Select field is allowed to have no value if you want the field to be empty; otherwise, add a value for this field when using the template.
Click OK.
Apply a Custom Metadata Template to an item
On creating a Custom Metadata Template, you can apply it to previewed or bulk items. To apply the Custom Metadata Template to an item:
Select the required item in the Results pane.
In the Preview pane, select the Metadata tab, and click Apply Custom Metadata Template.
In the Apply Custom Metadata Template dialog, do the following:
In Template name, select the required template.
Against If a field already exists, either select Retain the previous settings or Overwrite previous settings using this template.
Click Apply to apply the template to All fields in the template or Selected fields only. The custom metadata is added to the field and appears in the Metadata tab.
Create a Metadata Profile
Metadata Profiles enable you to configure profiles for metadata fields. You can:
Create a Metadata Profile specifically for the Case, User, or the Local Computer. Edit an existing Metadata Profile
Export or import a previously defined Metadata Profile as a file.
For further information on metadata, see Work with metadata and Analyze evidence. You can access Metadata Profiles from the following locations:
From the Global Options window's fourth panel, select Metadata Profiles.
From a right-click of a column name in the Results View, and selecting Choose Column Profile, then Edit Metadata Profiles. From the Preview pane, select the Metadata tab, which also displays the metadata fields associated with each item.
To create a Metadata Profile:
In the Metadata Profiles dialog, click the plus icon (+) to add a profile.
Select Case, User or Local Computer as the available Scope for the profile.
In the Create (or Edit) Metadata Profile window, click the plus icon (+) to select the required Metadata Type.
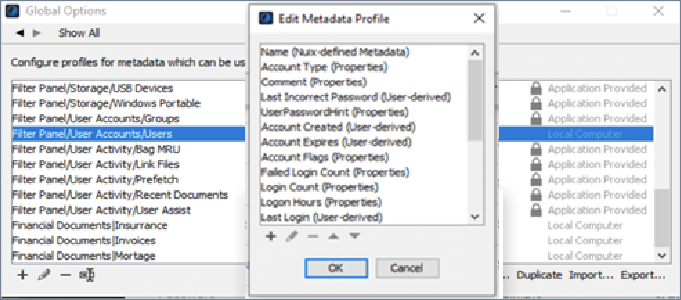
Select the required metadata using the Filter option and click OK. The selected metadata is added to the profile.
At the bottom of the Create (or Edit) Metadata Profile window, click any of the following buttons to action selected metadata:
Pencil icon to modify or update the selected metadata.
Minus icon to delete the selected metadata.
Up arrow to move the selected metadata up the list.
Down arrow to move the selected metadata down the list.
Rename the profile as required and click OK to save the profile.
Actions to perform on an existing Metadata Profile
From the bottom of the Global Options dialog, the following are actions you can perform on the Metadata Profile once it is saved, or later when you open it:
| Action |
Action |
|
|
Click to modify or update the selected metadata profile. |
|
|
Click to permanently delete the selected metadata profile. |
|
|
Click to rename the selected profile. |
| Move |
Click to move the selected profile to another scope. |
| Duplicate |
Click to create a copy of the selected profile. |
| Import |
Click to import a Nuix metadata profile file. |
| Export |
Click to export the Nuix metadata profile file. |


Import a Metadata Profile
Click the Import link at bottom right of the Global Options dialog to select and import a particular Metadata Profile into your case where existing items are matched by a defined parameter such as item GUID. This action is distinct from the following Create a Metadata Import Profile topic.
Export a Metadata Profile
Click the Export link at bottom right of the Global Options dialog to select a CSV Metadata Profile file to export to an external database while processing occurs. This action is distinct from the following Create a Metadata Export Profile topic.
Create a Metadata Import Profile
You use a metadata import profile to import metadata into a case where existing items are matched by a defined parameter such as item GUID. You can create a Metadata Import Profile based on a file type or a database. Depending on your selection of File or Database type, the relevant fields auto-populate for you to complete.
To create a Metadata Import Profile:
From File, select Global Options, then from the fourth panel of its window, select Metadata Import Profiles.
In the Metadata Import Profiles dialog, click the plus icon (+) to add a new Metadata Import Profile.
As the available Scope for the profile, select Case, User or Local Computer.
The Add Metadata Import Profile window opens with its Data Source, Column Mapping, and Value Mapping tabs that allow you to categorize the attributes you can add to this profile.
On the Data Source tab, select either File or Database as a data source type.
If a File type, the supported data sources you can choose from include:
Concordance load file
Comma Separated Values file (CSV)
Tab Separated Values file (TSV)
XML file
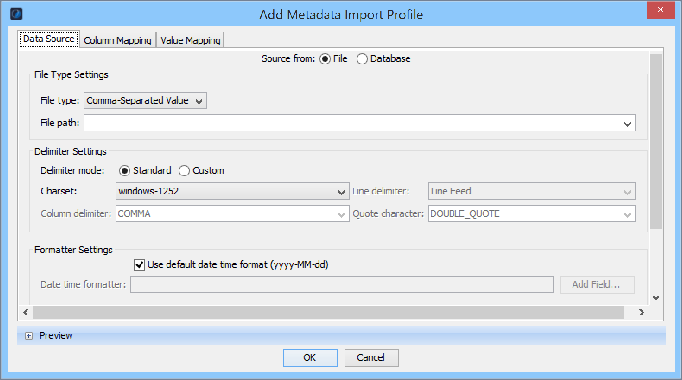
JSON file
If a Database type, the supported data sources you can choose from include:
MariaDB database
MSSQL database
Note: Fields on this dialog auto-populate according to your selection of File or Database type. See the following subsection for how to complete the necessary fields for each file type or database type.
Define a Concordance load file as source data for a Metadata Import Profile
To complete the details for a Concordance file as the source data for a Metadata Import Profile on the Add Metadata Import Profile window, see the Nuix Workstation Guide to Legal Load File Exports.
Define a CSV or TSV file as source data for a Metadata Import Profile
At Step 4 of the preceding Create a Metadata Import Profile, the fields you complete for a CSV or TSV use the same options as those for configuring a Concordance load file, but with these differences:
The Opticon file field is disabled.
The Digest settings are hidden
Both the Extract natives settings are hidden.
See the previous Define a Concordance load file for a Metadata Import Profile subsection for these details.
Define an XML file as source data for a Metadata Import Profile
For an XML file as the source data for a Metadata Import Profile, complete the following details on the Add Metadata Import Profile window:
At Step 4 of the preceding Create a Metadata Import Profile, select File and File type XML.
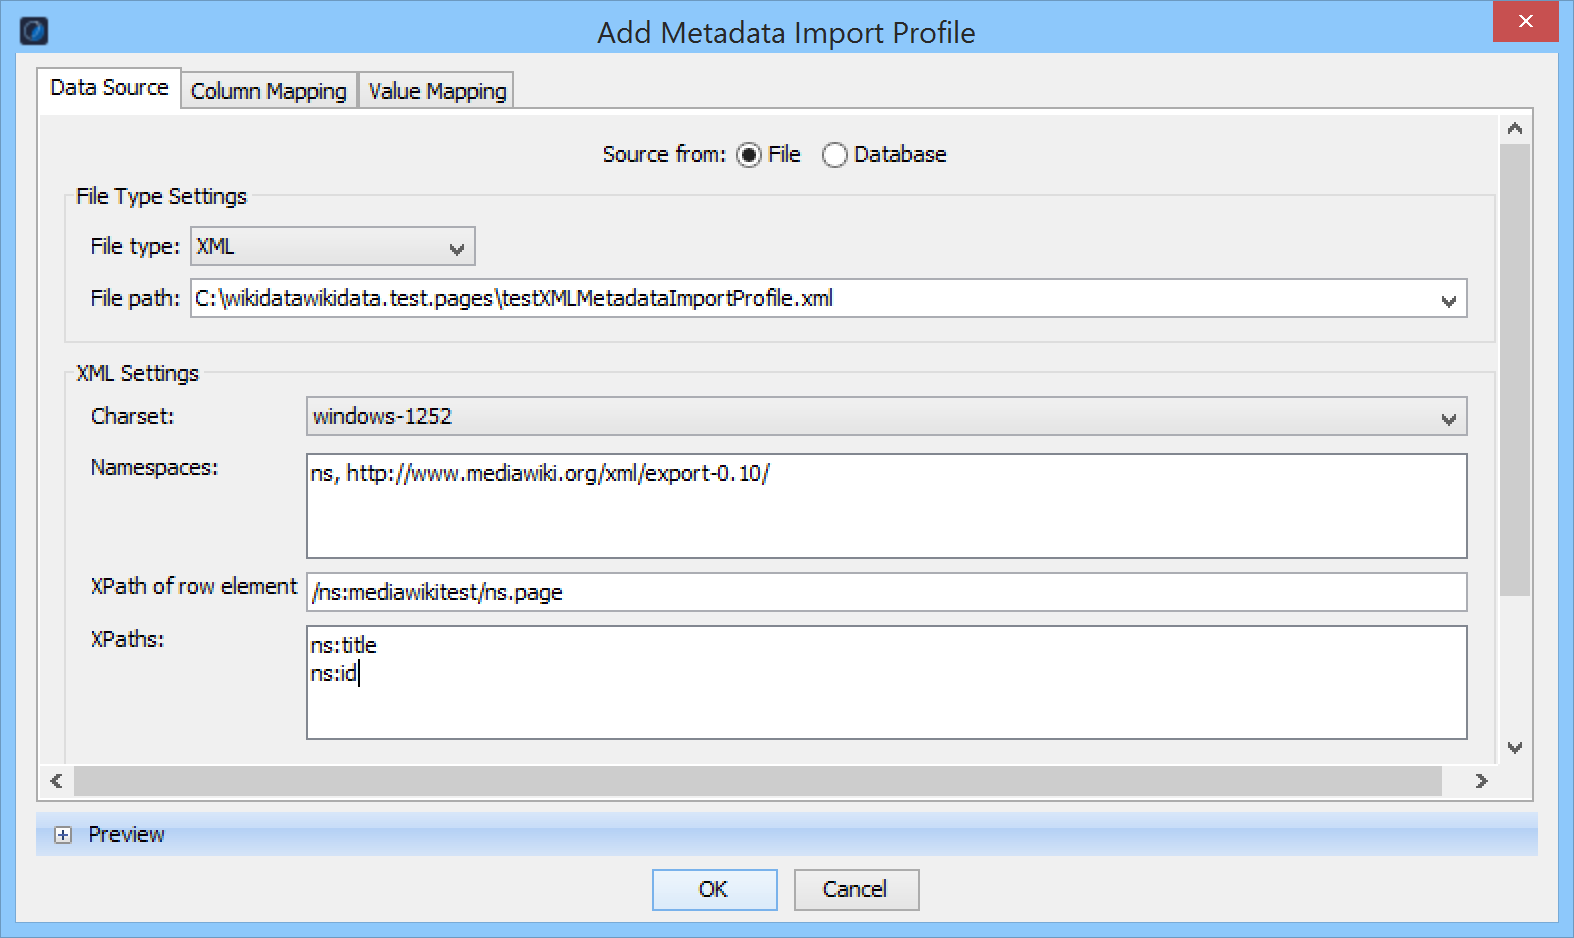
In File path, browse to and select the relevant XML source file.
In Namespaces, optionally enter XML namespaces for the XPaths, where each entry must contain a prefix and the URI, with a comma separator. For example: ns,http://www.mediawiki.org/xml/export-0.10/
In XPath of row element, enter the path to be used to select records, where each record is a line item, and the XPath is absolute. If you use a XPath namespace prefix, it must match one of the namespace prefixes in the Namespaces field.
Example with namespace prefix: /ns:mediawiki/ns:page
Example without namespace prefix: /root
In XPaths, enter the paths to be used to select the elements or attributes in each record, where they can be either:
An absolute XPath if the element or attribute is not in a row's context.
For example: /ns:mediawiki/ns:siteinfo/ns:namespaces/ns:namespace/@key
A relative XPath in the current context, for example: ns:title
If you use a XPath namespace prefix, it must match one of the namespace prefixes in the Namespaces field. Other examples with a namespace prefix include:
ns:id ns:revision/ns:id
ns:revision/ns:timestamp ns:revision/ns:contributor/ns:username ns:revision/ns:model
Define a JSON file as source data for a Metadata Import Profile
For a JSON file as the source data for a Metadata Import Profile, complete the following details on the Add Metadata Import Profile window:
At Step 4 of the preceding Create a Metadata Import Profile, select File and File type JSON.
In Row-level JSON Path, optionally enter the path to be used to select records in a JSON document, where each record is a line item, and the JSON Path is absolute.
For example: $.links.*
In JSON Paths, enter the paths to be used to select the elements or attributes in each record, where they can be either: A relative JSON Path in the current context. For example:
id description
An absolute JSON Path if values are not in a row's context. For example:
$.title
$.templates[*].name
For more information on writing a JsonPath query, see https://github.com/json-path/JsonPath
Define a database as source data for a Metadata Import Profile
This configuration involves configuration on three tabs: the Data Source, the Column Mapping and the Value Mapping tabs to define either a MariaDB or a MSSQL database.
To add a database as source data for a Metadata Import Profile:
At Step 4 of the preceding Create a Metadata Import Profile, select Database as a source, then select the Type: MariaDB or MSSQL.
In Server, enter an IP address, database server name, or localhost if it is a local database.
In Port, enter the number that the database server is listening on.
Enter the User name and Password.
In Database, specify the name of the database that you are connecting to on the server.
In Query, specify a valid query for retrieving data from one or more tables.
For example, it can be just "Select * from Table01" or you can join multiple tables and specify conditions with a "where" clause.
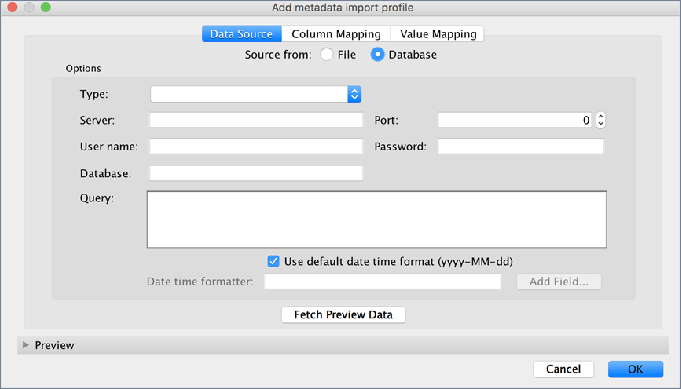
Select Use default date time format (yyyy-MM-dd) or manually enter a date-time format and click Add Field to add additional formats.
Click Fetch Preview Data to preview the data.
The following image shows example MariaDB data in a collapsible Preview panel, in which you can:
Define the number of rows you want to see.
Switch between showing the Original or Modified data source columns if set up to be different in the Column Mapping tab.
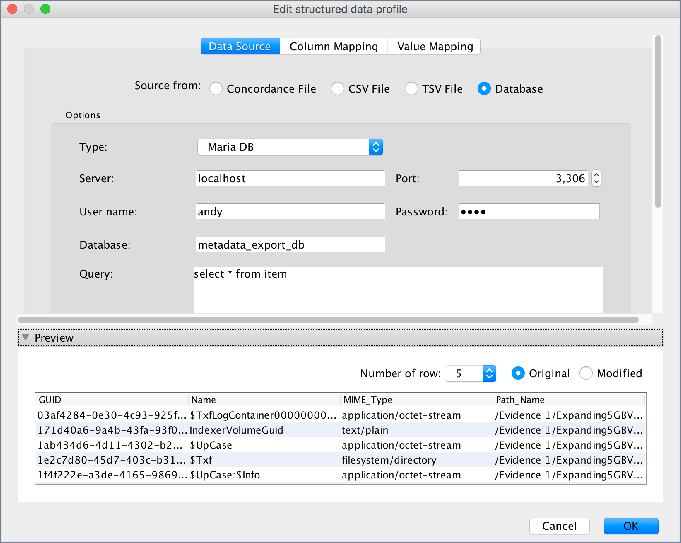
Click OK.
To set up the column mappings, see the following Map columns for a Metadata Import Profile using a Database source subsection for details.
To set up the map values, see the following Map values for a Metadata Import Profile using a Database source subsection for details.
Map COLUMNS for a Metadata Import Profile using a database source
Column mapping maps the source column to the destination column.
By default, the source column and destination column are the same. Set the Import flag if you want the column to be imported. The data type derives from the source data. For MSSQL, the data type is based on the table column metadata. For CSV and TSV, some heuristics are applied to derive the data type when the preview data is fetched for the first time, which may not be accurate.
Warning: To pre-populate, the column mapping in the Column Mapping tab, click Fetch Preview Data.
To edit the column mapping:
The Source Column is derived from the source data (which you cannot change).
The first line of the CSV file contains the source column. For MSSQL, the table column names or SQL projection names become the source columns.
Select Import to include the column during an import.
The Destination Column is the same as the source column by default (which you cannot change). The destination column is in bold text if it is not the same as the Source Column.
Enter a value from the Data Type.
If the data value does not convert using the value mapping, then it must be compatible with the data type otherwise a data conversion error may occur.
Click OK to save the profile.
Map VALUES for a Metadata Import Profile using a database source
A value mapping maps the original value to a new value. For example, the source data may contain an integer value of 0 to represent false and 1 to represent true. However, to save the value as Boolean, you must convert the integer value.
To add a value mapping to convert the value as Boolean:
Click the plus sign (+) to add a new row.
Select the Source Column to auto-populate the Data Type (which you cannot change).
Enter the Original value and the New value.
To delete a value mapping, select the row and click the minus sign (-) button.
Click OK to save the entire Metadata Import Profile.
Import metadata using a Metadata Import Profile
To import metadata using a Metadata Import Profile:
Select File, then Import and Import Metadata. The Import Metadata dialog opens.
From the Metadata import profile list, select a profile.
From Metadata type for importing, select either of the following:
Tag and then Prefix column name on value if you want to prefix the column name to the column value.
Custom metadata
Select the Destination column to identify the item for which the tag or custom metadata is added.
Select the Item property to identify the destination column as either a GUID, an Item Number, an MD5 hash, or a Production Set Document ID.
Note: If you selected Production Set Document ID as the Item property, you must also select the Production Set.
Select Ignore if no matching item for row if you want no errors to be raised when an item is not found.
Click OK to import the custom metadata.
Also see Import a Metadata Profile by running an API script in Work with metadata.
Configure export rules for a Metadata Export Profile
You can configure rules for how to export a Metadata Profile to export its data to an external database while your processing occurs, and you can use it when creating a case.
To view the list of metadata currently unavailable for upfront processing, see Appendix E: Metadata unavailable for upfront processing.
Note: Spaces and hyphens in metadata are replaced by underscores in the table.
For example, File Extension (Corrected) and MD5 Digest (Latest) is stored as File_Extension_(Corrected)_and_MD5_Digest_(Latest).
The result should be enclosed in quotes → "File_Extension_(Corrected)_and_MD5_Digest_(Latest)".
For MariaDB, use the grave accent key ( ` ), and for MSSQL, use double quotes ( " ), as the quotation style depends on the RDBMS you use.
To configure a Metadata Export Profile to an external database:
From File, select Global Options, then from the fourth panel of its window, select Metadata Export Profiles. A default Metadata Export Profile appears.
Select this profile and click the Edit icon.
In the Database Connection section:
Enter the details of the database into which you want to export the metadata.
Click the Test Connection link to ensure the database connects successfully.
In the Export Rules section, configure your item conditions as follows:
Export: Select to have the processor perform the export on items matching the rule.
Cascade: Select to continue to review the rules table to find another matching rule instead of stopping when a match is found. This allows you to export an item multiple times.
Metadata Profile: Select the default metadata profile or as pre-selected.
Table Name: Displays the names of tables connected to the configured database if the test connection (at Step 3b) was successful.
If you make changes to any table name, you must re-test the connection. You can add multiple rules to map to different tables, so that:
All matching rules are matched.
Any rules marked 'Cascade' are cascaded and matched.
If an export rule is matched, continue to go down the list of rules and continue matching.
If there is no match, matching stops and all rules under the unmatched rule are ignored, ending the process.
If there are two rules that export to the same table, the second rule is ignored, to avoid issues with rewriting to the same table.
Select Validate Mappings to verify that a table exists in the database and contains the metadata identifiers in the profile.
For example, if the profile contains Name, GUID, and File Type, the table must have columns matching the metadata identifier. For identifiers consisting of multiple words, this depends on the database's naming convention.
Click OK.
How Nuix Workstation applies the rules of a Metadata Export Profile
The following flowchart represents how the Rules are applied to an item:
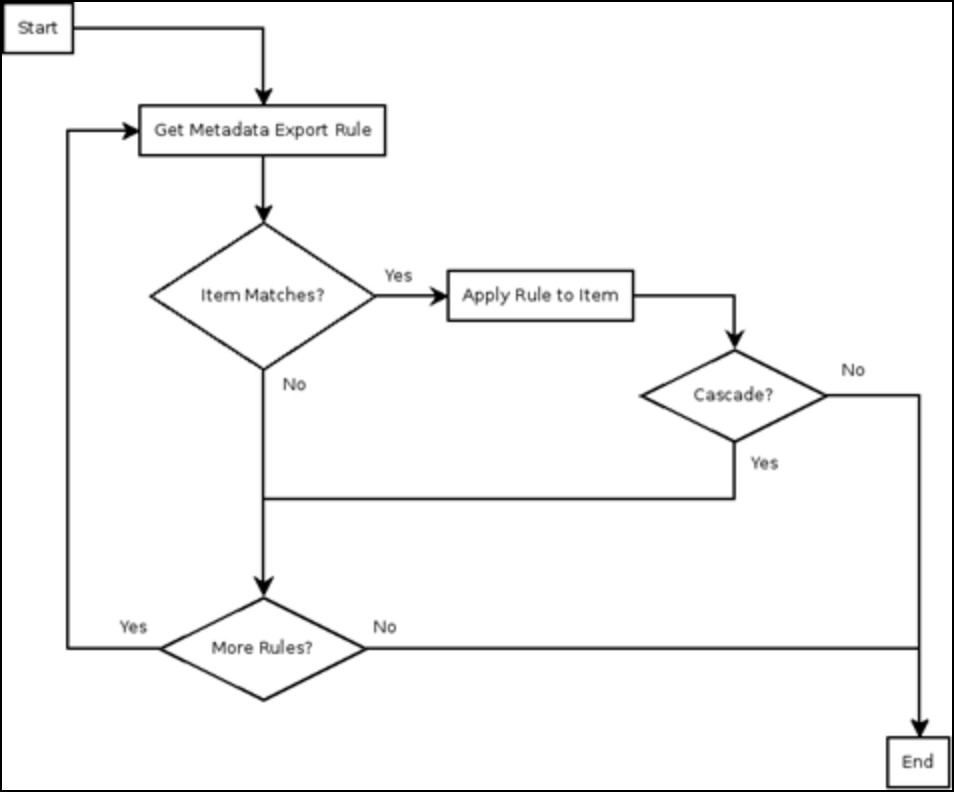
Every table needs a primary or unique key or a column named GUID which cannot be nullable. If neither of these conditions are met, the following error may appear: GUID column in table item is nullable. If any item fails to be exported, it is marked as 'Failed' with the reason why it did.