Search and Tag tab
This section covers:
What you can do from a Search and Tag tab
The elements of a Search and Tag tab
How to set options for running a Search and Tag query
How to create and modify tags for a case
How to save or export a Search and Tag query
How to import a Search and Tag query
In Nuix Workstation, tags are a type of user-defined metadata used to classify an item after you have reviewed it. You use the Search and Tag tab to search processed data using queries, and then tag the results for future reference. This allows you to target information you want to investigate, which is especially useful when you run a report of the tags used as the tag counts provide a good idea of what to focus your further investigation on. You can search by individual keyword, proximity, or freeform queries, or by a valid 'Search and Tag' CSV or JSON file to run multiple search queries at once.
You can save a new or modified Search and Tag query for a case to the following file types or import such a file in these file formats for use in your case:
CSV: A comma-delimited file similar to an excel-type format.
JSON: A file where a value name is paired with a value, making the search portable, and providing consistent results across all installations.
Search and Tag queries are able to search on:
GUI fields listed in the Search under Global Options (content, properties, names, pathnames, and evidence metadata).
A common set of four fields used in the Scripting API and elsewhere in scripting searches.
Note: Nuix Workstation Guide to Searching in Nuix Products
See this guide for detailed information on the various search techniques and syntax you can use to define queries that extract accurate results when searching in Nuix products that use the engine to run queries. These products include Nuix Workstation, Nuix Automation and Nuix Investigate. The syntax is easy-to-use and is illustrated in this guide with examples.
What you can do from a Search and Tag tab
On opening a Search and Tag tab for a case, you can do the following from its menu bar:
Create and delete tags to run against a particular query.
Re-order the order in which you want the tag queries to run. Clear tag and query information in the table.
Click Advanced to build more complex queries using the Advanced Query Builder.
Click Settings to access the Search and Tag Settings dialog to specify the search's scope, the action to run, and validation you require. You can also expand any tag using a prefix or suffix, or both, to target the result count more efficiently and reduce the tag count in the Results view.
Click Import to open and use any preconfigured tag and query you want to run, including one that you save after newly creating or modifying it. Click Save to save these tag queries as a CSV or JSON file. This effectively is exporting the file.
To implement the information in this section, see Search inside evidence and Tag or code evidence.
Elements of a Search and Tag tab
The Search and Tag tab consists of:
The Search and Tag table and its controls, in which you create tags and manage them. Advanced Search fields and a Scoping Query field, in which to define your query.
Search and Tag settings: To set options for running a Search and Tag query.
Search and Tag actions: To import and save a Search and Tag query.
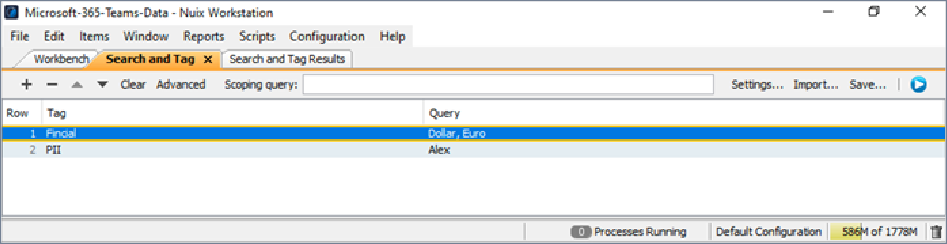
Search and Tag table and its controls
The Search and Tag table consists of rows of queries with tags.
On adding a row, (see the following controls table), double-click the row’s tag field to enter a tag and the query field to enter the query. To execute the query, click Run. Then the table inthe Search and Tag Results pane lists the number of hits. It can contain blank rows to create separate sections so Nuix Workstation ignores those rows when you run the table. See the following Create and modify tags for a case for step-by-step details.
The basic controls include adding and deleting rows to the table, moving an entry, and clearing the table.
| Control |
Explanation |
|
|
Click to add a row to the bottom of the table. If you select a row while adding, then the new row is added below the selected row. |
|
|
Click to delete one or more selected rows from the table. |
|
|
Click to move one or more selected rows up. |
|
|
Click to move one or more selected rows down. |
| Clear |
Click to clear all current rows from the table. |
| Advanced |
Click to open the Advanced Query Builder. See Use the Advanced Query Builder under Search inside Evidence for more details. |


Scoping query
The Scoping query field limits the scope of all direct matches in the table rows and applies only to direct matches. Items that you drag in as families and top-level items are not limited by the scoping query you enter.
Search and Tag settings
These settings allow you to set options for running a Search and Tag query. You access them by clicking Settings on the tab’s menu bar to open the Search and Tag Settings dialog. See Set options for running a Search and Tag query for all details about these settings.
Set options for running a Search and Tag query
To set options for running a Search and Tag query:
To open a Search and Tag tab, go to Window and select New Search and Tag Tab.
Click Settings on the tab’s menu bar to open the Search and Tag Settings dialog.
Hover over any field in this dialog (except the last ‘Matches’ fields) to display a tooltip on the result of selecting that option.
Tip: Hover up or down fields to see the previous or next tooltip. If you lose seeing a tooltip, refocus out of the dialog, return to it, and hover again to see the tooltips.
As wanted, make your selections from the following Search and Tag settings (where all fields are optional):
| Settings |
Options |
| Query Scope |
Select one of the following options: Include Families: To match top-level, family items of all items that match a query. In addition to direct matches, this option reports on any indirect family item and indirect top-level item matches. Deduplicate families: Only available only if you select Included Families, it deduplicates top-level items of raw matches and then matches them to their families. Omit excluded items: To omit excluded items from all results. Omit immaterial family items: To omit immaterial items from the family item and deduplicated family item matches. Unique items: To tag items that match only one query and do not match any others. Responsive items: To count responsive items. For deduplicated columns, this is a total count deduplicated by top-level items across all queries. For non-deduplicated columns, this is the same as the total affected items summary. |
| Action |
For items that match a query, select from the following options: Add tag If selected, enables Create tags even if no items match query. Select if you want to create all tags even if no items match an individual query. Leave unselected to create a tag if at least one item matches its associated query. Remove tag If selected, enables Remove empty tags from case. Select if you want to completely remove empty tags from the case. No Action Show tag name columns in the results: (Default). Select to show the tag name column in the results. Tag Responsive Items: Only enabled only if you select to query Responsive items. Select to tag all matches (where tag expansion rules apply). |
| Validation |
Select options as follows: Allow duplicate tags: Select to permit duplicate tags but not full duplicate tag and query combinations. Clear if you want every tag in the table to be unique. Allow duplicate queries: Select to permit duplicate queries but not full duplicate tag and query combinations. Clear if you want every query in the table to be unique. If you want to flag a missing tag from the table, select one of the following options: Fill with query: To fill the missing tag with the matching query. Fill with row number: To fill the missing tag with the matching row number. Show validation error: To display a validation error for missing tags. |
| Expand Tags |
Select this option to expand tags in a row that are unique but related to tags for family items, top-level items, and similar items, then select how to match your tags: Direct matches: To return items that directly match the criteria in the search settings. Top-level matches: To return items that include the highest-level ancestors for the selected criteria. Family matches: To return items that include all child items of the selected criteria. Deduplicated top-level matches: To return items from top-level matches and deduplicating them. Deduplicated family matches: To return items from family matches and deduplicating them. Unique matches: To return items that match one and only one of the given search and tag rows. Note: If you do not select Expand Tags, then direct, top-level, and family counts combine and can result in higher counts. With Expand Tags enabled and clearly labeled for each, then family results match family tag counts (direct matches direct and top matches top as well). See the following Create hierarchical tags by appending Prefix and Suffix tags section for details on how to expand your tags for greater searchability. |
Create and modify tags for a case
Create tags for a case on the Search and Tag tab
Note: This is distinct from creating tags from the Review and Tag pane. See Tag or code evidence.
To create tags from scratch for a case:
Go to Window and select New Search and Tag Tab.
A Search and Tag tab opens with other opens tabs for your case.
This tab opens with blank fields if you have not opened this tab before for your case.
If you have already entered tags and a query against each, then the table displays all pre-saved data.
In empty Row 1 do as follows:
Double-click in the empty Tag field and enter a value for your first tag.
Double-click in the empty Query field and enter criteria for your first query.
See Advanced Query Builder in Search inside evidence for details on how to enter one. A validation error appears to notify you if any query syntax is invalid.
Repeat for the next five rows or as necessary, until you create as many tags as you need.
Click + to add another new row and complete its Tag and Query fields.
To separate sections of tag queries in the resulting Results table:
Click + to add a blank row.
Use the Up or Down arrows to move it under a particular row number.
Select one or more rows and click the Run button (arrow in blue circle) to execute those queries. OR click the Run button to execute all listed queries.
When you run the table, Nuix Workstation ignores the blank queries, but separates the tag queries.
Results populate in real-time during the search and tag operation. The depth of results shown depends on the search options you configure.
Click Save to save these tag queries as a .csv or .JSON file. See the following Save or import a Search and Tag file section for more details.
Create hierarchical tags by appending Prefix and Suffix tags
To assemble tags into families of related tags and give you more searchability, expand a tag by appending a prefix or a suffix or both to it. To create hierarchical tags:
Follow all steps of the previous Set options for running a Search and Tag query, noting that what you select in the Query Scope section allows you to enable or disable which Prefix and Suffix fields you can enter for the adjacent 'Matches' option.
Select the Expand Tags option and then select one of the 'Matches' options for how to match your tags.
Optionally add either a prefix or suffix or both in the appropriate cell or cells, to expand their tags and switch them ON, using the pipe symbol “|” per the following examples:
Prefix examples:
“tag 1|raw hits”, “tag 1|top-level hits”
Suffix examples:
“raw hits|tag 1”, “top-level hits|tag 1”
Example of a prefix and suffix together:
“batch 1|tag 1|raw hits
Conversely, delete any existing prefix or suffix to turn those tags OFF.
Modify existing tags to search on for a case
To modify tags for a case that already contains some:
Open your case and its Search and Tag tab.
Click + to add an additional row, and complete its Tag and Query
Click - to delete an existing row you no longer need.
Select any row and click either the Up or Down arrows on the tab’s menu bar to move the order in which you want to run your tag queries.
Click Save to save this modified set of tag queries as a .csv or .JSON file. See the following Save or import a Search and Tag file section for more details.
Save or import a Search and Tag query
From the menu bar of a Search and Tag tab, you can click the following buttons:
Import: To Import a Search and Tag query as either a JSO
N or CSV file.
Save: To save a new or modified Search and Tag query for later reuse as a JSON or CSV file. This effectively is exporting the file.
Import a JSON or CSV Search and Tag query
JSON files make search and tag more portable and provide consistent results across all installations. They can have preferred settings. Then:
If no previous data exists in the table, the imported data uses settings from the JSON file (if present).
If the table already contains data, the imported data ignores the settings from the JSON file and uses the settings from the existing data.
The following image shows the format:
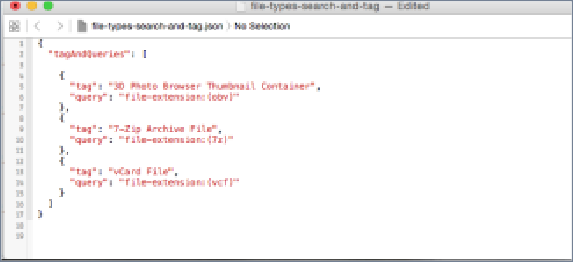
CSV files come in a format that does not retain any settings. If the table already contains data then new rows append to the end of the table and existing rows and settings stay intact, showing two columns (with no header row), where:
Column 1 contains the tag name and supports the use of nested tags via the pipe (‘|’) character.
Column 2 contains any valid Nuix query or a simple keyword.
To import a Search and Tag query:
Go to Window and select New Search and Tag Tab to open a Search and Tag tab.
In the top menu bar, click Import and browse to locate the file you want.
Save or export a Search and Tag query
To save or export a new or modified Search and Tag query:
In the menu bar of the Search and Tag tab to which you recently added or amended the table of tags, click Save.
In the Save dialog, specify the following:
Location
File name
Extension type (CSV or JSON)
Click Save.