Select MIME type and Logtash settings
The MIME Type Settings tab of the Evidence Processing Profile or Edit Processing Profile window, (depending on how you access either window), allows you to:
Enable the MIME types you want to process, and further configure a MIME type
Work with Logstash files in Nuix Workstation, including how to identify and analyze them
Enable MIME types you want to process
To enable which MIME types you want to process and further configure those types, (and which to ignore):
Open the Evidence Processing Profile window or the Edit Processing Profile window.
See Open the Evidence Processing or Edit Processing Profile window in Configure Evidence Processing settings.
Select the MIME Type Settings tab to set the types of evidence for items you want Nuix Workstation to process. This tab opens with a complete set of default settings to achieve the best mix of speed and forensic detail.
Note: Usually, there is no need to change the settings on this tab. You can click the Reset to defaults link to see all default settings again.
Expand the main MIME Type Settings node if necessary to display the full list of available MIME Types you can process.
Similarly, expand any particular MIME type to see its particular file types, and their extensions. For example, you may only want to only select the Email category or only image file types.
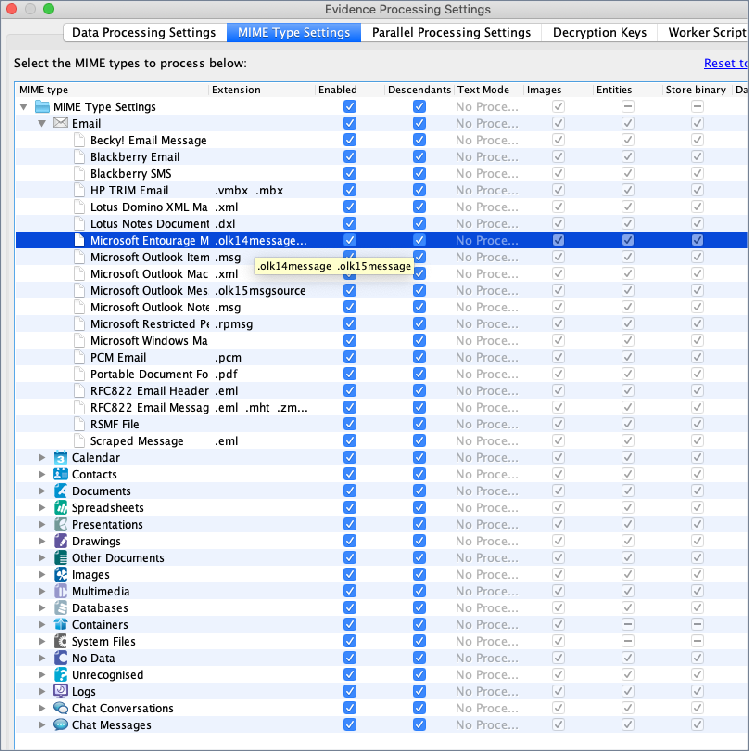
Enable check boxes in the Enabled column and optionally in the Descendants column to select only certain file types and only certain extension types that you need to process.
For example, only select the .xml and .msg file types under Email.
Make other selections as follows:
| Mime Type Settings |
Action |
| Extension |
View file type extensions. For truncated text (indicated by "..."), hover your mouse over it to see the full text. The example shows '.olk14message...' selected, and when you hover over that text it also contains '.olk15 message'. Some MIME-types, have no file extension. For example, the Blackberry file types. When extensions list multiple times, then look at the file structure level to determine their actual MIME-type. |
| Enabled |
Select each MIME Type you want to process. Note: If you clear this option against a MIME Type, it also clears all other options against that MIME type, so it is not processed. |
| Descendants |
Select to process descendants found in items of this MIME type. Examples of descendants are files in a zip archive or files attached to one or more email messages in an email store. Note: Ensure you enable the MIME type descendants, for processing structured or semi-structured data. See Process structured and semi-structured data in Add case evidence for more information. |
| Text Mode |
Select to process the text of the selected MIME type, using one of these options: Process Text |
| Mime Type Settings |
Action |
|
|
Text Strip: If you select this, by default the descendants are not selected. No Processing |
| Images |
Select to allow the generation of thumbnails and capture skin-tone information when processing images for the selected MIME types. |
| Entities |
Select to process Named Entities for the selected MIME type, by identifying and capturing them in the data set for use in further analysis. Note: To enable this, you must have selected the Extract named entities from text option under Item Content Settings on the Data Processing Settings tab. |
| Store Binary |
Select to store the binary of the selected MIME type. Note: To enable this, you must have selected the Store binary of data items option under Evidence Settings from the Data Processing Settings tab. Tip: Use Ctrl+F to search for MIME types by entering keywords. |
| Data Carving |
Select to identify and extract file types based on their file signatures, and carve the unallocated space in a file system. Note: To enable this, you must have selected the Carve file system unallocated space option under Deleted File Recovery and Forensic settings from the Data Processing Settings tab. |
For all file types, also look at the file structure to determine their MIME-types.
Tip: Do not select the checkbox for descendants of spreadsheets, else each cell in the spreadsheet creates a separate item.
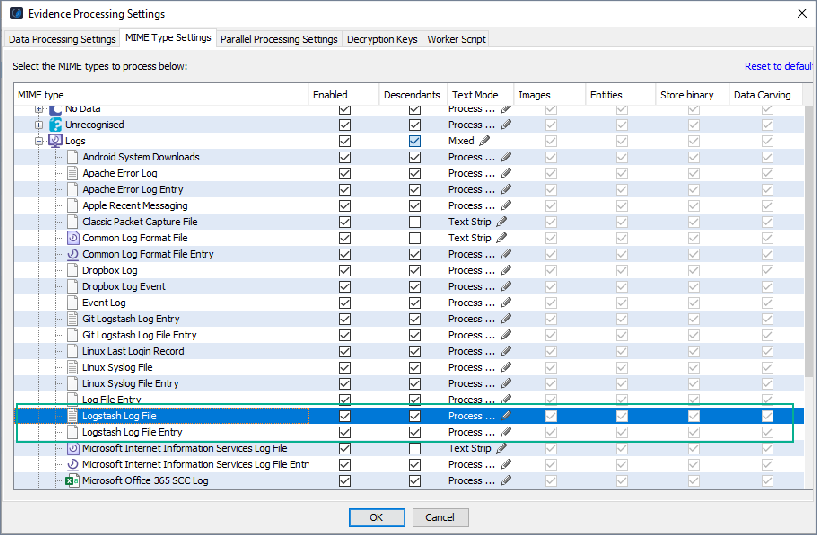
Work with Logstash files in Nuix Workstation
Note: To do this, you must enable and set the Logstash log file and file entry on the MIME Type Settings tab before you ingest the data.
Logstash is a free open-source tool for collecting and parsing log files. It uses a simple workflow and can parse any log files an investigator needs to analyze using a range of filters. Using the output file from Logstash, Nuix Workstation can ingest the log entries and apply context to the results that can assist an investigator in the analysis of the log entries, using a forensic tool with which they are familiar.
Once you parse the logs with Logstash, you can then ingest the output into Nuix Workstation, and then analyze the entries using named entity extraction, search macros, Word Lists, and other Nuix Workstation features.
Prerequisites before processing Logstash log files
Before you begin to process Logstash files, be mindful of the following:
The output must use the ‘file’ function for Nuix Workstation to read it correctly. The fields must be float, integer, or decimal only.
Some filters enter field information in a json format, which Nuix Workstation cannot read.
Enable and set the Logstash log file and file entry on the MIME Type Settings tab before you ingest the data.
Identify and analyze Logstash Logs
Logstash logs generate from: https://www.elastic.co/logstash/. To identify these files, do either:
In the Search bar enter a MIME-type search.
For example: mime-type: application/vnd.logstash-log, mime-type: application/vnd.logstash-log-entry
From the Filters pane, under Logs, navigate to the logstash log file or Logstash log file entry.
Parsed log entries are named by the date the log entry event occurred. You can process these logs in Nuix Workstation and review them on the Metadata tab.