Additional ECC Server configuration
Proceed with the following additional configuration steps once the ECC Server's preliminary configuration is complete and you can access the ECC system via ECC Administration Console:
Configure Keycloak Authentication (if using Keycloak for authentication)
Configure Azure AD authentication (if using Azure AD for authentication)
Configure an External Crossbar Messaging Router (for certain public-facing deployments)
Configure Activity Auditing (optional)
ECC Server License Activation (for all installations)
Server properties (for all installations)
Implement SSL security on the ECC Server (for all ECC Servers using HTTPS)
Deploy a self-signed or self-issued SSL certificate (if using your own SSL certificate)
Prepare ECC Client Installation Packages (for all installations)
Configure ECC users and security
ECC user accounts are needed to manage the ECC system via ECC Admin Console. After ECC Server and ECC Administration Console are installed, run Administration Console to configure a password for the ECC user 'Administrator' to block unauthorized access to the ECC system.
Warning: ECC Server is initially installed with no password for the user Administrator. You must complete this procedure to configure a password for the ECC user 'Administrator'; otherwise, the ECC system can be accessed by anyone.
Once you have set a password for the ECC User 'Administrator' using the following procedure, log out of Admin Console and then log back in to ensure the password has been set properly.
You can log out by clicking the  option near the upper-right corner of the screen to access the menu, then select Log out Administrator.
Warning: If you intend to integrate ECC with Keycloak or Azure AD for user authentication, you should first configure the ECC user 'Administrator' according to the following procedure before enabling Keycloak. This will ensure the ECC Server is secure even if Keycloak is later disabled.
Note: Once you enable the optional integration between ECC and Keycloak or Azure AD for user authentication, then the Users and Roles option in ECC becomes inaccessible, and all user, permission and group configuration for ECC must take place within Keycloak or Azure AD. For details see topic Configure Keycloak Authentication or Configure Azure AD authentication.
To add or edit an ECC user:
In Admin Console, click the  option near the upper-right corner of the screen to access the menu, then select Users and Roles.... The User list maintenance dialog displays:
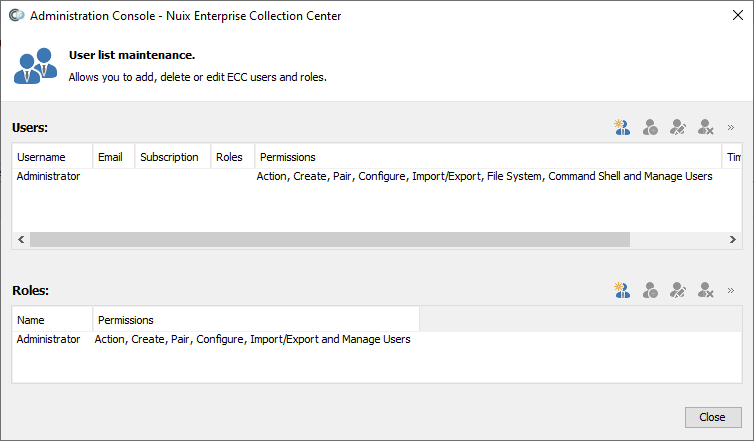
Note: If the Users and Roles option does not appear on the menu, then either the username you are logged in as lacks the Manage users and roles permission, or the ECC Server is integrated with Keycloak or Azure AD.
Stretch the dialog to view full permission and time zone information for each user.
Click Add User – the left-most button at the top – to add a new ECC User. Or select an existing user and click Edit User to set a password or modify user details. The User Details dialog appears:
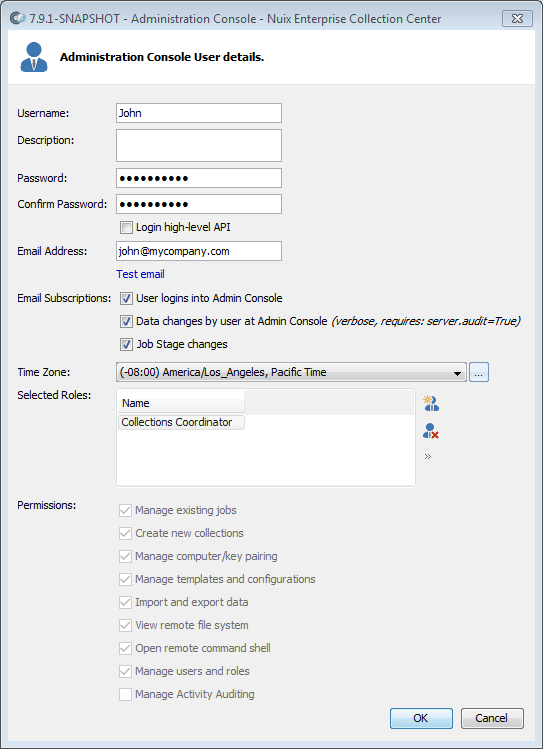
Fill out or edit the values for the user, as follows:
| Value |
Description |
| Username |
The username for this user, which will be entered at the Admin Console login screen. |
| Description |
A description of this user. Can be the user's full name and/or job title. |
| Password |
The password for this user account. |
| Notes:When changing the password for the user who you are currently logged in as, be sure to make note the new password, or else you may not be able to log back in to ECC Administration Console again. Specifying a strong password is recommended. Strong passwords contain at least 9 characters, and include a combination of upper and lowercase letters, numbers and symbols. When editing an existing user, the previous password is hidden from view. Leave the two Password fields unaltered to retain the prior password. |
|
| Warning: The ECC Server can be accessed by anyone until a password is set on the ECC user named Administrator. Leaving the Administrator user – or any user – without a password leaves your ECC system vulnerable to unauthorized access. |
|
| Email address |
The email address for this user. ECC email notifications will be sent to this address, provided – Diagnostic Auditing and Notifications is enabled (discussed in topic Server Properties) An SMTP server is properly configured (discussed in topic Server Properties for Email (SMTP)) The user has subscribed to one or more email subscriptions (see below) |
| Email subscriptions |
The ECC Server can send various kinds of email notifications to this user whenever certain activities occur. This user can "subscribe" to these notifications by checking one or more of the following options: |
| User logins into Admin Console |
When selected, receive an email notification whenever any ECC user logs into the system via Admin Console. |
| Data changes by user at Admin Console |
When selected, receive an email notification for any user-initiated changes via Admin Console. |
| Job Stage changes |
When selected, receive an email notification for each ECC collection or job, as the job goes through various stages. This includes job started, job completed, job cancelled, job failed and other stages. |
| Time zone |
The local time zone for this user. This is necessary to ensure jobs are scheduled at the expected time and date. |
| Permissions |
A set of permissions for this user, described below. Administrative accounts are generally granted all of these permissions. |
| Note:Users who lack all of the following permissions will still be able to log in to ECC via Admin Console to view ECC activities. If permissions are changed for a user, that user must log out of Admin Console and log back in for the changes to take effect. |
|
| Manage existing jobs |
When selected, this user is granted permission to take action on existing jobs, such as pausing or cancelling a job. |
| Create new collections |
When selected, this user is granted permission to create new collection jobs. |
| Manage computer/key pairing |
When selected, this user is granted permission to activate newly registered ECC Client computers and ECC Admin Console computers, by "pairing" them with an activation key. |
| Manage templates and configurations |
When selected, this user is granted permission to configure collection templates and collection configurations. These are both ways to save collection settings for repeated use. |
| Import and export data |
When selected, this user is granted permission to import or export records into ECC. This can include target details, groups and other kinds of records shown in ECC Admin Console. |
| View remote file system |
When selected, this user is granted permission to right-click any ECC Client computer and choose Browse File System. The user can see local files on the ECC Client computers and perform downloads of individual files or folders. |
| Open remote command shell |
When selected, this user is granted permission to right-click any ECC Client computer and choose Open Terminal. The user obtains an elevated command shell prompt, from which they can run non-graphical commands, utilities, scripts and applications. |
| Manage users and roles |
When selected, this user is granted permission to view, add, update or delete ECC users. This option also grants the user permission to access Computer Configurations, Client Deployment, License Activation and Server Properties. |
| Warning: Any user with Manage users permission can edit their own user account and grant themselves all other permissions. They can also add or edit all other user accounts. So this permission should be granted only to users who require complete access to ECC. |
|
| Manage activity auditing |
When selected, this user is granted permission to configure activity auditing. |
Note: The 'Administrator' user on a new ECC Server initially lacks access to the permissions View remote file system, Open remote command shell and Manage Activity Auditing. These permissions can be added to the existing 'Administrator' role, which the 'Administrator' user is a member of. Or one or more new roles can be added which include these permissions, then the 'Administrator' user or other users can be added to these roles.
Click OK to save changes.
Configure Keycloak authentication
Keycloak is an open source application providing federated authentication and related services. ECC Server can be integrated with a Keycloak server (optional). This allows user accounts maintained in Keycloak to be used for logging into ECC via ECC Admin Console. Keycloak users and groups can be imported from Active Directory and kept updated via scheduled synchronization. These accounts can then be used for authentication with Nuix ECC and other applications.
Note: Single Sign-On (SSO) to ECC using Keycloak-managed accounts is currently not supported.
This section is organized into the following topics:
Setup a Keycloak server (a one-time action)
Configure a Keycloak server to support Nuix ECC (includes setting up or syncing Keycloak users)
Assign Keycloak users to ECC roles (includes Keycloak user configuration)
Configure ECC Server to authenticate via Keycloak (a one-time action)
Configure multi-factor authentication (optional)
Setup a Keycloak server
Installation and initial configuration of a Keycloak server is beyond the scope of this guide. Please refer to the Keycloak documentation at https://www.keycloak.org/documentation regarding:
Requirements
Installation
Accessing the Keycloak "Admin Console" screens through your web browser
Configuring the initial "Master" realm so that an "OpenID Endpoint Configuration" is specified as one of the supported endpoints.
Configure an SMTP server so Keycloak can send password change notification emails to users who are setup in Keycloak. This gives users an easy way to sign into Keycloak and change their initial password.
The Keycloak server will be configured to "listen" for connections from other computers on a particular TCP port, such as 8080, 443, 80, etc. Traffic through this port must be permitted for all software and hardware firewalls between the Keycloak server and the computers it communicates with for authentication.
If the Keycloak server will integrate with an Active Directory Domain Controller to obtain users and groups, it may be necessary to configure software and hardware firewalls between the Keycloak server and the Domain Controller to permit traffic over TCP port 389, the standard port for LDAP.
Configure a Keycloak server to support Nuix ECC
A "realm" must be added to Keycloak to support authentication for ECC and other Nuix applications as follows:
Click the pull-down button in the upper left corner and if no existing realm named "nuix" is listed, click Add Realm.
Specify the realm name as "nuix" (all lowercase), then click Create.
Within the nuix realm settings:
In the General tab, ensure an "OpenID Endpoint Configuration" is specified as one of the supported endpoints.
In the Tokens tab, the SSO Session Timeout should be left at the default value of 30 minutes. The Client Login Timeout can be left at the default value of 5 minutes. These values can be changed; however, the SSO Session Timeout value must be greater than the Client Login Timeout value.
In the sidebar on the left, under Configure, click Client.
Click Create and add a client as follows:
Client ID: ECC (all capital letters)
Client protocol: openid-connect
Root URL: (leave empty)
Click Save.
In the list of clients, click the new ECC Client to display the ECC Client details.
From the Setting tab, ensure Access Type is set to confidential.
From the Settings tab, ensure Valid Redirect URIs is set to http://localhost*. If https is enabled for your Keycloak connection you can specify both http://localhost* and https://localhost* (i.e. two Valid Redirect URIs). Newer versions of Keycloak may require http://localhost and/or https://localhost without an asterisk - for details see the Keycloak documentation.
From the Credentials tab, ensure Client Authenticator is set to Client Id and Secret.
From the Credentials tab, make note of the generated Secret. You will need this secret when configuring the ECC Server. For now, you can copy/paste this secret into a text file.
From the Roles tab, click Create to create the following roles, which correspond to the permissions available within ECC:
| Role Name |
Composite |
Description |
| AdminView |
False (Off) |
View jobs |
| CommandShell |
False (Off) |
Open remote command shell |
| CreateCollections |
False (Off) |
Create new collections |
| FileSystemPreview |
False (Off) |
View remote file system |
| HighLevelAvailable |
False (Off) |
Access the ECC REST API |
| ImportAndExport |
False (Off) |
Import and export data |
| ManageAuditing |
False (Off) |
Manage activity auditing |
| ManageConfigurations |
False (Off) |
Manage templates and configurations |
| ManageJobs |
False (Off) |
Manage existing jobs |
| ManageUsers |
False (Off) |
Manage Computer Configurations, Client Deployment, License Activation and Server Properties. |
| Pairing |
False (Off) |
Manage computer/key pairing |
In the sidebar on the left, under Manage, click Users
You can add a user to the nuix realm from here, by clicking the Add user button on the right. These users will be able to access ECC via ECC Admin Console (their specific ECC permissions will be set later). Or you can integrate the nuix realm with an existing Active Directory server, and import Active Directory Users and Groups into the nuix realm in Keycloak. To add a user here:
Click Add user.
In the Details tab, specify the user credentials.
Ensure User Enabled is On.
Set Required User Actions to Update Password to force the user to change their Keycloak user password (this Update Password action may be added automatically even if you do not specify it).
Click Save.
Edit the user you just added.
In the Credentials tab, fill out the Password for this user.
Leave the Temporary option set to ON if this is a temporary password.
If you do not want the user to be prompted to change their Keycloak user password, set Temporary to OFF.
Click Set Password.
If you do not want the user to be prompted to change their Keycloak user password, go back to the Details page and delete the Update Password value from the Required User Actions field.
Click Save.
To import Active Directory Users and Groups into the nuix realm in Keycloak:
In the sidebar on the left, under Configure, click User Federation.
Click Add a provider, then select ldap.
In the Settings tab, the following values are suggested as a starting point:
| Field |
Value |
| Enabled |
ON |
| Import Users |
ON |
| Username LDAP attribute |
sAMAccountName |
| RDN LDAP attribute |
cn |
| UUID LDAP attribute |
objectGUID |
| User Object Classes |
person, organizationalPerson, user |
| Connection URL (revise value for your AD server FQDN and ensure TCP port 389 traffic is permitted through any firewalls) |
ldap://myadserver.mydomain.com:389 |
| Users DN (revise value as needed for your AD container and domain names) |
CN=Users,DC=mydomain,DC=com |
| Bind Type |
simple |
| Bind DN (specify an AD user which Keycloak will use to perform LDAP operations) |
CN=Administrator,CN=Users,DC=mydomain,DC=com |
| Bind Credential |
(password for the above AD account) |
Click the Mappers tab.
Ensure there is a Mapper named SAMAccountName. If necessary, click Create Mapper and specify the following:
| Field |
Value |
| Name |
sAMAccountName |
| Mapper Type |
user-attribute-ldap-mapper |
Click Save to save the mapper, then edit additional mapper fields as follows:
| Field |
Value |
| User Model Attribute |
username |
| LDAP Attribute |
sAMAccountName |
| Read Only |
ON |
Click Save to save the mapper.
If you wish to import Groups from Active Directory, repeat steps (d) through (g), but specify mapper fields as follows (these are suggested starting values -- modifications to suit your Active Directory configuration will be necessary):
| Field |
Value |
| Name |
EccLdapGroups |
| Mapper Type |
group-ldap-mapper |
| LDAP Groups DN |
CN=Users,dc=mydomain,dc=com Revise this value depending on the Container (CN) or Organizational Unit (ou) which holds the groups to import, and specify the proper domain name. To import groups from multiple Containers or OUs, create multiple Mappers. |
| Group Name LDAP attribute |
cn |
| Group Object Classes |
group |
| Preserve Group inheritance |
ON |
| Ignore Missing Groups |
ON |
| Membership LDAP Attribute |
member |
| Membership Attribute Type |
DN |
| Membership User LDAP Attribute |
sAMAccountName |
| LDAP Filter (optional) |
(leave empty or specify a filter) |
| Mode |
READ_ONLY |
| User Groups Retrieve Strategy |
LOAD_GROUPS_BY_MEMBER_ATTRIBUTE |
| Member-Of LDAP Attribute |
memberOf |
| Mapped Group Attributes |
(leave empty) |
| Drop non-existing groups during sync |
OFF |
Click Save to save the group mapper, then return to the Settings tab.
Click Test Connection to ensure a proper connection to the Active Directory server.
Click Test Authentication to ensure the specified "Bind" user can access the Active Directory server.
At the bottom of the screen, click Synchronize all users to import users from Active Directory into the "nuix" realm within Keycloak.
Under collapsible heading "Sync Settings", optionally configure a periodic sync to occur automatically between Keycloak and Active Directory.
Assign Keycloak users to ECC roles
Assign Keycloak users to various ECC roles, so they have permission to login to ECC via ECC Admin Console and perform various actions, as follows:
In Keycloak, ensure the realm "nuix" is selected.
In the sidebar on the left, under Manage, click Users.
Double-click a particular user to bring up the user's details.
Click the Role Mappings tab.
Under Client Roles, select ECC.
Select one or more Available Roles, then click the Add selected button to assign those roles to the user. These Keycloak roles correspond with specific permissions in ECC.
Note: The available roles are listed in the previous topic at Step 5.e. If certain roles are not assigned to a user in Keycloak, the user may not see a corresponding menu option in ECC Admin Console. For example, Keycloak users lacking the ManageAuditing role will not see the Manage Activity Auditing... menu pick from the menu in ECC Admin Console.
Repeat these steps for each user who will access ECC via ECC Admin Console. Alternately, Keycloak users can be assigned to various Groups within Keycloak. These groups can then be assigned ECC roles (when ECC is not integrated with Keycloak, ECC's own roles can be assigned to individual ECC users in a similar manner).
Configure ECC Server to authenticate via Keycloak
The default configuration of an ECC Server allows ECC to manage its own user accounts. In order to login to ECC via a Keycloak-managed user account, the ECC Server must be reconfigured as follows:
Ensure no jobs are in progress.
Edit the server.conf configuration file on the ECC Server. For details see the procedure Manually edit the server.conf file.
Scroll down to the comment ## Authentication and authorization server.
Remove the # from the following statements, and set their values as follows:
authentication.type=keycloak
authorization.server.url=http://mykeycloakserver.mydomain.com:8080
authorization.server.realm=nuix
authorization.server.secretId=b36cd2e-8323-436b-8aba-1e5a8471e5e0
Note: the actual authorization.server.url value must be adjusted for the name of the Keycloak server and the TCP port which it is listening on. The actual authorization.server.secretId value must be taken from the Secret field value which was generated earlier in Keycloak, shown within the nuix realm, in the details of the Client named ECC, under the Credentials tab.
Warning: In a production environment, the URL to the Keycloak server should utilize https, and an SSL certificate and private key should be configured in the Keycloak server.
Save changes to server.conf.
If the Keycloak server is configured for https and using a self-signed SSL certificate, then it is necessary to install a copy of the self-signed SSL certificate into the Java keystore used by ECC Server. Follow the procedure Add a self-signed SSL certificate to an ECC Server Java keystore.
Likewise, if the Keycloak server is configured for https and using an SSL certificate issued by an in-house certificate server, then it is necessary to install a copy of the root certificate from the in-house certificate server into the Java keystore used by ECC Server. Follow the procedure Add an in-house SSL certificate to an ECC Server Java keystore.
Start the Nuix ECC Server service. All subsequent logins via ECC Admin Console will require Keycloak-managed user accounts from the nuix realm that have the necessary ECC roles.
To re-enable access to ECC via ECC's own user accounts, stop the ECC Service, edit the server.conf file, and comment out the three "authorization" statements with a # symbol so they will be ignored, e.g.:
#authentication.type=keycloak
#authorization.server.url=http://mykeycloakserver.mydomain.com:8080
#authorization.server.realm=nuix
#authorization.server.secretId=b36cd2e-8323-436b-8aba-1e5a8471e5e0
Then save server.conf and restart the ECC Server service. You will then need to login to ECC with an account managed by ECC rather than an account managed by Keycloak.
Configure ECC Admin Console to authenticate via Keycloak
If the Keycloak server is configured for https and using a self-signed SSL certificate, then it is necessary to install a copy of the self-signed SSL certificate into the Java keystore used by ECC Admin Console -- on each computer running ECC Admin Console. First, be sure ECC Admin Console has been installed from a stand-alone installer (launching Admin Console from the ECC Server web page will prevent customizations to the Java keystore used by Admin Console). Then follow the procedure Add a self-signed SSL certificate to an ECC Admin Console Java keystore.
Likewise, if the Keycloak server is configured for https and using an SSL certificate issued by an in-house certificate server, then it is necessary to install a copy of the root certificate from the in-house certificate server into the Java keystore used by ECC Admin Console -- on each computer running ECC Admin Console. First, be sure ECC Admin Console has been installed from a stand-alone installer (launching Admin Console from the ECC Server web page will prevent customizations to the Java keystore used by Admin Console). Then follow the procedure Add an in-house SSL certificate to an ECC Admin Console Java keystore.
Configure multi-factor authentication
Note: Changes to the "nuix" realm within Keycloak can impact authentication for Nuix applications other than Nuix ECC.
Enable multi-factor authentication within Keycloak for ECC Admin Console logins, as follows:
In the Keycloak Admin Console, ensure the realm "nuix" is selected.
In the sidebar on the left, under Configure, click Authentication.
Click the Flows option on the toolbar, then select the flow named "Browser" from the pull-down list, then set the options on the screen as shown in the following image:
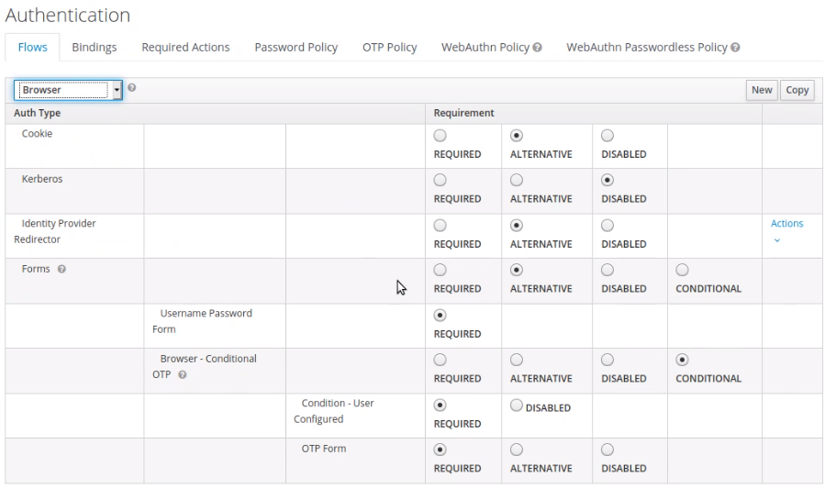
Refer to the Keycloak Server Administration Guide at https://www.keycloak.org/docs/latest/server_admin/ if you need a reference for what each of these Flow options does.
Save changes.
Click the OTP Policy option on the toolbar, and set the options as follows:
| Field |
Value |
| OTP Type |
Time based |
| OTP Hash Algorithm |
SHA1, SHA256, or SHA512 (SHA1 is suggested for maximum compatibility with various authenticator apps, while SHA256 is suggested for maximum security) |
| Number of Digits |
Specify the number of digits in each one-time password: either 6 or 8 |
| Look Ahead Window |
1 |
| OTP Token Period |
How much time, in seconds, the user is granted to enter their one-time password before it expires. A value in the range of 30 to 180 is suggested. Shorter values are more secure, but may not provide sufficient time for users to retrieve their one-time password and enter it. |
| Supported Applications |
This read-only field shows which authenticator applications are supported, based on the options you have specified. |
Save changes.
In the sidebar on the left, under Configure, click Client.
In the list of clients, select ECC to display the ECC Client details.
From the Settings tab, ensure Valid Redirect URIs is set to http://localhost* or https://localhost*, depending on whether your ECC Server uses http or https. If your ECC Server is configured for both http and https, click the [+] button to add a second Valid Redirect URI, so both http://localhost* and https://localhost* are listed. Newer versions of Keycloak may require http://localhost and/or https://localhost without an asterisk - for details see Keycloak documentation.
From the Settings tab, ensure Access type is confidential
From the Settings tab, ensure Standard Flow Enabled is ON.
Save changes.
Multi-factor authentication is now enabled within Keycloak for ECC Admin Console logins; however, individual users in Keycloak need to be configured to require multi-factor authentication, as follows:
In the Keycloak Admin Console, ensure the realm "nuix" is selected.
In the sidebar on the left, under Manage, click Users.
Click the user you wish to configure.
Click the Details tab from the toolbar to display the user details.
Set Required User Actions to Configure OTP. This will enable and require two-factor authentication for this user whenever they log in to ECC Admin Console. When set, the user must configure a one-time password generator on their mobile device using either the Free OTP or Google Authenticator application.
Save changes.
Note: Users will be prompted for a one-time password whenever they login to ECC Admin Console. This one-time password can be retrieved with an authenticator app such as Google Authenticator or FreeOTP, available for iPhones and Android mobile devices, as well as the WinOTP application for Windows 10 computers.
Note: To require all users within the realm "nuix" to require multi-factor authentication, go back to Configure > Authentication > Flows > Browser, and in the row that says Browser - Conditional OTP, choose the REQUIRED option instead of CONDITIONAL, then save changes.
Configure Azure AD authentication
Setup ECC AdminConsole as an application in Azure AD
In order to set up the application ECC AdminConsole in Azure AD, the user must have Administrator rights in the Azure AD portal.
Add ECC AdminConsole App to Azure AD
This procedure is based in part on a Microsoft procedure at https://docs.microsoft.com/en-us/azure/active-directory/manage-apps/add-application-portal
Login to the Azure Portal at https://portal.azure.com.
In the portal menu (3 vertical lines on the top left), select Azure Active Directory.
In the Overview page find the Tenant ID and make note of it. If no tenant ID has been established for your organization (i.e. if Azure AD is new for your organization) create a new tenant as described by Microsoft at https://docs.microsoft.com/en-us/azure/active-directory/develop/quickstart-create-new-tenant.
In the left menu, select Enterprise applications. The All applications pane opens and displays a list of the applications in your Azure AD tenant.
In the Enterprise applications pane, select New application.
In the Browse Azure AD Gallery pane, choose Create your own application on the top left.
In the new Create your own application page, add ECC AdminConsole as the app name.
Select Register an application to integrate with Azure AD (App you're developing).
Click Create - This will open Register an application.
Under Supported account types, select Accounts in this organizational directory only (Single tenant).
Under Redirect URI (optional), select Public client/native (mobile & Desktop) and enter https://localhost
Click Register.
In the left-hand navigation menu select Enterprise applications, then select the ECC AdminConsole application. In the Overview page, find the Application ID and make note of it. You will need this to configure your ECC Server.
Add Application Owners
In the Azure Portal menu (3 vertical lines on the top left), select Azure Active Directory.
Under Manage, select App registrations, and then select ECC AdminConsole application
Select Owners, and then select Add to get a list of user accounts that you can choose an owner from.
Search for and select the user account that you want to be an owner of the application.
Click Select to add the user account that you chose as an owner of the application
Add Application Roles
In the Azure Portal menu (3 vertical lines on the top left), select Azure Active Directory.
Under Manage, select App registrations, and select the ECC AdminConsole
Select App roles, and then select Create app role.
In the Create app role pane, choose the Users/Groups radio button.
Fill in the role information (see the table on the following page for details).
Ensure the Do you want to enable this app role? option is enabled for each role.
Select the option "Both (Users/Groups + Applications)" for Allowed member types for the following roles:
ECC.CreateCollections
ECC.HighLevelAvailable,
ECC.ManageConfigurations,
ECC.ManageJobs
Select Apply to save your changes.
| Display Name |
Value |
Allowed member types |
Description |
| ECC.AdminView |
AdminView |
Users/Groups |
The MINIMUM required permission to be able to view ECC Admin Console |
| ECC.CommandShell |
CommandShell |
Users/Groups |
Open remote command shell |
| ECC.CreateCollections |
CreateCollections |
Users/Groups,Applications |
Create new collections |
| ECC.FileSystemPreview |
FileSystemPreview |
Users/Groups |
View remote file system |
| ECC.HighLevelAvailable |
HighLevelAvailable |
Users/Groups,Applications |
Grants access to the ECC REST API |
| ECC.ImportAndExport |
ImportAndExport |
Users/Groups |
Import and export data |
| ECC.ManageAuditing |
ManageAuditing |
Users/Groups |
Manage Auditing |
| ECC.ManageConfigurations |
ManageConfigurations |
Users/Groups,Applications |
Manage templates and configurations |
| ECC.ManageJobs |
ManageJobs |
Users/Groups,Applications |
Manage existing jobs |
| ECC.ManageUsers |
ManageUsers |
Users/Groups |
Manage users and roles (used for Computer Configurations, Licensing, Server Properties and Client Deployment see TLCOLLECT-640) |
| ECC.Pairing |
Pairing |
Users/Groups |
Manage computer/key pairing |
Assign Users and Groups to Roles
In the Azure Portal menu (3 vertical lines on the top left), select Azure Active Directory.
Select Enterprise applications in the left-hand navigation menu.
Select All applications to view a list of all your applications, then choose the ECC AdminConsole application.
Under Manage, select Users and groups.
Select Add user to open the Add Assignment screen
Select the Users and groups selector from the Add Assignment screen. A list of users and security groups is displayed. You can search for a certain user or group as well as select multiple users and groups that appear in the list.
Once you've selected users and groups, select the Select button to proceed.
Select Select a role in the Add assignment screen. All the roles that you've defined for the application are displayed.
Choose a role and select the Select button to proceed.
Select the Assign button to finish the assignment of users and groups to the app.
Confirm that the users and groups you added appear in the Users and groups list.
Configure ECC Server to authenticate via Azure AD
The default configuration of an ECC Server allows ECC to manage its own user accounts. To login to ECC using Azure AD accounts the ECC Server must be reconfigured as follows:
If you took note of the Tenant ID and Application ID during steps 2 and 12 of the procedure Add ECC AdminConsole App to Azure AD, you can skip to step 9 below.
Login to the Azure Portal at https://portal.azure.com.
In the portal menu (3 vertical lines on the top left), select Azure Active Directory.
In the Overview page find the Tenant ID and make note of it.
Select Enterprise applications in the left-hand navigation menu.
Select the ECC AdminConsole application.
In the Overview page, find the Application ID and make note of it.
Log out of the Azure Portal.
Ensure no ECC jobs are in progress.
Edit the server.conf configuration file on the ECC Server. For details see the procedure Manually edit the server.conf file.
Scroll down to the comment ## Authentication and authorization server
Remove the # from the following statements, and set their values as follows:
authentication.type=azure
authentication.azure.tenantId=31e0d45a-b1d9-48a2-afa8-57137399eb2e
authentication.azure.applicationId=032dd354-c826-42a0-9616-1f46510c1f69
IMPORTANT: the tenantId and applicationId shown, above, are examples only. Change these values to your own tenantId and applicationId.
Start the ECC Server service and verify you can login through ECC Admin Console using credentials from an Azure AD user account that is associated with the ECC AdminConsole application.
Configure an external crossbar messaging router
Normally, the ECC Server uses an internal WAMP messaging router to manage connections from ECC Client and ECC Admin Console computers. But for certain deployment scenarios, such as Cloud Deployment with Additional Security, it may be more flexible or secure for all ECC computers to connect to a stand-alone WAMP messaging router.
A Crossbar Administration Guide for installing Crossbar Community Edition and integrating Crossbar with Nuix ECC Server is available through Nuix Technical Support.
Configure activity auditing
Activity auditing generates activity log files on the ECC Server. This feature must be enabled and configured.
To enable and configure activity auditing:
Login to ECC Admin Console
From the menu, select Manage Auditing...
Note: If Manage Auditing... does not appear in the menu, go to Users and Roles... and ensure the username you are logged in as is associated with a role that has the Manage Activity Auditing permission. If necessary, add the Manage Activity Auditing permission to a suitable role (which grants this permission to all users having this role), then log out of ECC and log back in. If using Keycloak for authentication, access the Keycloak Admin Console and ensure that the user has the ManageAuditing role (from the "ECC" client, within the "nuix" realm) enabled.
The Manage Activity Auditing dialog displays.

Enable activity auditing by checking the File Destination checkbox and/or the SysLog Destination checkbox. Fill out the fields in this dialog as follows:
| Field |
Description |
| File Destination |
Enables activity auditing, with log entries saved to the specified log file. |
| Full path to log file |
The volume, folder/directory and filename for the activity auditing logfile. This will be a plan text file. The folder should already exist. |
| Credentials |
When selected, enables specifying login credentials to access the specified volume and folder for the log file, i.e. Domain (needed only for an Active Directory username), User and Password. |
| Rolling File |
When selected, this option enables the Configure… button, which allows log file rotation settings to be specified. |
| SysLog Destination |
Enables activity auditing, with log entries saved to the specified SysLog server. |
| URL to SysLog server |
Specify the IP address of the SysLog server, followed by a colon and the TCP port number used by the Syslog server. |
| Credentials |
When selected, enables specifying login credentials to access the specified SysLog server, i.e. User and Password. |
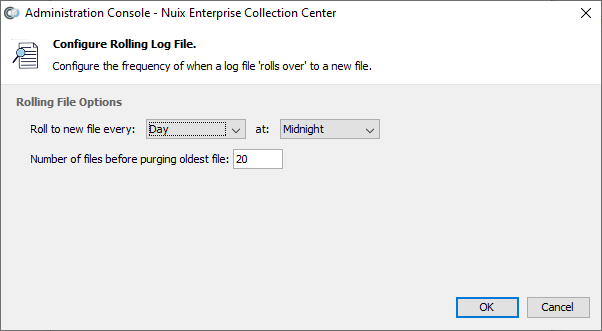
If the Rolling File option is selected, the Configure… button will display the Configure Rolling Log File dialog:
| Field |
Description |
| Roll to new file every: |
Select the interval -- Day, Week or Month -- after which a new empty log file will be created and become the active log file. The previous log file will be renamed (rotated). |
| at: |
Select the hour of the day for log file rotation to occur. |
| Number of files before purging oldest file: |
Specify how many older log files to retain before purging (deleting) the oldest log files. |
When the current log file is rotated, a new, empty log file will be created using the filename specified in the Manage Activity Auditing dialog. The older log file will be retained in the same folder but renamed according to the following filename format:
<specified-base-name>-yyyy-mm-dd.<specified-extension>.zip
For example, if the Manage Activity Auditing dialog has the Full path to log file set to...
D:\ecc-activity-logs\ecc-activity.log
...then -- assuming daily rotation -- on April 29, 2021 the auditing log file shown, above, will be renamed to:
D:\ecc-activity-logs\ecc-activity-2021-04-29.log.zip
...and a new empty log file named ecc-activity.log will be created to capture current activity.
The rotated logs are compressed using ZIP compression to save disk space.
Activities subject to activity logging
The ECC Server will log the following activities, showing who performed the action, which item was changed and the date and time that the action occurred:
User password changed
User updated: Role added or removed
Role updated: User added or removed from role
New Case added
Case modified
New Computer (ECC Client or ECC Admin Console) added
Computer modified or deleted
Computer Configuration deleted
Collection created
Job on <ComputerName or TargetName> changed status to <NewStatus>
File selection criteria modified or deleted
Remote Terminal opened and closed
Remote File System opened and closed
Remote File System: files uploaded, downloaded, deleted
Activity Logging logs actions taken via ECC Admin Console and via the ECC Server's REST API.
ECC Server license activation
ECC Server will not permit connections to ECC Client computers without an active license. You must activate the ECC Server by applying a license code.
To activate your ECC license:
From Admin Console, click the  button in the upper-right corner and select License.
Note: if the License option does not appear on the menu, then the username you are logged in as lacks the Manage users and roles permission.
Use the mouse to select the text in under Hardware ID. This text typically begins with
ecc\
Once the Hardware ID text is selected, copy it to the Clipboard (e.g. press Ctrl+C or Command+C).
Paste the Hardware ID into a new email message. In your email request, mention that this Hardware ID is a Nuix Dongle Key ID. Ask for an ECC Server license. Send the request to your Nuix representative.
Click Cancel to exit out of the License dialog in ECC Admin Console.
Your Nuix representative will check the status of your ECC license, prepare the ECC license text and send it to you via email.
Once you receive a response from your Nuix representative, select the text of the ECC license within the email. The license text usually begins with
-----BEGIN LICENSE-----
and ends with
-----END LICENSE-----
These beginning and ending lines should be selected as well. Copy this license text into the Clipboard.
Go back into the License dialog in ECC Admin Console, then select the entire contents of the License field and delete it, so the field is empty.
Paste the new license text into the License field, then click OK.
Server properties
Server Properties are used to configure various settings for the overall operation of ECC.
From Admin Console, click the  button in the upper-right corner and select Server Properties.
Note: if the Server Properties option does not appear on the menu, then the username you are logged in as lacks the Manage users and roles permission.
Stretch the screen wider, if necessary, so you can see which properties are editable (i.e. those with Access set to Read-Write).
Set the value of each property. You can do so by selecting the property, then clicking the  button. Or simply double-click the property to edit its value. See the following table of modifiable properties for details.
Note: Some ECC Server Properties are marked READ-ONLY and cannot be edited. This is shown in the Server properties dialog (you may have to scroll far to the right to see the column indicating READ-WRITE or READ-ONLY).
| Property |
Description |
Value type |
Default value |
| Admin_console.lock_after_inactive_x_minutes |
Lock Admin Console after this many minutes of inactivity. User must enter their password to re-enable Admin Console. When a user is prompted for their password, they can override this global setting and disable this timeout or change it (for themselves only). |
Number 1 to 99 |
99 |
| compress.tables.housekeeping.enabled |
True to enable automatic database table compression whenever the ECC Server service starts, and then once a day thereafter. During database compression each database table is locked. This means ECC Admin Console will not be able to show the current status of active jobs during database compression. Nor will ECC Admin Console be able to submit new jobs or restart/resume previous jobs until database compression is complete. False to disable automatic database table compression. |
True/False |
True |
| compress.tables.schedule.hours |
The hour of the day when database table compression will begin each day. 0 to 24. |
Number |
5 |
| compress.tables.schedule.minutes |
The minute of the day when database table compression will begin each day. 0 to 60. |
Number |
0 |
| database.transaction.logging.enabled |
This is the Diagnostic Auditing and Notifications setting. When set to true, enables recoding of detailed audit information for every database change (i.e. most events which occur in ECC). In order for email notifications to be sent this setting and the smtp.enable setting must both be set to true. This Diagnostic Auditing and Notifications feature differs from the Activity Auditing feature in three ways: 1. This auditing feature stores audit entries in the ECC Server database, rather than in log files. This can increase database size significantly over time. 2. This auditing feature enables email notifications. 3. This auditing feature can have a significant performance impact on the ECC Server. |
True/False |
False |
| fat.pack.access-report |
URL to report names of fetched text parsing classes or resources for future inclusion into the search-pack bundles. To disable, leave empty. |
URL |
(empty) |
| offline.after_x_minutes |
The period, in minutes, for which a Computer must lack a connection to the Server before its status is changed to offline. |
Number |
60 |
| purge.data_entries_after_x_days |
Notifications older than this many days will be purged from the database. Any deleted entries will also be purged at this time. |
Number |
365 |
| recurring.create_jobs_x_hours_in_advance |
Recurring collection configurations create individual collection Jobs this many hours in advance of each Job's scheduled start time. |
Number |
48 |
| security.rsa_key_length |
The length of RSA keys generated by the ECC Server for use in pairing (activating) computers running ECC Admin Console and ECC Client. Longer keys are more secure but take longer to generate. 2048 is fast and secure. 3072 is a minimum length of RSA keys used by the NSA. 4096 can take several seconds to generate. |
Number |
2048 |
| server.high-level-api.enabled |
When set to true, enables the high-level API in the ECC Server, so that Nuix Adaptive Security, Nuix Workstation or other programs can integrate with ECC via a REST API. |
True/False |
False |
| server.high-level-api.http-auth.by-db-users.enabled |
When True, integration with ECC Server via the High-Level API can be authenticated with an ECC user account having the Login High-level API option enabled. API Methods that require special permissions can be accessed only this way. |
True/False |
True |
| server.high-level-api.http-auth.name |
The username for authenticating high-level API calls to ECC Server. DEPRECATED. Instead, set server.high-level-api.http-auth.by-db-users.enabled to True and configure an ECC user with the Login High-level API option enabled and with Roles having the necessary permissions. |
Text |
|
| server.high-level-api.http-auth.password |
The password for authenticating high-level API calls to ECC Server. DEPRECATED. See server.high-level-api.http-auth.name, above, for details. |
Text (password) |
|
| server.notify_client.delay_deploy_job_in_millis |
The delay, in milliseconds, to wait between batches of 10 client computers being notified to pick-up new deploy jobs. |
Number |
1000 |
| server.pairing.admin.auto |
Whether incoming pairing requests from computers running ECC Admin Console will be accepted automatically and immediately. Setting this property to false gives you the opportunity to review new Admin Console computers and manually activate them. |
True/False |
True |
| server.pairing.client.auto |
Whether incoming pairing requests from computers running ECC Client will be accepted automatically and immediately. Setting this property to false gives you the opportunity to review new ECC Client computers and manually activate them. |
True/False |
True |
| server.wamp_router.ping_period_in_secs |
How frequently the ECC Server checks whether ECC Clients are still online, in seconds. Lower values allow for faster detection of offline ECC Clients, but puts more load on the network and the ECC Server. |
Number |
60 |
| smtp.email_batch_wait_period_in_secs |
The period, in seconds, email sending is suspended, to see if any additional notifications can be sent as well. For example, a value of 3600 would send an email notification at most once each hour. The body of that email message would contain line items for each of the ECC events which occurred in the past hour. |
Number |
60 |
| smtp.enabled |
In order for email notifications to be sent, this setting and the database.transaction.logging.enabled setting must both be set to true. |
True/False |
False |
| smtp.exclude_emails_older_than_x_days |
The threshold, in days, for emails to be considered no longer relevant and never sent. |
Number |
365 |
| smtp.props |
Email sending configuration, i.e. SMTP settings, including SMTP server protocol and user account credentials. The value is in Java properties form: setting=value(newline)setting=value(newline) etc. |
Text |
See default entry, below this table |
| smtp.props.subs.password |
The password for the SMTP user account. |
Text (password) |
|
| smtp.resend_attempt_in_x_minutes |
The hold period, in minutes, before attempting to resend an email which previously failed to send. |
Number |
60 |
| xtra.update.clients_last_contact_timestamp |
When True, update each client's last contact time stamp whenever a client goes online. |
True/False |
True |
| xtra.update.clients_online_history |
When True, update each client's monthly, daily and hourly online presence statistics whenever client goes online or offline. |
True/False |
True |
| xtra.update.clients_peer_IP_address_and_port |
When True, track the IP address and port of each client as seen by the server (router). Differs from the actual client's IP address if NAT is involved. |
True/False |
False |
Server properties for reporting information to Nuix
The server property fat.pack.access-report specifies a server which will receive information from your ECC Server. The only data sent is a list of any third-party Java classes fetched from the ECC Server by the full-text search feature running on an ECC Client. These classes are used to extract text from certain kinds of data files. Only the names of the classes are sent to the specified server.
The default value of this property is empty, which disables sending any data from ECC to Nuix.
Server properties for email (SMTP)
The server property smtp.props is used to configure the ECC Server's connection to an SMTP server, for sending ECC notification emails.
Note: Email notifications and the smtp.props property are not active unless the database.transaction.logging.enabled property and the smtp.enable property are both set to True. The default smtp.props value is configured for an SMTP server used by Nuix for email testing purposes. Once database.transaction.logging.enabled and smtp.enable are set to True, ECC email notifications will be sent using this SMTP server to any ECC user with a valid email address and active email subscriptions. Change smtp.props to use a different SMTP server at the first opportunity, because the SMTP server and account for Nuix email testing is limited by a daily sending quota, and may be decommissioned at any time.
To configure the SMTP server connection, go to the Server Properties screen, then edit the smtp.props property and modify its value. A dialog appears to edit the values of this property, as shown below:
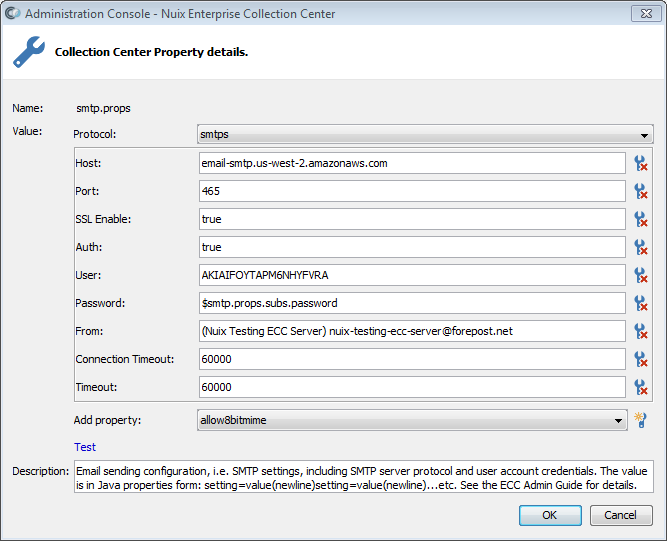
Each value within the smtp.props property is a setting for the Jakarta Mail library, which ECC uses for sending emails. Usually an SMTP server can be configured using only the fields shown; however, you can add additional Jakarta Mail properties as needed. The most common Jakarta Mail settings are described below:
| Setting |
Description |
| Protocol i.e.: mail.transport.protocol |
Specify smtp if using TCP port 25 for an unencrypted connection to the email server. The smtp protocol is also used for port 587 connections which use STARTTLS for security. Specify smtps for an SSL-encrypted connection to the SMTP server, typically over TCP port 465. |
| Host i.e.: mail.smtp.host or mail.smtps.host |
The fully qualified domain name of the SMTP server, or its IP address. When either SSL Enable=true or starttls.enable=true, the fully qualified domain name of the server should be specified rather than the IP address. |
| Port i.e.: mail.smtp.port or mail.smtps.port |
The TCP port number used for SMTP communication with the email server. If using mail.transport.protocol=smtp, then mail.smtp.port is typically set to 25. If STARTTLS is enabled mail.smtp.port is typically set to 25 (port will automatically switch to port 587 during STARTTLS negotiation). If using mail.transport.protocol=smtps, then mail.smtps.port is typically set to 465. |
| SSL Enable i.e.: mail.smtp.ssl.enable or mail.smtps.ssl.enable |
Set this property to true if using SSL (which should always be the case when using the smtps protocol). If using the smtp protocol on port 25, the property SSL Enable is typically set to false (even if using STARTTLS, see below). |
| Starttls.enable i.e.: mail.smtp.starttls.enable |
Set this property to true if the SMTP server utilizes STARTTLS. When this setting is needed, it is typically done using the following four settings: Protocol=smtp Port=25 SSL enable=false starttls.enable=true Note: the starttls.enable property must be added to the list of properties, using the Add property option at the bottom of the dialog. Also note that firewalls and ISPs must permit traffic on ports 25 and 587.
Antivirus programs and firewalls can also block access to SMTP ports. |
| Auth i.e.: mail.smtp.auth or mail.smtps.auth |
Set to true if the SMTP server you specified requires a login. |
| User i.e. mail.smtp.user or mail.smtps.user |
The User ID for accessing the SMTP server. For a Gmail server, specify the Gmail account's full email address, including @gmail.com. For a Yahoo Mail account, specify the Yahoo user ID without @yahoo.com. For Microsoft SMTP server or Exchange Server, specify the User ID. For an Active Directory domain account, do not include the domain name (see below) Note: Gmail and Yahoo Mail accounts are subject to strict daily email sending quotas, and are not recommended for sending ECC email notifications in a production environment. |
| Password i.e.: mail.smtp.password or mail.smtps.password |
The password for the SMTP server user ID. The value of the password should be the following special value in all cases: $smtp.props.subs.password The above special value serves as a placeholder for the actual password. You can then specify the actual password for the SMTP user using the smtp.props.subs.password property. The smtp.props.subs.password property is a separate property altogether; it is not part of the value of the smtp.props property. Instead, it is set from the Server Properties dialog. Note: Send email via Gmail SMTP servers requires obtaining an "app-specific password" from Google. This is used in lieu of the Google account password. |
| Auth.ntlm.domain i.e.: mail.smtp.auth.ntlm.domain or mail.smtps.auth.ntlm.domain |
If the SMTP server is a member of your network's Active Directory domain, and if you are using a domain account to login to the SMTP server, specify the domain name here. For other networks or logins, leave this property out. Note: The auth.ntlm.domain property must be added to the list of properties, using the Add property option at the bottom of the dialog. Note: User, Password, and Auth.ntlm.domain are sent to the SMTP server only if Auth is true. |
| From i.e.: mail.smtp.from or mail.smtps.from |
The sender's email address. Sets the return address for each notification message. |
| Connection Timeout i.e.: mail.smtp.connectiontimeout or mail.smtps.connectiontimeout |
The amount of time to attempt to connect to the SMTP server, in milliseconds. If not specified, the ECC Server will wait indefinitely for a response from the SMTP server. A value of 60000 (equal to 60 seconds) is suggested. |
| Timeout i.e.: mail.smtp.timeout or mail.smtps.timeout |
The amount of time to attempt to send an email message to the SMTP server, in milliseconds. If not specified, the ECC Server will wait indefinitely for a response from the SMTP server. A value of 60000 (equal to 60 seconds) is suggested. |
| Add property |
Allows additional seldom-used Jakarta Mail properties to be added to the dialog and edited. If needed, select each property and then click the button to the right of the property to add it to the dialog. Properties which have been added can be subsequently deleted using the "wrench" button to the right of each property. A complete reference for all Jakarta 2.0.1 properties is available on the web. |
Click OK to save the smtp.props setting, which holds all of the above setting names and values. Be sure to also configure the six separate SMTP-related properties described in the previous topic Server Properties.
database.transaction.logging.enabled
smtp.enable
smtp.email_batch_wait_period_in_secs
smtp.exclude_emails_older_than_x_days
smtp.props.subs.password
smtp.resend_attempt_in_x_minutes
Testing email server settings
In ECC Administration Console, edit the server property smtp.props, as described in the previous topic Server properties for email (SMTP).
Click the blue Test link at the bottom of the dialog for editing the smtp.props property.
If prompted, edit the ECC user you are logged in as to specify an email address for your ECC user account. You will need to cancel out of the smtp.props dialog and the Server properties dialog, then go to the Users and Roles dialog to do this. Then repeat steps 1 and 2.
Wait one minute or more for the email to be sent. The amount of time to wait depends on the value of server property smtp.email_batch_wait_period_in_secs.
Check your email inbox for a message from the ECC Server.
If no ECC email message arrives, you may need to alter the Server properties database.transaction.logging.enabled and/or smtp.props. Or it is possible the ECC user account lacks a valid email address.
Server properties for integration with other Nuix products
If you have a license for Nuix Adaptive Security or Nuix Workstation you can integrate Nuix ECC with these products. This requires enabling the ECC REST API by navigating to the Server Properties screen in ECC Admin Console and enabling the high-level API as follows:
| Property |
Description |
Value type |
Value for integration |
| server.high-level-api.enabled |
When True, enables the High-Level API in the ECC Server, so that Nuix Adaptive Security, Nuix Workstation or other products can integrate with ECC via the ECC REST API. |
True/False |
False |
| server.high-level-api.http-auth.by-db-users.enabled |
When True, enables High-Level API authentication using an ECC User account whose Login High-level API option is enabled. Certain API methods require this authentication method. |
True/False |
True |
Once the server.high-level-api.enabled property and server.high-level-api.http-auth.by-db-users.enabled property are set to True, you can integrate Nuix Directory, Nuix Workstation or Nuix Adaptive Security with ECC. These products will need to be configured with the ECC Server's URL. You will also need to specify a username and password. Configure an ECC user for this purpose, with the Login High-level API option enabled and with Roles having the permissions needed by the integration.
Note: It is also possible to configure a user account for the high level API using server properties server.high-level-api.http-auth.name and server.high-level-api.http-auth.password. But this method is no longer recommended: certain API methods cannot use this authentication method, and the permissions of this account cannot be adjusted.
Warning: When integrating ECC with other Nuix products, it is recommended that ECC be configured to communicate via HTTPS only. This will ensure that all sessions between ECC and the other products are encrypted by SSL/TLS. Using HTTP to integrate ECC may leave the high-level API user name and password vulnerable to network packet sniffing.
Implement SSL security on the ECC Server
This is an optional step to secure communication with the ECC Server when:
Downloading and installing Nuix Launcher from the ECC Server's web page via a web browser
Launching ECC Admin Console from the ECC Server's web page via a web browser
Executing ECC REST API commands, or integrating ECC with other Nuix applications
Warning: If ECC will be a public-facing server or integrated with Nuix Adaptive Security or other Nuix applications, then SSL encryption is required to ensure the security of the ECC authentication credentials sent to the ECC Server.
Tip: If you are not going to use the ECC REST API or integrate ECC with another Nuix product then you can avoid the need to configure SSL in ECC entirely. To do so, (1) leave the ECC Server configured to communicate via HTTP rather than HTTPS, (2) ensure the high-level API (REST) is disabled in Server Properties, and (3) ensure the ECC Server cannot be accessed publicly on the internet. Nuix Launcher and Admin Console will download without encryption, but no critical data is transmitted during these activities. All direct communication between ECC Server, ECC Admin Console and ECC Client will still be encrypted using a built-in encryption protocol.
To implement SSL security:
An SSL certificate from a trusted Certificate Authority must be obtained, or a self-signed or company-issued SSL certificate must be created (see Note, below).
SSL certificates from a trusted Certificate Authority will require a DNS record for the fully qualified domain name of the ECC Server, e.g. a DNS "A" host record for myeccserver.mydomain.com, and a corresponding DNS "PTR" reverse lookup record.
The Nuix ECC Server must be configured to use HTTPS and a port number, such as 443 or 9443. The ECC Server must also be configured to utilize an SSL certificate. Nuix ECC Server should also be configured to no longer accept HTTP sessions. These settings can be accessed from the ECC Server Configuration Wizard (described later in this guide).
If the SSL certificate is self-signed, then this public SSL certificate will need to be installed within the Java keystore for the ECC Server, each ECC Admin Console computer, and each ECC Client with Search computer. In addition, computers that will launch ECC Admin Console from the ECC Server's web page will need to install a copy of this SSL certificate into their web browser's certificate store. This can be accomplished via Group Policy for computers which are members of an Active Directory domain.
If the SSL certificate is issued by an in-house certificate server, then the root certificate used by that certificate server will need to be installed within the Java keystore for the ECC Sevrer, each ECC Admin Console computer, and each ECC Client with Search computer. In addition, computers that will launch ECC Admin Console from the ECC Server's web page will need to install a copy of this SSL certificate into their web browser's certificate store. This can be accomplished via Group Policy for computers which are members of an Active Directory domain.
Note: If your ECC Server will be exposed to the public internet, you should use an SSL certificate from a commercial provider who is a trusted Certificate Authority, rather than creating your own certificate. These certificates generally cost money and require time to process. Because these certificates are already trusted, you can avoid installing certificates on every computer running ECC Admin Console or ECC Client with Search.
The following procedures guide you through implementing SSL security.
Using an SSL certificate from a trusted certificate authority
You can re-run the ECC Server Configuration Wizard at any time to enable HTTPS and configure an SSL certificate from a trusted Certificate Authority, as follows:
Warning: The following procedure will reconfigure communications on the ECC Server. This will require a restart of the ECC Server, as well as reconfiguration of ECC Server Connection Profiles for all ECC Client computers. ECC Admin Console computers will need to alter their server connection settings as well.
Obtain the SSL certificate, private key and any intermediate certificates from a trusted Certificate Authority.
Prepare the SSL certificates and keys. You will need a PEM-encoded text file for the private key, the SSL certificate, and any intermediate certificates (not all certificate authorities use intermediate certificates).
On the ECC Server computer, launch the ECC Server Configuration Wizard. See Run the ECC Server Configuration Wizard.
At the Welcome screen, click Next until you reach the Wizard page containing the General and Protocols settings.
Ensure the Hostname of your computer is specified, rather than an IP address. The hostname you specify must correspond to the CN (Common name) specified within the SSL certificate, or one of the DNS Names listed in the certificate under Subject Alternative Names. If your ECC Server is a member of an Active Directory name, then specify the fully qualified hostname, e.g. myserver.mydomain.com. If your ECC Server is NOT a member of any domain, then specify the hostname as the name of the computer. Either way, the hostname you specify should be "ping-able" from other computers.
Tip: Your ECC Server may communicate more reliably if its network adapter is assigned to a static IP address on the local LAN. If, instead, your ECC Server is currently configured to obtain an IP address dynamically, via DHCP, then consider changing to a static IP address. With static IP addresses, there is less chance of communication failures due to stale DNS records or other issues with DNS, DHCP or WINS network services.
Enable HTTPS and specify a unique TCP port number for HTTPS, such as 443.
Consider disabling HTTP, so that only an encrypted HTTPS connection can be made to the ECC Server. This is more secure than allowing both HTTP and HTTPS.
Select the Certificates option, then copy and paste the text of your private key and SSL certificate files into the corresponding fields within the Install SSL Certificate dialog, shown below:
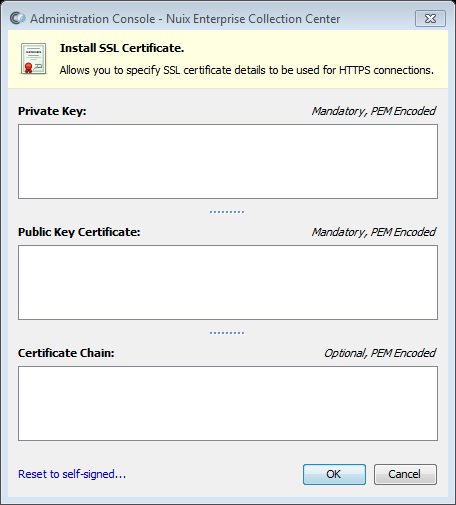
Click OK when done pasting the private key, public certificate and any certificate chain for your SSL certificate.
Click Next to advance to the final page of the Wizard. Write down the URL information presented on the last screen of the Server Configuration Wizard, for future reference.
Click Finish to save the new configuration and start (or restart) the ECC Server service.
Using a self-signed SSL certificate
Warning: The following procedure will reconfigure communications on the ECC Server. This will require a restart of the ECC Server, as well as reconfiguration of ECC Server Connection Profiles for all ECC Client computers. Installations of ECC Admin Console and ECC Client with Search will need to add a copy of the new self-signed SSL certificate to their Java keystores (the ECC Server itself will need this as well).
On the ECC Server computer, run the ECC Server Configuration Wizard from the Desktop shortcut or from a command shell; see Run the ECC Server Configuration Wizard.
At the Welcome screen, click Next until you reach the Wizard page containing the General and Protocols settings.
Enable HTTPS and specify a unique TCP port number for HTTPS, such as 443. This port must not be used by any other process on the ECC Server.
Consider disabling HTTP, so that only an encrypted HTTPS connection can be made to the ECC Server. This is more secure than allowing both HTTP and HTTPS.
If HTTPS had not been previously enabled, you can click Next to proceed; otherwise, select the Certificates option, then click the Reset to self-signed option.
Click Next to advance to the final page of the Wizard.
Note the URL information presented on the final screen of the Server Configuration Wizard. Write down this information for future reference.
Click Finish. The ECC Server service will be reconfigured and restarted, then a web browser will be launched to verify initial communicate with the ECC Server.
Add the self-signed SSL certificate to the ECC Server's Java keystore.
Proceed with topic Verify the Nuix ECC Server web page is responsive via SSL.
Using an SSL certificate from an in-house certificate server
Warning: The following procedure will reconfigure communications on the ECC Server. This will require a restart of the ECC Server, as well as reconfiguration of ECC Server Connection Profiles for all ECC Client computers. Installations of ECC Admin Console and ECC Client with Search will need to add a copy of the in-house certificate server's root certificate to their Java keystores (the ECC Server itself will need this as well).
On the ECC Server computer, run the ECC Server Configuration Wizard from the Desktop shortcut or from a command shell; see Run the ECC Server Configuration Wizard.
At the Welcome screen, click Next until you reach the Wizard page containing the General and Protocols settings.
Enable HTTPS and specify a unique TCP port number for HTTPS, such as 443. This port must not be used by any other process on the ECC Server.
Consider disabling HTTP, so that only an encrypted HTTPS connection can be made to the ECC Server. This is more secure than allowing both HTTP and HTTPS.
Select the Certificates option.
Paste the contents of the private key into the Private key field.
Paste the contents of the SSL certificate into the Public Certificate key field.
If the in-house certificate sever used one or more intermediate certificates, past each of these into the Intermediate (chain) certificates field. Also, past the root certificate used by the in-house certificate server into the Intermediate (chain) certificates field, below any intermediate certificates.
Note: each certificate in the Intermediate (chain) certificates field should have its headers and footers appear on distinct lines.
Click Next to advance to the final page of the Wizard.
Note the URL information presented on the final screen of the Server Configuration Wizard. Write down this information for future reference.
Click Finish. The ECC Server service will be reconfigured and restarted, then a web browser will be launched to verify initial communicate with the ECC Server.
Add the in-house certificate server's root certificate as a trusted certificate within the Java keystore of the ECC Server; see the procedure Add an in-house SSL certificate to an ECC Server Java keystore.
Proceed with topic Verify the Nuix ECC Server web page is responsive via SSL.
Verify the Nuix ECC Server web page is responsive via SSL
From a Windows PC, run a web browser and browse to the Nuix ECC Server web page URL:
Specify https rather than http in the web address.
Specify the new SSL port number in the address, e.g. 9443, rather than the previous port number. If port 443 was specified, it can be omitted from the address.
If the server is a domain member, use the fully qualified domain name of your ECC Server. If the server is a workgroup member, use just the hostname (COMPUTERNAME).
Domain member example on SSL Port 443
https://myserver.mydomain.com
Workgroup member example on SSL Port 9443
https://myserver:9443
Your web browser may issue a warning, such as There is a problem with this website's security certificate. This is an expected warning when browsing to an https web site which uses a self-signed SSL certificate (the warning should not appear if using a trusted SSL certificate). Click Continue to this website (not recommended). Your particular web browser may require other steps to permit access to the web page. Then the ECC Server Web Page will be displayed.
Try accessing the web page using the older, non-SSL web address. This older address should fail completely if HTTP was disabled via ECC Server Configuration Wizard.
SSL is now successfully configured in ECC Server. See additional procedures, below, to export the SSL certificate and deploy the certificate to other ECC Admin Console computers.
Deploy a self-signed or self-issued SSL certificate
If the Nuix ECC Server utilizes a self-signed SSL certificate, or a certificate from your own certificate server, you may be unable to connect to the ECC Server during the following activities:
Displaying the ECC Server's web page via a web browser.
If the ECC Server's web page fails to display in your web browser, you may be able to add an exception in your browser so the web page can be viewed. Mozilla Firefox allows such exceptions. For other web browsers, you'll need to export a copy of the ECC Server's public SSL certificate, then import that certificate into the certificate store used by the web browser.
Running Admin Console directly, or launching Admin Console from the ECC Server's web page.
Running an advanced search from an ECC Client.
Accessing ECC from within Nuix Adaptive Security, Nuix Workstation or a REST Client.
To permit other Nuix applications to integrate with ECC, you'll need to export a copy of the ECC Server's public SSL certificate, then import that certificate into the certificate store used by the other Nuix application. For Nuix Adaptive Security this would be the Windows certificate store on the Adaptive Security server. For Nuix Workstation this would be the Java cacerts keystore file within Nuix Workstation's JRE folder.
To enable the activities listed above, a copy of the ECC Server's self-signed public SSL certificate -- or the root certificate for the company-issued SSL certificate -- must be deployed to the computers which need to reach the Server. The deployment can occur in three ways:
Manually importing the certificate
Deploying the certificate via Group Policy
Deploying the certificate via a script, such as a batch file
This step is needed when using self-signed or company-issued SSL certificates on the ECC Server.
Applications requiring that an SSL certificate be added to their Java keystore
Applications which need to have such SSL certificates added to their Java keystores include:
| Application |
Path to Java Keystore |
| The ECC Server |
For Windows: "C:\Program Files\Nuix\ECC Server\jre64\lib\security\cacerts" For Linux: /opt/nuix/ecc-server/jre/lib/security/cacerts For macOS: /Library/nuix/ecc-server/jre/lib/security/cacerts |
| Any computers running ECC Admin Console |
For Windows: "C:\Program Files\Nuix\ECC Admin Console 100.2\jre\lib\security\cacerts" For Linux: /Library/nuix/ecc-admin-console-100-2/jre/lib/security/cacerts For macOS: /opt/nuix/ecc-admin-console-100-2/jre/lib/security/cacerts |
| Any computers running ECC Client with Search |
For Windows: "C:\Program Files\Nuix\Nuix Enterprise Collection Center\Client\jre64\lib\security\cacerts" For Linux: /usr/local/nuix/jre/lib/security/cacerts For macOS: /usr/local/nuix/jre/lib/security/cacerts |
Which certificates need to be added to each Java keystore
When the ECC Server uses a self-signed SSL certificate, that public certificate must be added to the Java keystores for the applications listed above.
When the ECC Server uses a company-issued SSL certificate, the root certificate associated with that company-issued SSL certificate must be added to the Java keystores for the applications listed above.
When ECC Server is integrated with a Keycloak server for user authentication, and when that Keycloak server is protected by a self-signed or company-issued SSL certificate, then the Keycloak server's SSL certificate needs to be added to the ECC Server's Java keystore (specifically, the Keycloak server's self-signed certificate, or the root certificate associated with the Keycloak server's company-issued SSL certificate). Computers which will run ECC Admin Console will also need a copy of the Keycloak's SSL certificate installed in their Java keystores.
Export the SSL certificate to a file
The root certificate for a company-issued SSL certificate can be obtained from the administrator of your organization's in-house certificate server. But a self-signed SSL certificate must be exported to a file before it can be deployed to other computers.
From a Windows computer, run the Microsoft Edge web browser.
Browse to the https URL for your Nuix ECC Server web page, as described above under the topic Verify the Nuix ECC Server web page is responsive via SSL. For example: https://myserver.mydomain.com
If Microsoft Edge indicates "Your connection isn't private", click the Advanced button, then click the link to "continue to the site (unsafe)".
At the top of the Microsoft Edge screen, next to the URL, click the words Not secure to view site information, then click "Your connection to this site is not secure".
At the message "The certificate for this site is not valid", click the Show Certificate button (appears just to the left of the [X] button near the top-right corner of the dialog).
Click the Details tab, then click the Export... button at the bottom.
Save the file, with the Save as type setting set to the default: Base64-encoded ASCII, single certificate. When you name the file give it a .crt filename extension.
Exit Microsoft Edge.
Install the SSL certificate for web browsing (Windows)
This method is suggested for installing the ECC Server's self-signed SSL certificate or the root certificate from an in-house certificate server on a limited number of computers.
On Windows computers, the SSL certificate (a text file in Base64-encoded ASCII format, a.k.a. PEM) must be installed in the Windows Certificate Store for Microsoft Edge to trust the certificate. Some versions of the Firefox web browser have their own certificate store, into which you can install a copy of the certificate (or add an exception in Firefox for the ECC Server's web page). Chrome and other web browsers may have their own SSL certificate store.
To install an SSL certificate into the Windows Certificate Store:
Click the Start button, type certmgr, then run the program Manage computer certificates (i.e. Certificate Manager). You will be prompted by "User Account Control" to allow elevation.
In Certificate Manager, select Trusted Root Certification Authorities.
Right-click Certificates under Trusted Root Certification Authorities, then choose All Tasks > Import...
Click Next to accept the Store location of Local machine.
Click Browse and open the .crt file that you exported from the ECC Server. Alternately, open the .crt file holding a copy of your in-house certificate server's root certificate).
Ensure Place all certificates in the following store is set to Trusted Root Certification Authorities, then click Next.
Click Finish, then OK.
Exit out of the Certificate Manager, then restart Microsoft Edge.
You can now browse to the ECC Server via Microsoft Edge from this computer – without being warned about the ECC Server's self-signed (or company-issued) SSL certificate being untrusted or invalid.
Install the certificate on ECC Admin Console
When the ECC Server uses HTTPS and is protected by a self-signed SSL certificate, or an SSL certificate generated by an in-house certificate server, then it is necessary to place a copy of that SSL certificate (or a copy of the root certificate, if generated in-house) into the Java keystore on each computer where ECC Admin Console is installed. This can only be done after ECC Admin Console is installed using a regular Admin Console installer (simply launching Admin Console from the ECC Server's web page is insufficient). For details see the procedure Configuring SSL for Admin Console and the procedure Add an SSL certificate to a Java keystore.
Install the SSL certificate on ECC Client with Search
When the ECC Server uses HTTPS and is protected by a self-signed SSL certificate, or an SSL certificate generated by an in-house certificate server, then it is necessary to place a copy of that public SSL certificate into the Java keystore on each computer where ECC Client with Search is installed. This can only be done after ECC Client with Search is installed. For details see the procedure SSL configuration steps.
Prepare ECC Client installation packages
A Server Connection Profile is a small, encrypted file named credentials.wsc01 which contains server connection details, including Server connection URL and TCP Port number. If the ECC Server uses an SSL certificate, then this credentials.wsc01 file will also contain information about that certificate. A credentials.wsc01 file with custom settings can accompany each installation of ECC Client. The following procedure details how to create a Server Connection Profile, save it as a separate file, and embed it into an ECC Client installation package. These customized ECC Client installation packages can then be used to install ECC Client along with the Server Connection Profile for connecting to your ECC Server. Or the new credentials.wsc01 file can be deployed to existing ECC Client computers.
It is also possible to embed a copy of the Nuix Adaptive Security Endpoint installer for Windows into the ECC Client Service MSI installer (also for Windows). This permits deployment of a single MSI to install two endpoint products – ECC Client and Adaptive Security Endpoint – on Windows endpoint computers, for customers who have licensed both ECC and Adaptive Security.
To prepare an ECC Client installation package
Follow the procedure in the topic Run the Client Deployment utility. Repeat this procedure to prepare ECC Client installer packages for other operating systems, if needed. You can then use the modified ECC Client installation packages to install ECC Client on computers throughout your network.
Warning: Do not install ECC Client on more computers than your ECC Server is licensed for. Exceeding your license limit may result in warnings within ECC Admin Console and can even prohibit your ECC system from operating.
Note: It is possible to install ECC Client using an unmodified ECC Client installation package, then manually copy the proper Server Connection Profile (a file named credentials.wsc01) to the computer. For details see topics Saving a New Server Connection Profile and Distributing a New Server Connection Profile.
Note: If your deployment scheme requires you to prepare customized installers, and those installers need to be code-signed (and notarized, for macOS), please send a request to Nuix Support.
Obfuscated ECC Client installations
You can configure an ECC Client installation package for Windows, macOS, or Linux to install the program in an obfuscated manner. Specifically, the name of the services, worker processes, and program installation path can be changed to obscure the fact that ECC Client is installed on the computer. On Windows computers, you can also hide Nuix ECC Client from the Control Panel > Programs and Features listing.
To prepare an obfuscated installer for ECC Client for Windows:
Run Admin Console on a Windows computer and follow the procedure in the topic Run the Client Deployment utility, with the following changes:
Before Step 11, click the + on the right side of the screen in the Obfuscation Settings section divider. This will reveal the obfuscation settings for installers.

Obfuscation Settings (for Windows) within the Client Deployment dialog
Ensure the option Embed in a Windows MSI Installer file is selected under Export Settings at the bottom of the dialog.
Under Obfuscation Settings, select the Enable option. This will enable the remaining Obfuscation Settings fields.
Change any or all of the various names for the ECC Client service and its various workers (child processes).
Optionally change the name of the Install Folder (this is a sub-folder under C:\Program Files -- or under C:\Program Files (x86) when installing on 64-bit editions of Windows).
Note: Ensure that the new names entered use valid characters for a file name on Windows (i.e. do not use colon, forward slash, backslash, asterisk, question mark, vertical bar, or angle brackets). Hyphens, underscores, and spaces are permitted, though no spaces are allowed at the beginning or end of a name.
Optionally select the option Hide Install From Programs and Features so the ECC Client installation does not appear under Control Panel > Programs and Features.
Note: If ECC client is installed on a Windows computer using an obfuscated MSI installer that is hidden from Programs and Features, you will not be able to uninstall ECC Client via Programs and Features. Instead, you can uninstall ECC Client by re-running the obfuscated ECC Client installer via an elevated Command Prompt, as shown in the following example:
msiexec.exe /x obfuscated.msi /quiet
Continue with Step 11 from the procedure Run the Client Deployment utility.
To prepare an obfuscated installer for ECC Client for macOS or Linux
Run Admin Console on a macOS or Linux computer and follow the procedure in the topic Run the Client Deployment utility, with the following changes:
Before Step 11, click the + on the right side of the screen in the Obfuscation Settings section divider. This will reveal the obfuscation settings for macOS or Linux installers. Change the name of the service and each worker process.
Continue with Step 11 from the procedure Run the Client Deployment utility.
Note: To prepare an obfuscated ECC Client installer for macOS, you must run ECC Admin Console from a macOS computer. To prepare an obfuscated ECC Client installer for Linux, you must run ECC Admin Console from a Linux computer.