Installing ECC Admin Console
Using the stand-alone ECC Admin Console installer
ECC Admin Console can be installed directly using an installer obtained from your Nuix representative. Installing Admin Console in this manner is preferred and is necessary whenever the requirements for launching ECC Admin Console from the ECC Server's web page cannot be met.
To install ECC Admin Console with a stand-alone installer:
Obtain the stand-alone installer for ECC Admin Console from your Nuix representative. Editions are available for 64-bit versions of Windows, Linux, and macOS.
On Windows and macOS, double-click the corresponding installer file to begin the installation.
Some versions of Linux may permit you to install the .DEB or .RPM installation package by double-clicking it from the desktop. Nuix Launcher can also be installed from a Linux command-line shell, as shown in the following example for 64-bit Debian Linux (for initial installations or upgrades):
sudo dpkg -i /path/to/nuix-launcher_1.1.17.0_amd64.deb
For Red Hat-derived Linux distributions, install the Nuix Launcher RPM file from a command-line shell, as shown in the following examples for 64-bit Red Hat Linux.
For an initial installation (all on one line):
sudo rpm -i /path/to/nuix-Launcher-1.1.17-0.x86_64.rpm
For an upgrade installation (all on one line):
sudo rpm -U /path/to/nuix-Launcher-1.1.17-0.x86_64.rpm
You can also install via the Yum package manager (all on one line):
sudo yum --nogpgcheck localinstall /path/to/nuix-Launcher-1.1.17-0.x86_64.rpm
To run ECC Admin Console:
The ECC Admin Console stand-alone installer will place a shortcut on the desktop so you can easily run the program.
Enabling high-resolution scaling
The text and graphics within ECC Admin Console screens can be scaled up so they are more legible on a high-resolution monitor.
To enable high-resolution scaling on a Windows PC:
Right-click the desktop shortcut for launching ECC Admin Console and choose Properties.
Modify the Target field as shown in the following example:
Old Value (all on one line):
"C:\Program Files\Nuix\ECC Admin Console 100.8\jre\bin\javaw.exe" -jar NuixCcAdminConsole.jar splash
Revised Value (all on one line):
"C:\Program Files\Nuix\ECC Admin Console 100.8\jre\bin\javaw.exe"
-Dsun.java2d.win.uiScaleX=125% -Dsun.java2d.win.uiScaleY=125%
-jar NuixCcAdminConsole.jar splash
In the example, above, text and graphics are scaled up 125% (i.e. a 25% increase). Set this percentage as needed.
Click OK to save changes to the desktop shortcut.
Run ECC Admin Console via the desktop shortcut and see if the higher scaling is satisfactory. If necessary, exit out of ECC Admin Console and repeat these steps.
To enable high-resolution scaling on a Linux PC:
Edit the text file
/usr/local/share/applications/com.nuix.ecc-admin-console-100-8.desktop
On the line beginning with Exec= add the parameters:
-Dsun.java2d.win.uiScaleX=125% -Dsun.java2d.win.uiScaleY=125%
These new parameters go just after /opt/nuix/ecc-admin-console-100-10/jre/bin/java
and just before -jar
Save your changes and retry launching ECC Admin Console from the desktop shortcut.
To enable high-resolution scaling on an Apple macOS computer:
Edit the text file
/Library/nuix/ecc-admin-console-100-8/ecc_admin_console.command
Revise the following line:
jre/bin/java -jar NuixCcAdminConsole.jar
so it appears as follows (all on one line):
jre/bin/java -Dsun.java2d.win.uiScaleX=125%
-Dsun.java2d.win.uiScaleY=125%-jar NuixCcAdminConsole.jar
Save your changes and retry launching ECC Admin Console from the desktop shortcut.
Launching ECC Admin Console from the ECC Server web page
Requirements
Local administrator rights are required to install Nuix Launcher.
If the ECC Server is configured for HTTPS, it must:
Use an SSL certificate from a trusted Certificate Authority.
Have the TLSv1.2 protocol and at least one TLSv1.2-related cipher suite enabled.
Certain newer versions of Linux do not support launching ECC Admin Console in this manner.
If the ECC Server uses a self-signed or company-issued SSL certificate, or has disabled TLSv1.2, then it is necessary to install ECC Admin Console using the stand-alone installer.
Install Nuix Launcher
Before ECC Admin Console can be launched from the ECC Server's web page, it is necessary to perform a one-time installation of a small utility named Nuix Launcher. This utility downloads, unpacks and runs the ECC Admin Console program from the ECC Server.
To install or upgrade Nuix Launcher:
Log in to the computer as a user with local Administrator privileges.
Run a web browser to browse to the ECC Server's web page.
Click the link at the bottom to download the edition of Nuix launcher which corresponds to the operating system of your computer:
| Operating system |
Nuix Launcher installer |
| Windows – 64-bit |
NuixLauncher-1.1.17.0.msi |
| Red Hat Linux (and derivatives) – 64-bit |
nuix-Launcher-1.1.17-0.x86_64.rpm |
| Debian/Ubuntu Linux (and derivatives) – 64-bit |
nuix-launcher_1.1.17.0_amd64.deb |
| macOS 10.14 "Mojave" and older – 64-bit |
NuixLauncher-1.1.17.0.pkg |
| macOS 10.15 "Catalina" and newer – 64-bit |
NuixLauncher-1.1.18.0.pkg |
Or obtain a copy of the Nuix Launcher installer(s) from your Nuix account representative.
Locate the Nuix Launcher installer which you downloaded in the previous step.
On Windows and macOS, double-click the corresponding installer file to begin the installation.
Some versions of Linux may permit you to install the .DEB or .RPM installation package by double-clicking it from the desktop. Nuix Launcher can also be installed from a Linux command-line shell, as shown in the following example for 64-bit Debian Linux (for initial installations or upgrades):
sudo dpkg -i /path/to/nuix-launcher_1.1.17.0_amd64.deb
For Red Hat-derived Linux distributions, install the Nuix Launcher RPM file from a command-line shell, as shown in the following examples for 64-bit Red Hat Linux.
For an initial installation (all on one line):
sudo rpm -i /path/to/nuix-Launcher-1.1.17-0.x86_64.rpm
For an upgrade installation (all on one line):
sudo rpm -U /path/to/nuix-Launcher-1.1.17-0.x86_64.rpm
You can also install via the Yum package manager (all on one line):
sudo yum --nogpgcheck localinstall /path/to/nuix-Launcher-1.1.17-0.x86_64.rpm
Click the blue Launch Admin Console button on the ECC Server's web page. If prompted, allow the link to open or associate with .launcher-package files.
Configure SSL for Admin Console
Requirements:
Any self-signed SSL certificate used by your ECC Server has been exported to a file, then imported into the following certificate stores on your computer:
The Java 11 Runtime Environment certificate store.
The certificate stores used by your web browsers.
For details see topics Export the self-signed SSL certificate to a file and Deploy a self-signed SSL Certificate.
ECC Admin Console uses Java to communicate with the ECC Server. If the ECC Server does not use HTTPS, or is configured for HTTPS and uses an SSL certificate issued by a trusted certificate authority (such as DigiCert, Let's Encrypt, Comodo, Sectigo, Thawte, RapidSSL, GeoTrust, Symantec, etc.), then no further action is required.
But if the ECC Server is configured for HTTPS and uses a self-signed SSL certificate or an SSL certificate issued by an in-house certificate server, then a copy of one or more of these certificates must be imported into the keystore used by Java on each ECC Admin Console computer. See the procedures:
Add a self-signed SSL certificate to an ECC Admin Console Java keystore
Add an in-house root certificate to an ECC Admin Console Java keystore
These changes will take effect the next time the ECC Admin Console service is run.
Launch ECC Admin Console
ECC Admin Console can be launched from any web browser that can reach the ECC Server.
The following requirements must be met:
The ECC Server is running and accessible from your network.
The ECC Server is NOT configured with a self-signed SSL certificate, or an SSL certificate issued by an in-house certificate server.
The procedures outlined in Preliminary configuration of the ECC Server have been completed.
Nuix Launcher is installed on your computer.
If the requirements, above, cannot be met then ECC Admin Console must be installed using the stand-alone installer, and launched from the desktop shortcut.
Configure the default ECC Server connection
The first time ECC Administration Console is run, you will be prompted to set up the Default ECC Server Connection, as follows:
Launch the Nuix ECC Administration Console program from the desktop shortcut or form the ECC Server's web page.
The first time you run Admin Console, the Set up Server Connection dialog appears:
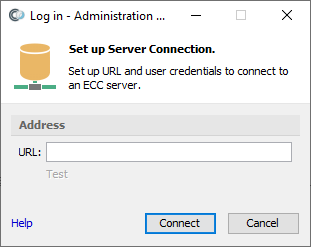
Enter the URL for your ECC Server. The URL is similar to the URL you used earlier to access the ECC Server via web browser, except that this URL always ends with a colon and the TCP port number. This URL was provided at the end of the ECC Server installation.
Click the blue Test link below the URL to ensure you can communicate with the ECC Server.
Click Next to save the server connection settings as your Default ECC Server. The Log in dialog appears:
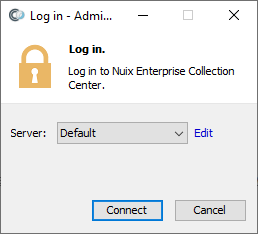
Select the ECC Server from the Server list (there will be only one initially) and click Connect.
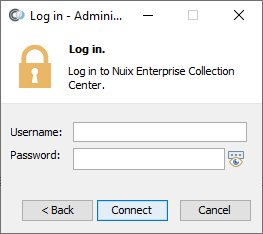
Enter the username Administrator, then click OK to log in to the ECC Server.
Warning: On a new installation, the only ECC user is Administrator, and the password is left empty. Setting a password for the Administrator user is a crucial step to configuring a new ECC Server. For details see topic Configure ECC users and security, below.
If the ECC Server is integrated with a Keycloak authentication server, and if multi-factor authentication is enabled for the Administrator user, then a web browser will appear and prompt for a one-time password.
Note: One-time passwords can be retrieved with an authenticator app such as Google Authenticator or FreeOTP, available for iPhones and Android mobile devices, as well as the WinOTP application for Windows 10 computers.