Ongoing administration
Run the Client Deployment utility
The Client Deployment utility is part of ECC Admin Console. It allows you to review or create an ECC Server Connection Profile (a file named credentials.wsc01), which each ECC Client needs in order to connect to an ECC Server.
The Client Deployment utility also lets you review or embed an ECC Server Connection Profile within an ECC Client installation package. The modified ECC Client installation package can then be deployed to endpoint computers throughout your organization, allowing the ECC Client to be installed preconfigured to connect to the specified ECC Server. These ECC Client installation packages can be further customized to obscure the presence of ECC Client or to add various other options to the installation.
Note: When embedding a Server Connection Profile into an ECC Client installer for Windows, you have the option to enable the network capture feature. If the Set installer to include Network Capture Worker option is enabled, the modified ECC Client .msi installer will install a WinPcap driver on each Windows ECC Client computer. Details regarding this technology are available at http://www.winpcap.org/ and at http://en.wikipedia.org/wiki/Pcap.
Note: The original MSI files are signed with a Nuix code signing certificate. The original macOS PKG installers for ECC Client are also signed by Nuix and notarized by Apple. By embedding your organization's Server Connection Profile into one of these files, you are tampering with the installer file contents and therefore invalidating the signature/notarization of the installer. This is generally not a problem; however: Installing a modified MSI or PKG file may produce warnings that the software publisher is unknown. Installing a modified MSI file via Group Policy may produce warnings or errors. If your deployment scheme requires you to prepare customized installers, and those installers need to be code-signed (and notarized, for macOS), please send a request to Nuix Support.
To run the Client Deployment utility:
Go to a computer that (a) has ECC Admin Console installed, and (b) is running the same operating system as the computers for which you are preparing an ECC Client installation. For example, to prepare an ECC Client installation package for macOS, go to a macOS computer.
Note: Preparing ECC Client installation packages for Linux requires running ECC Admin Console from a Linux computer with a graphical desktop environment, such as Gnome, KDE or other popular desktop environment. Once an ECC Client installer for Linux has been prepared, it can be installed on Linux computers whether or not they have a graphical desktop.
Login to the computer as a user with local Administrator privileges.
If the computer runs Linux or macOS, be sure the following utilities are installed before you proceed:
| Computer OS |
Utility packages required to embed an ECC Server connection into an ECC Client installer |
| macOS computers |
'xar', 'gunzip' and 'pkgbuild' utilities |
| Linux |
'rpm', 'rpm2cpio', 'cpio' and 'alien' |
macOS computers typically have all of the required utility packages pre-installed. Linux computers typically need to install these packages, using web browser downloads, yum, apt-get or other means. Command-line commands such as 'which pkgbuild' or 'which rpmbuild' can verify whether a needed utility is installed.
Disclaimer: Nuix makes no warranty for the above products, which are provided by other entities.
Run ECC Admin Console from the desktop shortcut, or by browsing to the ECC Server and clicking Launch Admin Console.
Prepare a first-time server connection, if necessary, by following the procedure Configure the Default ECC Server Connection.
Log in to the ECC Server.
Select the top-most  menu button, then select Client Deployment, then wait several seconds for the Client Deployment dialog to appear.
Note: if the Client Deployment option does not appear on the menu, then the username you are logged in as lacks the Manage users and roles permission.
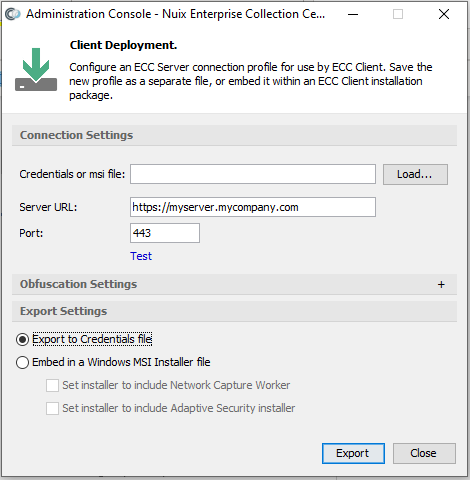
Note: The dialog image shown, above, is from ECC Admin Console's Client Deployment dialog running on a Windows computer. When running on a macOS or Linux system, the Client Deployment dialog offers options for embedding the connection profile into a .pkg or .rpm installation package, respectively.
Specify the following values:
| Value |
Description |
| Server URL |
The web address for the ECC Server, beginning with http:// or https:// followed by the server's hostname or fully qualified domain name. |
| Note:Do not specify a port number here, nor the colon that precedes the port number. See the examples, below. |
|
| Port |
The TCP port number for the Nuix ECC Server. If the ECC Server URL begins with http:// specify the port number associated with HTTP. If the ECC Server URL begins with https:// specify the port number associated with HTTPS. |
| Note: Web browsers can omit the colon and port number from a URL in two special cases – when using http:// over port 80, or when using https:// over port 443. But here, the port number must be explicitly entered. When ECC Clients and ECC Admin Console computers communicate with the ECC Server, they use AES-256 encrypted communication - regardless of the TCP port number. This direct communication does not require HTTPS (TLS) encryption; however, the ECC REST API depends entirely on HTTPS to ensure data is transmitted in a secure, encrypted format. |
|
| Test |
Click Test to verify that the specified Server URL and Port are valid. |
Regular domain example using HTTP:
| Server URL |
|
| Port |
80 |
Workgroup example using HTTPS:
| Server URL |
https://myserver |
| Port |
443 |
Click the Test option to verify the values you entered are correct and that communication with the Nuix ECC Server can be made. You should see a response confirming a successful test in a few moments, or an error within one minute if the settings are not correct or the ECC Server is unreachable.
Select the Export to Credentials file option, if not already selected, then
Click Export.
Navigate to the Modified Installers folder which you created earlier (see topic Obtain the ECC Installers).
Name the credentials file credentials.wsc01 and save it. This file can be manually deployed to computers already running ECC Client, if necessary (e.g. after installing an updated SSL certificate on an ECC Server, a fresh credentials.wsc01 file must be saved and deployed to each ECC Client computer).
Select Embed in an Installer file option, then:
Select the Set installer to include Network Capture Worker option, if you wish to activate this feature (this option applies to Windows installers only; Network Capture is enabled for all Linux and macOS ECC Clients).
Select the Set installer to include Adaptive Security installer option, if you wish to install both ECC Client and Adaptive Security Endpoint via a single MSI installer (this option applies to Windows installers only). Once this option is enabled, a Browse button will appear. Click this Browse button to select the setup.exe file for Nuix Adaptive Security Endpoint.
Click Export.
Navigate to the Modified Installers folder which you created earlier (see topic Obtain the ECC Installers).
Select the ECC Client installation package (one of the following):
| Installation | Installer |
| Nuix ECC Client Service 32-bit.msi Nuix ECC Client Service 64-bit.msi Nuix ECC Client Search Service 64-bit.msi nuixecc-100.6.0.28299-1.i386.rpm nuixecc-100.2.0. 28127-1.x86_64.rpm nuixecc_100.6.0.28299-1_amd64.deb nuixecc_100.6.0.28299-1_i386.deb NuixECCClient-100.6.0.28299.pkg |
installer for 32-bit Windows installer for 64-bit Windows installer for 64-bit Windows installer for 32-bit Red Hat Linux* installer for 64-bit Red Hat Linux* installer for 32-bit Debian/Ubuntu Linux* installer for 64-bit Debian/Ubuntu Linux* installer for 64-bit macOS * See note, below |
Note: If you need to update an ECC Client installer for a Debian/Ubuntu-based Linux or for a Red Hat-based Linux, run Admin Console from a similar Linux system and from the Client Deployment dialog select the 32-bit or 64-bit .rpm installer. The program will extract the .rpm file, add the specified Server Connection Profile details, then generate TWO modified installers: an updated .rpm installer for Red Hat-based Linux distributions AND an updated .deb installer for Debian/Ubuntu-based Linux distributions.
Click Save. This will embed the Server Connection Profile into the selected Nuix ECC Client installation package file.
Rerun the ECC Server Configuration Wizard
On the ECC Server computer, run the ECC Server Configuration Wizard from the Desktop shortcut.
Alternately, you can launch the ECC Server Configuration Wizard by running the following commands from a command shell:
| Operating system |
Commands to re-launch the ECC Server configuration wizard |
| Windows |
rem – From Command Prompt opened As Administrator... cd /d "C:\Program Files\Nuix\ECC Server" jre64\bin\java.exe -jar NuixEccServer.jar |
| Linux |
# From Terminal or a shell... cd /opt/nuix/ecc-server sudo jre/bin/java -jar NuixEccServer.jar |
| macOS |
# From Terminal or a shell... cd /Library/nuix/ecc-server sudo jre/bin/java -jar NuixEccServer.jar |
See the topic Run the ECC Server Configuration Wizard to review the various Wizard screens and options.
When the Finish button is clicked from the final page of the ECC Server Configuration Wizard, any changes are saved and the service is restarted.
Manually edit the server.conf file
The ECC Server's primary configuration file, server.conf, can be manually edited. This gives access to many more settings than the ECC Server Configuration Wizard can access. To edit this file:
| Operating system |
Commands to view/edit the ECC Server service configuration file |
| Windows |
From the Start menu, right-click the Notepad shortcut and choose Run as Administrator. Any other text editor can be run, so long as it is run elevated (i.e. as Administrator). Choose File > Open, then change the filename filter in the lower-right corner to show "Files of type: All Files (*.*)". Navigate to folder C:\Program Files\Nuix\ECC Server\conf Open the file named server.conf |
| Linux |
Open this file in a text editor, e.g. sudo nano /opt/nuix/ecc-server/conf/server.conf The Nano text editor can be exited with Ctrl+X. |
| macOS |
Open this file in a text editor, for example: sudo nano /Library/nuix/ecc-server/conf/server.conf The Nano text editor can be exited with Ctrl+X. |
When manually making changes to the server.conf file, it is necessary to first stop the ECC Server and then restart it once the edits are saved.
Manually edit the https-cert.pem file
The ECC Server's SSL configuration file, https-cert.pem, is typically viewed or modified by running the ECC Server Configuration Wizard and viewing the Certificates dialog. This file can also be manually edited, as follows:
| Operating system |
Commands to view/edit the ECC Server's https-cert.pem file |
| Windows |
From the Start menu, right-click the Notepad shortcut and choose Run as Administrator. Any other text editor can be run, so long as it is run elevated (i.e. as Administrator). Choose File > Open, then change the filename filter in the lower-right corner to show "Files of type: All Files (*.*)". Navigate to folder C:\Program Files\Nuix\ECC Server\conf Open the file named https-cert.pem. |
| Linux |
Open this file in a text editor, for example: sudo nano /opt/nuix/ecc-server/conf/https-cert.pem The Nano text editor can be exited with Ctrl+X. |
| macOS |
Open this file in a text editor, for example: sudo nano /Library/nuix/ecc-server/conf/https-cert.pem The Nano text editor can be exited with Ctrl+X. |
When manually making changes to the https-cert.pem file, it is necessary to first stop the ECC Server and then restart it once the edits are saved.
Within the https-cert.pem file, the keys and certificates must be placed in the following order:
The private key comes first, as a Base64-encoded ASCII value sandwiched between a
-----BEGIN RSA PRIVATE KEY----- header
and an -----END RSA PRIVATE KEY----- footer.
Next comes the public certificate.
Following the public certificate are any intermediate certificates (not all SSL certificates require these).
If the public certificate was issued by an in-house certificate server, then the root certificate must be included as the final certificate.
All of the certificates are in PEM format, i.e. Base64-encoded data sandwiched between a
-----BEGIN CERTIFICATE----- header and an -----END CERTIFICATE----- footer.
The PEM format is simple, but strict. Headers and footers such as -----BEGIN RSA PRIVATE KEY----- and -----END CERTIFICATE----- must appear on their own line: they cannot be on the same line as another header, footer or any Base64 data. They must include exactly five hyphens at their start and end, with no spaces immediately before or after the hyphens.
Check the ECC Server service
To check the status of the ECC Server service:
| Operating system |
Commands to stop the ECC Server service |
| Windows |
From Control Panel, Administrative Tools, Services – view the service named Nuix ECC Server. |
| Linux |
# From Terminal or a shell... sudo service nuix-ecc-server status # or sudo invoke-rc.d nuix-ecc-server status |
| macOS |
# From Terminal or a shell... sudo launchctl list | egrep -m 2 "(Status|ecc|uix/server)" |
ECC Server shutdown and startup
It is often necessary to shut down or restart Collection Center computers, in order to install operating system updates, to relocate or upgrade equipment, to allow configuration changes to take effect, or simply to save power when not in use.
Any ECC computer can be powered off or restarted in a normal fashion, e.g. on Windows by clicking Start > Shutdown. ECC applications and services will close any active connections. Nevertheless, the following shutdown and startup procedures will ensure minimal issues and monitoring alerts.
Stop the ECC Server service
Optional: Exit out of any open ECC Administration Console sessions.
If ECC Administration Console is left running while an ECC Server is shut down, then Administration Console will lose its server connection. It may be necessary to exit Administration Console and restart the program once the ECC Server is running again.
Shut down the ECC Server service, as follows:
| Operating system |
Commands to stop the ECC Server service |
| Windows |
From Control Panel, Administrative Tools, Services – stop the service named Nuix ECC Server. Or from an administrative Command Prompt or batch file, enter the command net stop "Nuix ECC Server" |
| Linux |
# From Terminal or a shell...
sudo systemctl stop nuix-ecc-server.service # or sudo service nuix-ecc-server stop # or sudo invoke-rc.d nuix-ecc-server stop |
| macOS |
# From Terminal or a shell (all on one line)...
sudo launchctl unload /Library/LaunchDaemons/com.nuix.ecc-server.plist |
Note: Any active ECC Clients will queue their status messages while the ECC Server is shutdown or otherwise unavailable. Once the ECC Server is restarted, the active ECC Clients will report their latest status information.
Start the ECC Server service
The ECC Server service is configured to automatically start whenever the computer where ECC Server was installed is started. If you manually shut down the service, you can start it up again with the following commands (for example, after manually editing the configuration):
| Operating system |
Commands to start the ECC Server service |
| Windows |
From Control Panel, Administrative Tools, Services – start the service named Nuix ECC Server. Or from an administrative Command Prompt or batch file, enter the command: net start "Nuix ECC Server" |
| Linux |
# From Terminal or a shell...
sudo systemctl start nuix-ecc-server.service # or sudo service nuix-ecc-server start # or sudo invoke-rc.d nuix-ecc-server start |
| macOS |
# From Terminal or a shell (all on one line)...
sudo launchctl load /Library/LaunchDaemons/com.nuix.ecc-server.plist |
Update server connections for ECC Clients
At any time, you can change the Server Connection Profile which ECC Clients use to connect to the ECC Server. This is necessary if the ECC Server's URL or TCP port number changes, or whenever the ECC Server's SSL certificate is renewed or replaced (assuming the ECC Server uses HTTPS).
Note: Each ECC Client service will need to be restarted before the settings within a new Server Connection Profile can take effect.
Configure and save a new server connection profile
See topic Run the Client Deployment utility.
Distribute a new server connection profile
For Windows computers running ECC Client
Stop the service named Nuix ECC Client from Control Panel > Administrative Tools > Services. Or stop the service from a Command Prompt run As Administrator, using the following command:
net stop "Nuix ECC Client"
Copy the newest Credentials.wsc01 file (the latest Server Connection Profile) to each ECC Client computer's Profile folder, overwriting any existing file. The Profile folder is typically:
C:\ProgramData\Nuix\Nuix Enterprise Collection Center\Profile
The precise location of the Credentials.wsc01 file is specified by the following registry value on each ECC computer:
Key:
HKEY_LOCAL_MACHINE\SOFTWARE\Nuix\Nuix Enterprise Collection Center\Version 1.0
Item: CredentialFolderPath
Start the service named Nuix ECC Client from Control Panel > Administrative Tools > Services. Or start the service from a Command Prompt run As Administrator, using the following command:
net start "Nuix ECC Client"
For Linux and macOS computers running ECC Client
Stop the Nuix ECC Client service from Terminal or a bash shell as follows:
On Debian-based Linux:
sudo invoke-rc.d nuixecc stop
or
sudo service nuixecc stop
On Red Hat based Linux:
sudo service nuixecc stop
On macOS:
sudo launchctl unload /Library/LaunchDaemons/com.nuix.ecc-client.plist
Copy the newest credentials.wsc01 file (the latest Server Connection Profile) to each ECC Client computer's Profile directory, overwriting any existing file. The directory name is:
/usr/local/nuix/etc
The file must be named in all lowercase:
credentials.wsc01
Start the Nuix ECC Client service.
On Debian-based Linux:
sudo invoke-rc.d nuixecc start
or
sudo service nuixecc start
On Red Hat based Linux:
sudo service nuixecc start
On macOS:
sudo launchctl load /Library/LaunchDaemons/com.nuix.ecc-client.plist
Relocate the ECC Server database
To relocate the ECC Server database:
Backup the ECC Server database.
Relocate the database folder to a new folder.
Warning: If you add a new volume to the ECC Server (for example, in order to store the database), the new volume may invalidate the ECC license key. Contact Nuix Support to coordinate changes to the hardware of your ECC Server, so that a new license can be provided quickly.
Manually change the Database location. See Manually edit the server.conf file.
Restart the ECC Server service.
ECC Server database maintenance and repair
The ECC Server automatically executes scheduled maintenance tasks to keep the underlying database in optimal condition. No action by a systems administrator is required.
Database corruption is rare, but can happen due to hardware failure, power outages and other unexpected events. If error messages or log files indicate database corruption or other concerns, please contact Nuix Support for assistance. Provide copies of any log files or screen images. An ECC Server data backup may be required to recover from a database corruption.
ECC Server data backup
The ECC Server stores collection settings in a database file and in a set of configuration files and log files. These files should be backed up periodically.
Note: Specific backup methods, frequencies, media types, rotation schedules, offsite storage and other backup topics are beyond the scope of this Guide. Contact your organization's IT staff or a qualified IT consultant for recommendations.
The backup procedure must ensure that no collections are running or about to run prior to starting the backup.
General procedure for backing up ECC Server
Shut down the ECC Server service, as described in the topic ECC Server Shutdown and Startup.
Backup the entire ECC Server application data folder, including sub-folders. This folder is typically located as follows:
| Operating system |
ECC Server application data folder location |
| Windows |
C:\ProgramData\Nuix\ECC Server |
| Linux |
/var/lib/nuix/ecc-server |
| macOS |
/Library/Application Support/nuix/ecc-server |
The ECC Server application data folder contains the Apache Derby database, in the data\derby sub-folder. The ECC Server application data folder also contains a logs subfolder.
The ECC Server's application data folder requires 50 MB to 100 MB of disk space for a typical installation; however, your installation may exceed these figures. Given time, log files and database files can extend disk usage to several gigabytes.
Restart the ECC Server computer, as described in the topic ECC Server Shutdown and Startup.
Schedule automatic ECC Server data backups
Scheduling a backing up ECC Server's application data folder requires creating a script to perform several functions. A typical ECC Server data backup script would do the following:
Shut down the ECC Server service, as described in the topic ECC Server Shutdown and Startup.
Backup the ECC Server's application data folder, including all subfolders and files.
Restart the ECC Server service, as described in the topic ECC Server Shutdown and Startup.
Log any warnings or errors that occur at each of the above steps.
Exit with an ERRORLEVEL of 1 or higher if any errors were encountered, or exit with an ERRORLEVEL of 0 if no errors were encountered.
The above steps can be performed with a batch file or bash script, scheduled to run via Windows Task Scheduler or crontab, and running under a user account with highest (administrator-level) permissions for accessing the ECC Server.
Additional backups
Consider backing up other items related to the ECC system, including (but not limited to):
The Server Connection Profile used by ECC Client.
The modified installers for ECC Client (MSI, PKG, DEB or RPM installation packages containing an embedded copy of your ECC Server's Connection Profile, and possibly an embedded installer for Nuix Adaptive Security Endpoint).
The server.conf configuration file and all other files within the conf subfolder of the ECC Server's installation folder. To locate this file, see topic View or Edit Server Configuration Settings.
Any SSL certificate used with the ECC Server, including the public certificate, the private key and any intermediate certificates. These files are stored on the ECC Server in the same folder as the server.conf file. To locate this folder, see topic View or Edit Server Configuration Settings.
The files you collect to Destination folders, plus the corresponding Log folders and crawl databases located within the various Destination folders.
Consider performing a full disk image backup of the ECC Server's hard disks from time-to-time. Having such backups available could facilitate recovery from a server hard disk crash or other catastrophic failure. Perform the ECC Server Shutdown Procedure before recording such image backups. Use a third-party disk image backup program which can restore backup images.
The ECC Server license activation can only be backed up by taking a full disk image backup of the ECC Server, using a tool such as Acronis TrueImage Server Edition, and restoring that image to the same hardware. If you need to restore an ECC Server data backup to a different computer, you'll need to contact Nuix for a new license activation code.
Restore ECC Server data from a backup
Restoring the ECC Server Data folder from a backup requires:
| Step | Description | Details |
| 1. |
Shutting down the ECC Server service |
See topic ECC Server Shutdown and Startup |
| 2. |
Restoring the Data folder to the proper location |
Restore procedures depend on your chosen backup method. See topic ECC Server Data Backup for folder location. |
| 3. |
Restarting the ECC Server service |
See topic ECC Server Shutdown and Startup |
Purge old log files
Warning: Prior to purging any logs or records, be sure such actions comply with any applicable government regulations, court requirements and your own organization's policies and corporate governance requirements. Consult your organization's legal counsel, if necessary, before proceeding with any purge.
ECC Server application log files are used for diagnostic purposes. You may wish to delete or rotate (rename) the older log file periodically, to keep it from growing so large that it is difficult to review. To do so:
Stop the ECC Server service: see topic ECC Server Shutdown and Startup
Locate the ECC Server application log file. On production installations of ECC Server, this log file is located in one of the following folders:
| Operating system |
ECC Server application log folder |
| Windows |
C:\ProgramData\Nuix\ECC Server\logs |
| Linux |
/var/lib/nuix/ecc-server/logs |
| macOS |
/Library/Application Support/nuix/ecc-server/logs |
Rename or delete the file application.log
Restart the ECC Server service: see topic ECC Server Shutdown and Startup.
SSL certificate procedures
Prepare SSL certificates and keys
The various procedures for installing certificates and keys throughout this guide require that each certificate or key is stored as a PEM-encoded text file (sometimes referred to as Base64-encoded ASCII, but PEM is more accurate). But certificates and keys are sometimes stored in other formats.
If you obtain your SSL certificate and private key from a trusted certificate authority, you may need to convert the files provided by the certificate authority into a different format. Specifically, if you are provided a .pfx keystore file, use the following steps to extract the private key and SSL certificate from the .pfx file:
To extract and convert certificates and keys from a .PFX file:
Install OpenSSL on your computer.
Place a copy of the .pfx file you received on your computer.
Open a Command Prompt, terminal or bash shell
Run the OpenSSL commands shown, below, to extract and convert the contents of the .pfx file.
To extract the private key from a .PFX file:
Modify the filenames in the command, below, as needed. Filenames can be double-quoted and can include drive/folder/directory paths.
openssl pkcs12 -in keystore-from-CA.pfx -nocerts -out private.key
After running the command, above, examine the resulting private.key file using a text editor. It should contain a heading exactly like this one:
-----BEGIN RSA PRIVATE KEY-----
If, instead, it begins with a heading:
-----BEGIN ENCRYPTED PRIVATE KEY-----
then proceed with the next step to save this key as an RSA private key.
To convert an encrypted private key to an RSA private key:
The following command is needed only if the private key begins with a heading:
-----BEGIN ENCRYPTED PRIVATE KEY-----
This command will generate a new private key file with an RSA heading:
openssl rsa -in private.key -out private-rsa.key
Modify the filenames in the command, above, as needed.
To extract the SSL certificate from a .PFX file:
openssl pkcs12 -in keystore-from-CA.pfx -clcerts -nokeys -out public.crt
Modify the filenames in the command, above, as needed.
To extract the certificate chain (including any intermediate certificates) from a .PFX file:
openssl pkcs12 -in keystore-from-CA.pfx -cacerts -nokeys -chain
-out cert-chain.crt
Modify the filenames in the command, above, as needed.
Some certificate authorities do not package their intermediate certificates within .pdx files. Instead, they offer download links to obtain their intermediate certificates from their web sites.
Miscellaneous guidelines for certificates and keys:
Sometimes a certificate or key will contain extra information
above the -----BEGIN CERTIFICATE----- header or -----BEGIN RSA PRIVATE KEY----- header. This extraneous information should be deleted; however, be sure to retain the header (including the leading 5 hyphens).
Ensure you have a separate text file for each certificate and key. The file names should make it easy to distinguish whether the certificate within is a private key, a public certificate, an intermediate certificate or a root cert. Store these files in a secure manner.
It is not necessary -- and is bad practice -- to install the private key for an SSL certificate on an ECC Client or ECC Admin Console computer.
Renew an SSL certificate on the ECC Server
All SSL certificates have an expiration date – typically one year from the date they were generated. A newer SSL certificate should be installed prior to the expiration date of the old certificate, as described in the following procedures.
When the SSL certificate is issued from a trusted Certificate Authority
Proceed at a time when the ECC Server service can be shut down.
Obtain the new SSL certificate, the new private key and any intermediate certificates from the Certificate Authority which issued the new SSL certificate. If necessary, you may need to extract the private key, the SSL certificate and any intermediate certificates from a .pfx file; see procedure Prepare SSL certificates and keys.
Note: The private key and each certificate must be in the form of a PEM-encoded text file. These files can be viewed in any text editor. The private key must have a header:
-----BEGIN RSA PRIVATE KEY-----
If, instead, the private key has a header:
-----BEGIN ENCRYPTED PRIVATE KEY-----
then you will need to convert this encrypted private key to an RSA private key; see procedure Prepare SSL certificates and keys.
On the ECC Server, run the ECC Server Configuration Wizard.
Click Next three times to advance to the Wizard page containing the General and Protocols sections.
Ensure the setting HTTPS enabled is selected, then click the Certificates... link to the right of this setting.
From the SSL Certificates dialog, clear any existing values, then copy/paste the private key, SSL certificate and intermediate certificates (if any) into their respective fields.
Complete the ECC Server Configuration Wizard and allow time for the ECC Server to restart.
Create a new credentials.wsc01 file from ECC Admin Console's Client Deployment dialog; see Run the Client Deployment utility. The new credentials.wsc01 file will need to be deployed to each ECC Client; see Deploy a new or updated SSL certificate, below.
This new credentials.wsc01 file will contain information from the ECC Server's new SSL certificate.
For details see topic Implement SSL Security on the ECC Server.
When the SSL certificate is issued from an in-house certificate server
Proceed at a time when the ECC Server service can be shut down.
On the ECC Server, run the ECC Server Configuration Wizard.
Click Next three times to advance to the Wizard page containing the General and Protocols sections.
Ensure the setting HTTPS enabled is selected, then click the Certificates... link to the right of this setting.
From the SSL Certificates dialog, clear any existing values, then copy/paste the private key, SSL certificate and intermediate certificates (if any) into their respective fields.
Copy/paste the root certificate from the in-house certificate server into the intermediate certificates field, being careful to preserve any intermediate certificate values in that field (the root certificate should be pasted below any existing intermediate certificates).
Complete the ECC Server Configuration Wizard and allow time for the ECC Server to restart.
Add the root certificate from the in-house certificate server into the Java keystore on the ECC Server itself, as well as the Java keystore on any installation of ECC Admin Console or ECC Client with Search. For details see the topics under Add an in-house SSL certificate to a Java keystore.
Each ECC Admin Console installation will need to be installed using the stand-alone installer, rather than being launched from the ECC Server's web page. This ensures the Java keystore for ECC Admin Console will remain unchanged after each launch of Admin Console.
Browsing to the ECC Server's web page would require adding a site exception for the ECC Server's web site within the browser. Some web browsers allow importing a copy of the in-house certificate server's root certificate into the browser's certificate store, so the ECC Server website can be fully trusted and no warning issued (optional).
Create a new credentials.wsc01 file from ECC Admin Console's Client Deployment dialog; see Run the Client Deployment utility. The new credentials.wsc01 file will need to be deployed to each ECC Client; see Deploying a new or updated SSL certificate, below.
This new credentials.wsc01 file will contain information from the ECC Server's new SSL certificate.
For details see topic Implement SSL Security on the ECC Server.
When the SSL certificate is self-signed
You can generate a fresh self-signed SSL certificate with a new expiration date whenever needed, as follows:
Proceed at a time when the ECC Server service can be shut down.
Shut down the ECC Server service. See topic Stop the ECC Server service.
On the ECC Server, delete or rename the PEM-encoded text file which holds the old self-signed public certificate and private key. This file is named https-cert.pem, and is located in the same folder as the server.conf file. See topic View or Edit Server Configuration Settings to locate this folder.
Or run the ECC Server Configuration Wizard, then from the SSL Certificates dialog, click the link to generate a self-signed SSL certificate. Complete the Wizard to restart the ECC Server, then skip to Step 5.
Review the contents of server.conf to ensure that https.enabled=true and to check the port number associated with https (e.g. https.port=443). See topic View or Edit Server Configuration Settings. If the setting https.enabled=true is not present in server.conf, then no self-signed SSL certificate will be generated when the ECC Server service is restarted.
Restart the ECC Server service; see topic Start the ECC Server service. When the ECC Server service starts up, it will detect that the SSL certificates file is missing and will generate new self-signed SSL certificate with a one-year expiration date, along with a new private key.
Deploy the new self-signed SSL certificate (but do NOT deploy the new private key). The new self-signed SSL certificate must be installed in the Java keystore on the ECC Server itself, as well as the Java keystore on any installation of ECC Admin Console or ECC Client with Search. For details see the topics under Add a self-signed SSL certificate to a Java keystore.
Each ECC Admin Console installation will need to be installed using the stand-alone installer, rather than being launched from the ECC Server's web page. This ensures the Java keystore for ECC Admin Console will remain unchanged after each launch of Admin Console.
Browsing to the ECC Server's web page would require adding a site exception for the ECC Server's web site within the browser. Some web browsers allow importing a copy of the self-signed public certificate into the browser's certificate store, so the ECC Server web site can be fully trusted, and no warning issued (optional).
Create a new credentials.wsc01 file from ECC Admin Console's Client Deployment dialog; see Run the Client Deployment utility. The new credentials.wsc01 file will need to be deployed to each ECC Client; see Deploying a new or updated SSL certificate, below.
This new credentials.wsc01 file will contain information from the ECC Server's new self-signed SSL certificate.
For details see topic Implement SSL Security on the ECC Server.
Deploy a new or updated SSL certificate
Whenever a new or updated SSL certificate is installed on the ECC Server, several steps must be taken to update the certificate stores and Server Connection Profiles of various computers participating in the ECC system, as follows:
For any kind of SSL certificate
Whenever the ECC Server's SSL certificate is updated each installation of ECC Client or ECC Client with Search will require an updated Server Connection Profile (i.e. a new credentials.wsc01 file). To generate this credentials.wsc01 file, run Client Deployment from ECC Admin Console. Deploying the file may require using Group Policy or another software deployment tool or script.
Further actions for deploying an SSL certificate from a trusted Certificate Authority
No further action is required.
Further actions for deploying a self-signed SSL certificate
A copy of the ECC Server's new self-signed SSL certificate must be installed into the following java keystores:
The ECC Server's own Java keystore: see procedure Add a self-signed SSL certificate to an ECC Server Java keystore.
The Java keystore for each installation of ECC Admin Console (i.e. where the stand-alone installer for ECC Admin Console was used). See procedure Add a self-signed SSL certificate to an ECC Admin Console Java keystore.
The Java keystore for each installation of ECC Client with Search. See procedure Add a self-signed SSL certificate to an ECC Client with Search Java keystore.
Further actions for deploying an SSL certificate from an in-house certificate server
A copy of the ECC Server's new SSL certificate from an in-house certificate server DOES NOT need to be deployed to other systems; HOWEVER, if the root certificate used to issue this new SSL certificate has been updated, then that newer root certificate must be installed into the following java keystores:
The ECC Server's own Java keystore, see procedure Add an in-house root certificate to an ECC Server Java keystore.
The Java keystore for each installation of ECC Admin Console (i.e. where the stand-alone installer for ECC Admin Console was used). See procedure Add an in-house root certificate to an ECC Admin Console Java keystore.
The Java keystore for each installation of ECC Client with Search. See procedure Add an in-house root certificate to an ECC Client with Search Java keystore.
Add a self-signed SSL certificate to a Java keystore
If an ECC Server is configured with a self-signed SSL certificate, then actions must be taken to install copies of SSL certificates into the Java keystores for various ECC programs, including:
The ECC Server's own Java keystore
The Java keystore used by ECC Admin Console
The Java keystore used by ECC Client with Search
In addition, it may not be possible to browse to the ECC Server's web page without getting a warning from the web browser that the web site is insecure. When such warnings occur most web browsers offer an "Advanced" button which allows adding an exception to permit viewing the ECC Server's "unsafe" web site. It is also possible to add the necessary SSL certificate(s) to the keystore used by the web browser, so that the ECC Server web page will be considered a trusted site and no warning will occur.
The following procedures detail how to add SSL certificates to various keystores on Windows, Linux and macOS. These procedures can be avoided by configuring the ECC Server with an SSL certificate issued by a trusted Certificate Authority.
Add a self-signed SSL certificate to an ECC Server Java keystore
When the ECC Server uses a self-signed SSL certificate – or an SSL certificate issued by an in-house certificate server – then a copy of the SSL certificate must be added to the Java keystore for ECC Server, as follows:
| Operating system |
Commands to add a self-signed SSL certificate to the ECC Server's Java keystore |
| Windows |
rem – From Command Prompt opened As Administrator...
cd /d "C:\Program Files\Nuix\ECC Server" jre64\bin\keytool -importcert -alias MyEccServerCert
rem – respond 'yes' (without quotes) when prompted |
| Linux |
# From Terminal or a shell...
cd /opt/nuix/ecc-server sudo jre/bin/keytool -importcert -alias MyEccServerCert
# respond 'yes' (without quotes) when prompted |
| macOS |
# From Terminal or a shell...
cd /Library/nuix/ecc-server sudo jre/bin/keytool -importcert -alias MyEccServerCert
# respond 'yes' (without quotes) when prompted |
In the commands, above, replace the file path:
%USERPROFILE%\Desktop\ecc-self-signed.crt or ~/Desktop/ecc-self-signed.crt
with the full path to the self-signed SSL certificate which you exported from the ECC Server. The alias MyEccServerCert can be changed to any unique name.
Add a self-signed SSL certificate to an ECC Admin Console Java keystore
Whenever the ECC Server uses a self-signed SSL certificate, a copy of the SSL certificate must be added to the Java keystore for ECC Admin Console, as follows:
| Operating system |
Commands to add a self-signed SSL certificate to the Java keystore for ECC Admin Console |
| Windows |
rem – From Command Prompt opened As Administrator...
cd /d "C:\Program Files\Nuix\ECC Admin Console 100.2" jre\bin\keytool -importcert -alias MyEccServerCert
rem – respond 'yes' (without quotes) when prompted |
| Linux |
# From Terminal or a shell...
cd /opt/nuix/ecc-admin-console-100-2 sudo jre/bin/keytool -importcert -alias MyEccServerCert
# respond 'yes' (without quotes) when prompted |
| macOS |
# From Terminal or a shell...
cd /Library/nuix/ecc-admin-console-100-2 sudo jre/bin/keytool -importcert -alias MyEccServerCert
# respond 'yes' (without quotes) when prompted |
In the commands, above, replace the file path:
%USERPROFILE%\Desktop\ecc-self-signed.crt or ~/Desktop/ecc-self-signed.crt
with the full path to the self-signed SSL certificate which you exported from the ECC Server. The alias MyEccServerCert can be changed to any unique name.
Add a self-signed SSL certificate to an ECC Client with Search Java keystore
When the ECC Server uses a self-signed SSL certificate – or an SSL certificate issued by an in-house certificate server – then a copy of the SSL certificate must be added to the Java keystore for ECC Server, as follows:
| Operating system |
Commands to add a self-signed SSL certificate to the Java keystore for ECC Client with Search |
| Windows |
rem – From Command Prompt opened As Administrator...
cd /d "C:\Program Files\Nuix\ECC Server" jre64\bin\keytool -importcert -alias MyEccServerCert
rem – change "jre64" to "jre32" for 32-bit editions rem of ECC Client for Windows. rem – respond 'yes' (without quotes) when prompted |
| Linux |
# From Terminal or a shell...
cd /usr/local/nuix/jre sudo jre/bin/keytool -importcert -alias MyEccServerCert
# respond 'yes' (without quotes) when prompted |
| macOS |
# From Terminal or a shell...
cd /usr/local/nuix/jre sudo jre/bin/keytool -importcert -alias MyEccServerCert
# respond 'yes' (without quotes) when prompted |
In the commands, above, replace the file path:
%USERPROFILE%\Desktop\ecc-self-signed.crt or ~/Desktop/ecc-self-signed.crt
with the full path to the self-signed SSL certificate which you exported from the ECC Server. The alias MyEccServerCert can be changed to any unique name.
Note: It is possible to prepare a Java keystore file (a cacerts file) with the proper certificates added, then run a Deploy and Launch job in ECC to replace the cacerts keystore file on each of your ECC Client computers. The Deploy job sends cacerts and an installation script to each ECC Client with Search computer. The Launch job runs the installation script to overwrite the cacerts file under the ECC Client program folder with the new cacerts file. The new keystore takes effect once each endpoint computer restarts or the ECC Client service is restarted: the script run by the Launch job can schedule the restart of the ECC Client service via schtasks.exe (Windows) or cron (Linux and macOS).
This approach requires some planning, as the ECC Server can only be configured for one SSL certificate at a time.
Add an in-house root certificate to a Java keystore
If an ECC Server is configured with an SSL certificate issued by an in-house certificate server, then actions must be taken to install a copy of the root certificate -- the one used by the certificate server to issue the ECC Server's SSL certificate -- into the Java keystores for various ECC programs, including:
The ECC Server's own Java keystore
The Java keystore used by ECC Admin Console
The Java keystore used by ECC Client with Search
In addition, it may not be possible to browse to the ECC Server's web page without getting a warning from the web browser that the web site is insecure. When such warnings occur most web browsers offer an "Advanced" button which allows adding an exception to permit viewing the ECC Server's "unsafe" web site. It is also possible to add a copy of the root certificate to the keystore used by the web browser, so that the ECC Server web page will be considered a trusted site and no warning will occur.
The following procedures detail how to add a root certificate to various keystores on Windows, Linux, and macOS.
Tip: The following procedures can be avoided by configuring the ECC Server with an SSL certificate issued by a trusted Certificate Authority.
Add an in-house root certificate to an ECC Server Java keystore
If the ECC Server or Keycloak server is using an SSL certificate that was generated by an in-house certificate server, then install the corresponding root certificate into the Java keystore used by ECC Server.
| Operating system |
Commands to add a root certificate from an in-house certificate server to the ECC Server's Java keystore |
| Windows |
rem – From Command Prompt opened As Administrator...
cd /d "C:\Program Files\Nuix\ECC Server" jre64\bin\keytool -import -trustcacerts -alias InHouseRoot
rem - adjust paths as needed; respond 'yes' when prompted |
| Linux |
# From Terminal or a shell...
cd /opt/nuix/ecc-server sudo jre/bin/keytool -import -trustcacerts -alias InHouseRoot
# adjust paths as needed; respond 'yes' when prompted |
| macOS |
# From Terminal or a shell...
cd /Library/nuix/ecc-server sudo jre/bin/keytool -import -trustcacerts -alias InHouseRoot
# adjust paths as needed; respond 'yes' when prompted |
In the commands, above, replace the file path:
%USERPROFILE%\Desktop\in-house-root.crt or ~/Desktop/in-house-root.crt
with the full path to the root certificate which the in-house certificate server used to issue the ECC Server's SSL certificate (or the Keycloak server's SSL certificate). The alias InHouseRoot can be changed to any unique name.
Add an in-house root certificate to an ECC Admin Console Java keystore
If the ECC Server or Keycloak server is using an SSL certificate that was generated by an in-house certificate server, then install the corresponding root certificate into the Java keystore for each installation of ECC Admin Console.
| Operating system |
Commands to add a root certificate from an in-house certificate server to the Java keystore for ECC Admin Console |
| Windows |
rem – From Command Prompt opened As Administrator...
cd /d "C:\Program Files\Nuix\ECC Admin Console 100.2" jre\bin\keytool -import -trustcacerts -alias InHouseRoot
rem - adjust paths as needed; respond 'yes' when prompted |
| Linux |
# From Terminal or a shell...
cd /opt/nuix/ecc-admin-console-100-2 sudo jre/bin/keytool -import -trustcacerts -alias InHouseRoot
# adjust paths as needed; respond 'yes' when prompted |
| macOS |
# From Terminal or a shell...
cd /Library/nuix/ecc-admin-console-100-2 sudo jre/bin/keytool -import -trustcacerts -alias InHouseRoot
# adjust paths as needed; respond 'yes' when prompted |
In the commands, above, replace the file path:
%USERPROFILE%\Desktop\in-house-root.crt or ~/Desktop/in-house-root.crt
with the full path to the root certificate which the in-house certificate server used to issue the ECC Server's SSL certificate (or the Keycloak server's SSL certificate). The alias InHouseRoot can be changed to any unique name.
Add an in-house root certificate to an ECC Client with Search Java keystore
If the ECC Server is using an SSL certificate that was generated by an in-house certificate server, then install the corresponding root certificate into the Java keystore for each installation of ECC Client with Search.
| Operating system |
Commands to add a root certificate from an in-house certificate server to the Java keystore for ECC Client with Search |
| Windows |
rem – From Command Prompt opened As Administrator...
cd /d "C:\Program Files\Nuix\Nuix Enterprise Collection Center\Client" jre64\bin\keytool -import -trustcacerts -alias InHouseRoot
rem – change "jre64" to "jre32" for 32-bit editions rem of ECC Client for Windows. rem - adjust paths as needed; respond 'yes' when prompted |
| Linux |
# From Terminal or a shell...
cd /usr/local/nuix/jre sudo jre/bin/keytool -import -trustcacerts -alias InHouseRoot
# adjust paths as needed; respond 'yes' when prompted |
| macOS |
# From Terminal or a shell...
cd /usr/local/nuix/jre sudo jre/bin/keytool -import -trustcacerts -alias InHouseRoot
# adjust paths as needed; respond 'yes' when prompted |
In the commands, above, replace the file path:
%USERPROFILE%\Desktop\in-house-root.crt or ~/Desktop/in-house-root.crt
with the full path to the root certificate which the in-house certificate server used to issue the ECC Server's SSL certificate. The alias InHouseRoot can be changed to any unique name.
Note: It is possible to prepare a Java keystore file (a cacerts file) with the proper certificates added, then run a Deploy and Launch job in ECC to replace the cacerts keystore file on each of your ECC Client computers. The Deploy job sends cacerts and an installation script to each ECC Client with Search computer. The Launch job runs the installation script to overwrite the cacerts file under the ECC Client program folder with the new cacerts file. The new keystore takes effect once each endpoint computer restarts or the ECC Client service is restarted: the script run by the Launch job can schedule the restart of the ECC Client service via schtasks.exe (Windows) or cron (Linux and macOS). This approach requires some planning, as the ECC Server can only be configured for one SSL certificate at a time.