Adding cases and collections
Cases and collections overview
Once the Initial Configuration is complete, new Cases and Collections can be added and submitted from the Administration Console.
A Case is an arbitrary set of one or more Collections. A Case can be thought of as a top-level project under Administration Console. A Case may refer to a legal case, a lawsuit, or a project.
A Collection is a specification of:
General information, such as the name of the Collection and the associated Case
A scheduled time for running the Collection
A sequence – either a single Task or multiple Tasks
Task details for each Task in the Sequence (Collect, Survey, Delete, Launch, etc.)
A Destination location, specifying where to save the collected data (for certain task types only)
One or more Targets specifying (1) the location where files reside and/or (2) the ECC Client computers which will run the Tasks in the collection
Note: In ECC, a "Collection" may consist of Tasks which do not collect data, such as a Deploy task or a Launch Command task.
Typically, a Collection will be added to a new Case and then run immediately or scheduled to start a short time into the future. In subsequent weeks, additional Collections for the same Case will be added and run. Larger organizations may have multiple Cases – each with their own set of Collections – maintained through Administration Console.
Adding a case
Click the ● ● ● button near the upper-right corner of the Administrative Console screen to access the menu, then select Cases. The Case List Maintenance dialog displays:
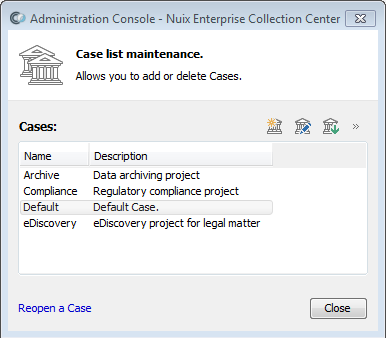
Click the New Case button (the left-most of the three buttons at the top).
Enter the name of the new Case, then click OK.
Tip: Keep the Case Name brief, if possible. The Case Name becomes part of the default Destination folder name and long file/folder path names greater than 255 characters are not readily viewable in Windows Explorer.
Note: Avoid typing symbols /, \, ?, *, :, ", <, > which are prohibited in Windows folder names.
Cases can also be added by Launching the New Collection Wizard.
Launching the new collection wizard
From the Administration Console, click the Add Case or Collection button at the top of the Cases and Collections screen to run the New Collection Wizard:

This wizard enables you to create new Cases and a new Collection. The following sections provide step-by-step instructions for using the New Collection Wizard.
Collection page
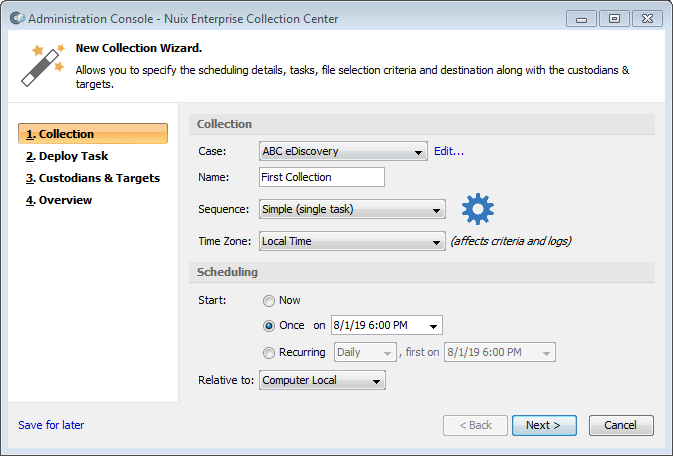
For the Case, either select an existing Case from the drop-down list, or click the Edit button, then add a new Case.
Note: Keep Case Names brief. The Case Name will be used as a sub-folder under the Collection's default Destination folder. Keeping Case Names brief helps to keep the Destination folder paths within the limits of Windows Explorer.
Once a Collection is added, it cannot be edited or assigned to a different Case; however, a Collection can be cancelled and re-created, if necessary.
Type the Name for the new Collection.
Note: The guidelines for Case Names, above, also apply to Collection Names.
Select a Sequence to specify how many tasks will be performed by this collection and optionally which kinds of tasks will be performed. The following options are available from the Sequence pull-down list:
| Option |
Description |
| Simple (single task) |
Performs one task on each selected target. This Sequence type is suggested for simple operations or when first learning to use ECC. |
| Collect, Relocate |
Performs a Collect task, followed by a Relocate task. This Sequence is typically used when the selected targets are laptops or other computers which may not be connected to the network when the collection is scheduled to begin. |
| Deploy, Launch |
Performs a Deploy task, followed by a Launch task. The Sequence is intended for deploying scripts or console utilities and then executing them. |
| Deploy, Move |
Performs a Deploy task, followed by a Move task. The Sequence is intended for deploying files to the ECC Client(s), then immediately moving these files from the ECC working folder to the desired destination folder. Tip: Specify the placeholder {ECC.WorkingFolder} in the Local Path location field for the Targets or Computers participating in the Move. |
| Deploy, Collect, Relocate |
Performs a Deploy task, followed by a Collect task, then finally a Relocate task. The Collect task can utilize files and folders deployed by the first task for advanced file selection and exclusion. |
| Deploy, Launch, Collect, Relocate |
Performs a Deploy task, followed by a Launch task, followed by a Collect task, then finally a Relocate task. This Sequence can be used to: Deploying scripts or console utilities, Then executing the deployed scripts or programs, Then collecting the output from the script or program to a local folder (especially for portable computers which may be disconnected from the network when the sequence of tasks is scheduled to begin), Then finally relocating the collected files to a network share. |
| Custom (2 tasks) |
Performs any two tasks in sequence |
| Custom (3 tasks) |
Performs any three tasks in sequence |
| Custom (4 tasks) |
Performs any four tasks in sequence |
The above list describes only a few of the tasks available in ECC. All the available Tasks are described more fully in the topic Task Types.
Note: If you are preparing an ECC collection for computers with a mix of Windows, Linux and/or macOS operating systems, it is often necessary to configure separate collections for each operating system platform. Platform-specific collections are necessary for Launch Command tasks, or tasks that specify local folder paths.
Regarding a Sequence with two or more tasks:
The first task will begin at the scheduled start time and the second task will begin once the first task has completed. The third task (if one is configured) will begin when the second task completes, and so forth.
If one task fails, then any subsequent tasks in the Sequence will still be attempted.
If a task completes successfully but a subsequent task fails, any actions taken by the earlier successful tasks will persist. I.E. the earlier tasks will not be "undone" after a later task in the sequence fails.
Specify the Time Zone for scheduling
This setting is either Local Time or GMT. It effects the collection scheduling time, as well as any date ranges in the Selection Criteria, and the logging of the date and time information.
Under Scheduling, specify the Start time:
| Option |
Description |
| Now |
Runs the Collection as soon as you click the Done button at the bottom of this screen. |
| Once at |
Schedules the Collection to run at the future date and time you specify. |
| Recurring |
Schedules the Collection to run repeatedly, e.g. once each day, week or month. You can set the starting day and time (the same start time will be honored for each recurrence). By choosing Weekly and clicking the Advanced link, you can configure the particular days of the week when the collection will take place. You can also specify an interval, such as once every 3 weeks. By choosing Monthly and clicking the Advanced link, you can configure the particular day of the month when the collection will take place. You can also specify an interval, such as once every 4 months. |
| Note:Recurring collections are only available when the Sequence is set to Simple (single task). The ECC Server automatically schedules the next recurring collection job (once the current recurring collection job has finished). For details see topic Recurring Collections. |
Click Collect Task on the left side, or click Next to proceed.
Tip: If you wish to save your settings before you have completed each of the numbered steps, you can click the Save for later link at the bottom left corner of the New Collection Wizard. This will save your partially-completed Collection settings as a new "Collection Configuration". Doing so will not run or schedule the Collection.
When you are ready to complete your Collection, you'll create a new Collection based on this Collection Configuration, and resume at the step where you left off. For details, see topic Creating a Collection Using a Collection Configuration, below.
Task types
The New Collection Wizard will show one or more pages for configuring each Task to be performed by the Collection. The number of Task pages shown depends on the Sequence selected previously.
The following kinds of Tasks can be configured:
| Task type |
Description |
Notes |
| Survey |
Generate log files and reports that list files which meet the specified file selection criteria, without taking any further action. |
Suitable for locating files and validating file selection criteria. Can also generate log files to be converted into FileLists for subsequent collections. |
| Collect |
Collect files from the specified Targets. Optionally collect RAM and/or volatile information from the specified ECC Client computers. |
Files meeting the selection criteria are saved at the specified Destination as raw files or packed within a FileSafe file. Original files in each Target location are left unaltered. |
|
|
Note: On ECC Client computers running Windows, Survey and Collect tasks can also process deleted files from local volumes. For details see topic Collection of Deleted Files. ECC clients running Windows can also collect file system tables and/or unallocated clusters from local volumes. For details see topic Collection of File System Tables and Unallocated Clusters. |
|
| Disk Image |
Collect local disk or volume images. |
Such images represent large amounts of data that can consume considerable network bandwidth and disk space at the destination. |
| Network Capture |
Collect network packets from specified ECC Client computers. |
Can be helpful for cyber security incident response. |
| Deploy |
The selected ECC Client computers fetch a file or folder from the specified location. The files are then accessible locally on each of the ECC Client computers. |
Any kind of file or folder can be deployed. A subsequent Launch Command task can execute a deployed script or utility program. A subsequent Collect task can utilize deployed FileLists, hash databases, NIST databases, etc. for advanced file selection and exclusion. |
| Launch Command |
Executes the specified program or script on the specified ECC Client computers. |
The program or script must be non-interactive; it must not issue any prompts. |
| Move |
Moves files to the specified folder. Files within sub-folders are also moved (unless explicitly excluded). |
Handy for relocating files that a previous Deploy task placed within the {ECC.WorkingFolder} location. Can also mover files from other folders. The Move task performs a copy, followed by a delete of the source file. This allows file moves to different volumes. Options are available to: permit existing files in the destination folder to be overwritten. ensure that each file move takes place only if an existing file of the same name is found in the destination folder. |
| Relocate |
Copies or moves collected data and/or logs to a new location. This process also verifies the integrity of the items being moved or copied. |
Invalid as first task: must follow a Collect task, a Collect and Delete task, a Network Capture task or a Disk Imaging task. Typically employed to take data that was previously collected (held in a local folder) and move it to a network folder. Such "Collect and Relocate" sequences help ensure reliable data collections on laptops and other computers that may occasionally disconnect from the network. |
| Delete |
Files which meet the selection criteria are deleted from the specified Targets. The disk space occupied by deleted file content can be scrubbed (i.e. secure file deletion). |
|
| Collect and Delete |
Files which meet the selection criteria are collected from the specified Targets and saved at the specified Destination. The original files are then deleted from the Targets. The disk space occupied by deleted file content is scrubbed (i.e. secure file deletion). |
|
The Wizard pages for configuring each Task are described below.
Collect task
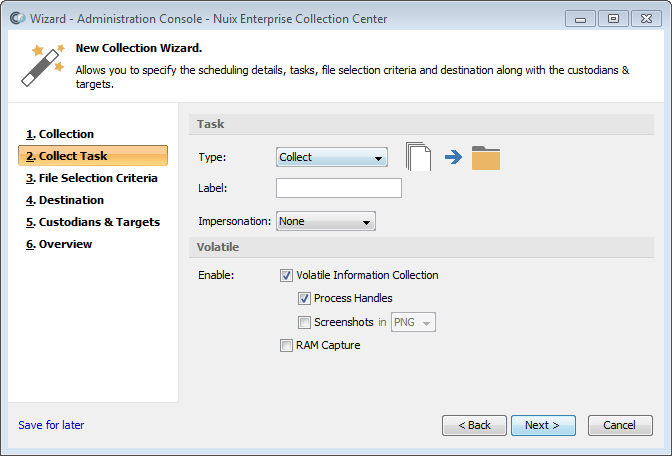
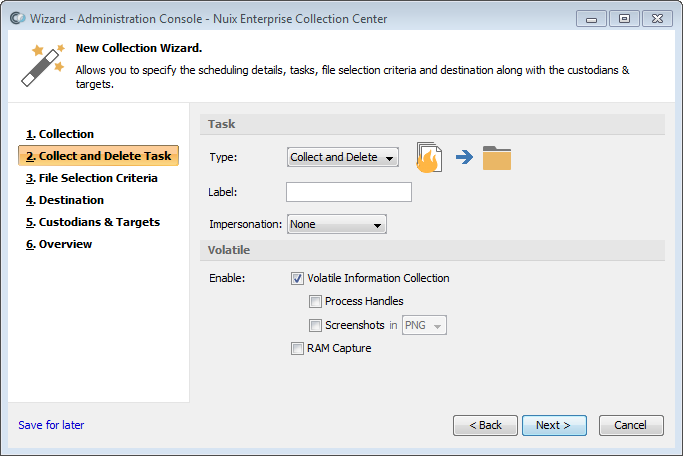
Select Collect from the Type pull-down list, if not already selected.
This Task type is described in the earlier topic Task Types.
Specify a label for this collection (optional). The list of jobs shown in Admin Console's Dashboard pane can be filtered according to the label value.
Select an Impersonation option:
None - The ECC Client program which performs this Task will run under the same user credentials that the ECC Client service is running under (the default is to run as the Client Computer's local SYSTEM account, or as 'root'). On Windows computers EFS-encrypted folders and files will not be accessible.
Logged in User - The ECC Client program which performs this Task will run using the account of the currently logged in user. On Windows computers any EFS-encrypted folders and files established by this user will be accessible.
Note: The Impersonation option applies only to ECC Client computers running Windows. The setting is ignored for ECC Client computers running Linux or macOS.
Select Volatile Information options:
Volatile Information Collection - if checked, collects operating system and process details from the ECC Client computers associated with each selected target.
Process Handles - if checked, also collects a list of open handles associated with running processes. Applies only to ECC Client computers running Windows.
Screenshots - if checked, also captures screen images of any open windows and the currently logged in user's Desktop. Applies only to ECC Client computers running Windows.
Tip: The Impersonation option must be set to Logged in User to capture screenshots on ECC Client computers running Windows.
Screenshot File Format - the graphic file format in which to save screen images. Can be PNG or JPG.
RAM Capture - Collects a copy of system RAM as a file containing raw bytes of memory. Each RAM capture file is typically as large as the amount of memory on the ECC Client computer.
Note: RAM Capture collections are no longer supported on macOS.
Click Next to proceed.
The New Collection Wizard will advance to the File Selection Criteria Page.
Survey task
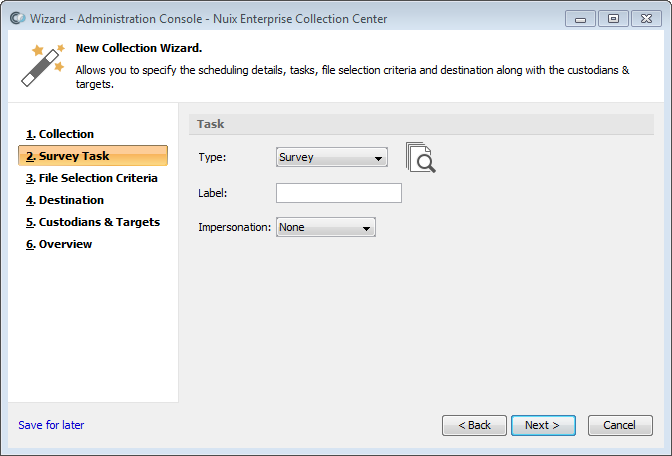
Select Survey from the Type pull-down list, if not already selected.
This Task type is described in the earlier topic Task Types.
Specify a label for this collection (optional). The list of jobs shown in Admin Console's Dashboard pane can be filtered according to the label value.
Select an Impersonation option:
None - The ECC Client program which performs this Task will run under the same user credentials that the ECC Client service is running under (the default is to run as the Client Computer's local SYSTEM account). EFS-encrypted folders and files will not be accessible.
Logged in User - The ECC Client program which performs this Task will run using the account of the currently logged in user. Any EFS-encrypted folders and files established by this user will be accessible.
Note: The Impersonation option applies only to ECC Client computers running Windows. The setting is ignored for ECC Client computers running Linux or macOS.
Click Next to proceed.
The New Collection Wizard will advance to the File Selection Criteria Page.
Disk image task
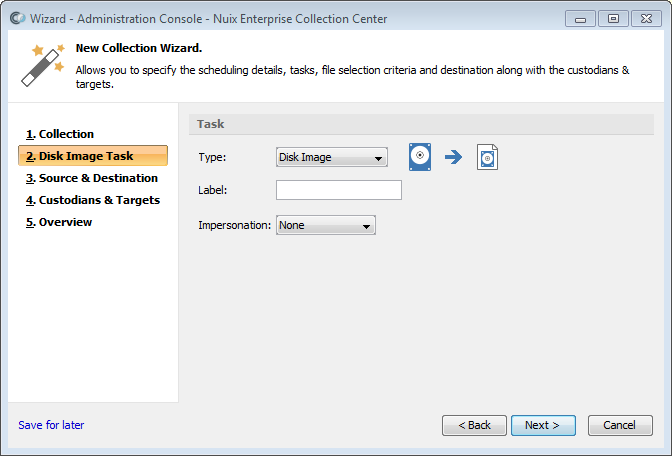
Select Disk Image from the Type pull-down list, if not already selected.
This Task type is described in the earlier topic Task Types.
Specify a label for this collection (optional). The list of jobs shown in Admin Console's Dashboard pane can be filtered according to the label value.
Select an Impersonation option:
None – This is the recommended setting for a Disk Image Task. The ECC Client program which performs this Task will run under the same user credentials that the ECC Client service or daemon is running under (the default on Windows-based ECC Client computers is to run as the local SYSTEM account, with the highest possible privileges).
Logged in User - The ECC Client program which performs this Task will run using the account of the currently logged in user.
Tip: For a Disk Image task, Impersonation should be set to None to ensure disks and volumes can be properly detected.
Note: The Impersonation option applies only to ECC Client computers running Windows. The setting is ignored for ECC Client computers running Linux or macOS.
Note: Disk Imaging tasks are not supported on macOS 10.13 High Sierra or newer.
Click Next to proceed.
The New Collection Wizard will advance to the Source and Destination Page.
Network capture task
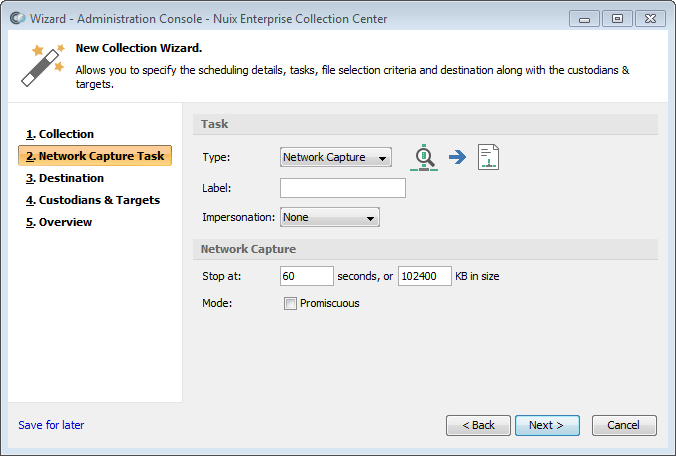
Select Network Capture from the Type pull-down list, if not already selected.
This Task type is described in the earlier topic Task Types.
Specify a label for this collection (optional). The list of jobs shown in Admin Console's Dashboard pane can be filtered according to the label value.
Select an Impersonation option:
None - The ECC Client program which performs this Task will run under the same user credentials that the ECC Client service is running under (the default is to run as the Client Computer's local SYSTEM account, with the highest possible privileges).
Logged in User - The ECC Client program which performs this Task will run using the account of the currently logged in user.
Warning: For a Network Capture task, Impersonation should be set to None to ensure network packets can be properly captured.
Note: The Impersonation option applies only to ECC Client computers running Windows. The setting is ignored for ECC Client computers running Linux or macOS.
Specify Network Capture options:
Stop at – Seconds: specify the duration of the network capture, in seconds.
Stop at – KB in size: specify the maximum capture file size, in kilobytes (the default value is 102400 kilobytes, equal to 100 megabytes).
Note: The network capture collection will stop when the specified duration has elapsed, or when the network capture file grows to the specified size – whichever comes first.
Mode – Promiscuous: Select this option to enable Promiscuous Mode on each ECC Client computer participating in the network capture. Promiscuous Mode allows the computers running ECC Client to capture network packets no matter which network device they are addressed to. When the Promiscuous option is not selected, only network packets addressed to the selected ECC Client computers can be captured.
Note: Promiscuous Mode is fully effective only on ECC Client computers connected to a network hub. Computers connected to a network switch may not be able to detect packets addressed to other computers – even if Promiscuous Mode is enabled. VLANs and other network mechanisms can also limit which packets a particular computer can capture.
Click Next to proceed.
The New Collection Wizard will advance to the Destination Page.
Deploy task
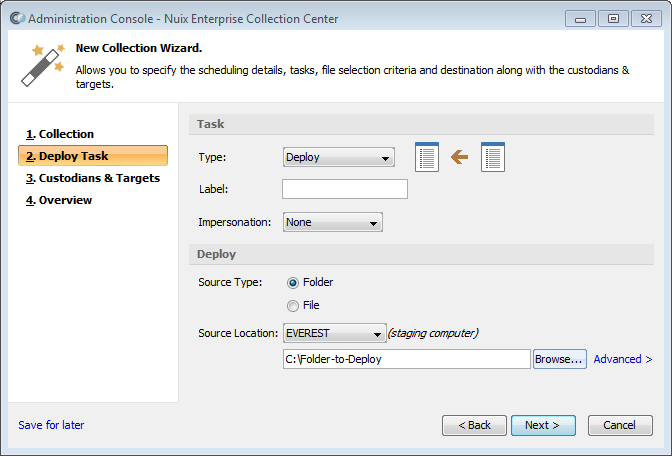
Select Deploy from the Type pull-down list, if not already selected.
This Task type is described in the earlier topic Task Types.
Specify a label for this collection (optional). The list of jobs shown in Admin Console's Dashboard pane can be filtered according to the label value.
Select an Impersonation option:
None - The ECC Client program which performs this Task will run under the same user credentials that the ECC Client service is running under (the default is to run as the Client Computer's local SYSTEM account). EFS-encrypted folders and files will not be accessible.
Logged in User - The ECC Client program which performs this Task will run using the account of the currently logged in user. Any EFS-encrypted folders and files established by this user will be accessible.
Select a Source Type option:
Source Type: Folder - The specified folder – including any files or subfolders contained within – will be deployed to each ECC Client computer in this Collection.
Source Type: File - The specified file will be deployed to each ECC Client computer in this Collection.
Specify the Source Location, including the computer which holds a copy of the files to be deployed, as well as the full path (and filename) of the local folder (or file) to be deployed.
Select a staging computer from the pull-down list. Staging computers are computers which (1) have an installation of ECC Client, and (2) have been configured to serve as a staging computer. See topic Configuring Computers for details.
In the empty field below the staging computer, type the full path of the local file, local folder, or network share to be deployed.
Note: The Source Location cannot be a URL for an Amazon S3 bucket or Azure Blob Storage container.
Note: A Deploy job will select a pair of random TCP ports to use for communication between the selected staging computer and each of the computers selected in the following panel. This range can be restricted in the Computer Configuration(s) associated with each of these ECC Client computers. For details see the topic Configuring ECC Client Computers in the ECC Administration Guide.
It is also possible to specify specific TCP ports to be used for inbound and outbound communications between these computers. For details see the attributes for the SmartMoverParams element, within the Nuix Collector and ECC JobFile Reference.
Tip: You can deploy the contents of a network share. First, specify a UNC path in the field provided under Source Location. Next, click the Advanced > link, then specify the network credentials needed to access the share.
Tip: All Deploy tasks copy the source file or folder to a local folder on each ECC Client computer. This folder can be referred to in Collect tasks and other tasks using the JobFile variable {ECC.WorkingFolder}. For details see topic The Working Folder.
Click Next to proceed.
The New Collection Wizard will advance to the Custodians and Targets Page or to the next Task to configure.
Launch command task
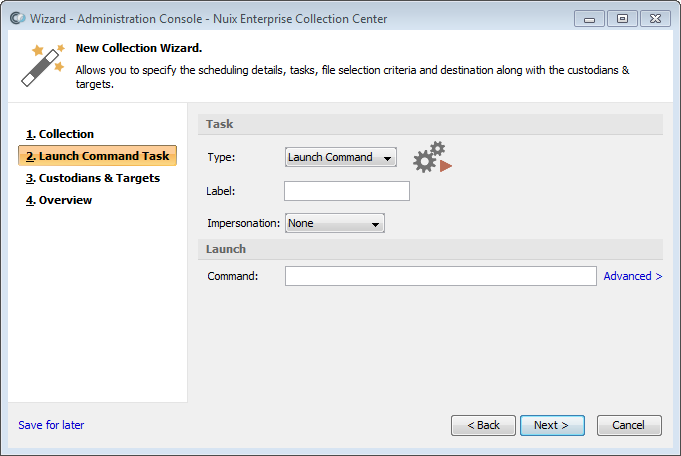
Select Launch Command from the Type pull-down list, if not already selected.
This Task type is described in the earlier topic Task Types.
Specify a label for this collection (optional). The list of jobs shown in Admin Console's Dashboard pane can be filtered according to the label value.
Select an Impersonation option:
None - The ECC Client program which performs this Task will run under the same user credentials that the ECC Client service is running under (the default is to run as the Client Computer's local SYSTEM account). EFS-encrypted folders and files will not be accessible.
Logged in User - The ECC Client program which performs this Task will run using the account of the currently logged in user. Any EFS-encrypted folders and files established by this user will be accessible.
Note: The Impersonation option applies only to ECC Client computers running Windows. The setting is ignored for ECC Client computers running Linux or macOS.
Specify the Command. Enter the full path of the program to run, along with any command-line arguments.
Note: Paths or command-line arguments which contain spaces must be enclosed within a pair of double quotes.
The current directory for the command is set to the "Deploy folder" on each ECC Client computer. For details see topic The Working Folder.
Optionally click the Advanced link to specify additional options for running scripts with a command shell, setting a timeout, specifying user credentials for accessing UNC paths, and using MD5 hashes to verify the integrity of programs and scripts. For details see topic Advanced Command Launching. For details regarding writing your own scripts see topic Writing Scripts for Command Launch Collections.
Click Next to proceed.
The New Collection Wizard will advance to the Custodians and Targets Page or to the next Task to configure.
Move task
Moves files from the specified folder to a new folder.
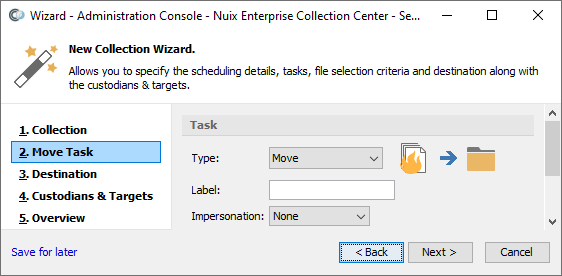
Select Move from the Type pull-down list, if not already selected.
This Task type is described in the earlier topic Task Types.
Specify a label for this collection (optional). The list of jobs shown in Admin Console's Dashboard pane can be filtered according to the label value.
Select an Impersonation option:
None - The ECC Client program which performs this Task will run under the same user credentials that the ECC Client service is running under (the default is to run as the Client Computer's local SYSTEM account). EFS-encrypted folders and files will not be accessible.
Logged in User - The ECC Client program which performs this Task will run using the account of the currently logged in user. Any EFS-encrypted folders and files established by this user will be accessible.
Note: The Impersonation option applies only to ECC Client computers running Windows. The setting is ignored for ECC Client computers running Linux or macOS.
Click Next to proceed to the Destination page for a Move task:
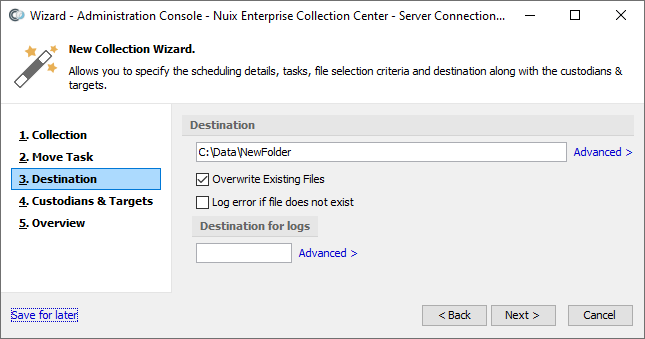
Under Destination specify:
| Item |
Description |
| Destination |
The folder, network share or cloud storage URL where the files will be moved to. The Advanced option allows specifying credentials for network or cloud locations which require them. |
| Overwrite existing files |
If selected, an existing file with the same name at the specified Destination will be overwritten with the file being moved. If not selected, an existing file with the same name at the specified Destination will be preserved, and the file being moved will be renamed with a unique numeric suffix. |
| Log error if file does not exist |
This option only applies if Overwrite existing files is selected. If selected, each file will be moved ONLY if a same-named file already exists in the specified Destination. If a same-named file does not already exist, then that file will NOT be moved, and an error will be noted in the Error log and/or Error report. |
| Destination for logs |
The folder, network share or cloud storage URL where logs for this Move task will be saved. This is typically a different folder than the first Destination folder. The Advanced option allows specifying credentials for network or cloud locations which require them. |
Click Next to proceed.
The New Collection Wizard will advance to the Custodians and Targets Page or to the next Task to configure.
Note: The Custodians and Targets Page is where you specify the Locations of the files to be moved. This can be the folder where a previous Deploy task placed files (specify the placeholder {ECC.WorkingFolder} in the Location path), or any other folder that the ECC Client can access. Files within sub-folders are also moved.
Relocate task
Note: A Relocate task copies or moves the data collected and/or the logs generated during the previous task. This previous task must have saved the data or logs to a local folder.
The Relocate task cannot be the first task in a sequence. A Relocate task must immediately follow one of the following tasks in the same Collection:
Collect task
Collect and Delete task
Network Capture task
Disk Imaging task
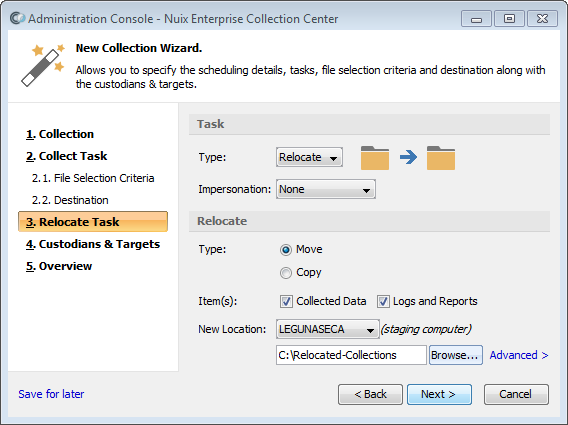
Select Relocate from the Type pull-down list, if not already selected.
This Task type is described in the earlier topic Task Types.
Specify a label for this collection (optional). The list of jobs shown in Admin Console's Dashboard pane can be filtered according to the label value.
Select an Impersonation option:
None - The ECC Client program which performs this Task will run under the same user credentials that the ECC Client service is running under (the default is to run as the Client Computer's local SYSTEM account). EFS-encrypted folders and files will not be accessible.
Logged in User - The ECC Client program which performs this Task will run using the account of the currently logged in user. Any EFS-encrypted folders and files established by this user will be accessible.
Note: The Impersonation option applies only to ECC Client computers running Windows. The setting is ignored for ECC Client computers running Linux or macOS.
Specify Relocate options:
Type – Move: - Moves the collected data (or "Evidence") and/or logs from the destination specified in the previous task to the New Location. The moved items will be deleted from the original destination specified in the previous task.
Type – Copy: - Copies the collected data (or "Evidence") and/or logs from the destination specified in the previous task to the New Location.
Items – Collected Data: - Select this option to copy or move the items collected in the previous task.
Items – Logs and Reports: - Select this option to copy or move the log files (and any reports) generated in the previous task.
New Location: - Select a staging computer from the pull-down list. Staging computers are computers which (1) have an installation of ECC Client, and (2) have been configured to serve as a staging computer. See topic Configuring Computers for details. You must also specify the folder on the staging computer where these files will be placed. This can be a local folder or a network share.
Note: The New Location cannot be a URL for an Amazon S3 bucket or Azure Blob Storage container.
Note: A Relocate job will select a pair of random TCP ports to use for communication between the selected staging computer and each of the computers selected in the following panel. This range can be restricted in the Computer Configuration(s) associated with each of these ECC Client computers. For details see the topic Configuring ECC Client Computers in the ECC Administration Guide.
It is also possible to specify specific TCP ports to be used for inbound and outbound communications between these computers. For details see the attributes for the SmartMoverParams element, within the Nuix Collector and ECC JobFile Reference.
Tip: You can relocate collected data, logs and reports to a network share. First, specify a UNC path in the field provided under New Location. Next, click the Advanced > link, then specify the network credentials needed to access the share.
Click Next to proceed.
The New Collection Wizard will advance to the Custodians and Targets Page or to the next Task to configure.
Delete task
Select Delete from the Type pull-down list, if not already selected.
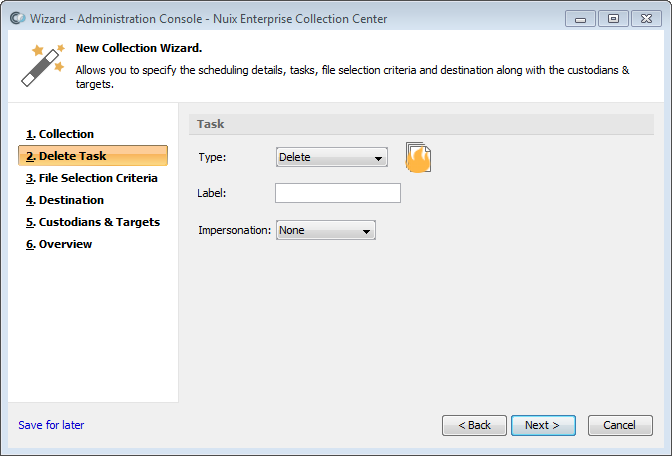
This Task type is described in the earlier topic Task Types.
Note: ECC's default settings will perform a secure file deletion. If you wish to modify these settings, refer to the topic Advanced Deletion Options.
Specify a label for this collection (optional). The list of jobs shown in Admin Console's Dashboard pane can be filtered according to the label value.
Click Next to proceed.
The New Collection Wizard will advance to the File Selection Criteria Page.
Collect and delete task
Select Collect and Delete from the Type pull-down list, if not already selected.
Note: This Task type is described in the earlier topic Task Types. ECC's default settings will perform a secure file deletion. If you wish to modify these settings, refer to the topic Advanced Deletion Options.
Specify a label for this collection (optional). The list of jobs shown in Admin Console's Dashboard pane can be filtered according to the label value.
Select an Impersonation option:
None - The ECC Client program which performs each Task will run using the Client Computer's local SYSTEM account. EFS-encrypted folders will not be accessible.
Logged in User - The ECC Client program which performs each Job will run using the account of the currently logged in user. Any EFS-encrypted folders established by this user will be accessible.
Note: The Impersonation option applies only to ECC Client computers running Windows. The setting is ignored for ECC Client computers running Linux or macOS.
Select Volatile Information options:
Volatile Information Collection - if checked, collects operating system and process details from the ECC Client computers associated with each selected target.
Process Handles - if checked, also collects a list of open handles associated with running processes. Applies only to ECC Client computers running Windows.
Screenshots - if checked, also captures screen images of any open windows and the currently logged in user's Desktop. Applies only to ECC Client computers running Windows.
Tip: The Impersonation option must be set to Logged in User to capture screenshots.
Screenshot File Format - the graphic file format in which to save screen images. Can be PNG or JPG.
Click File Selection Criteria on the left side, or click Next to proceed.
The New Collection Wizard will advance to the File Selection Criteria Page.
File selection criteria page
The File Selection Criteria page is displayed only for "Survey", "Collect", "Delete" and "Collect and Delete" tasks.
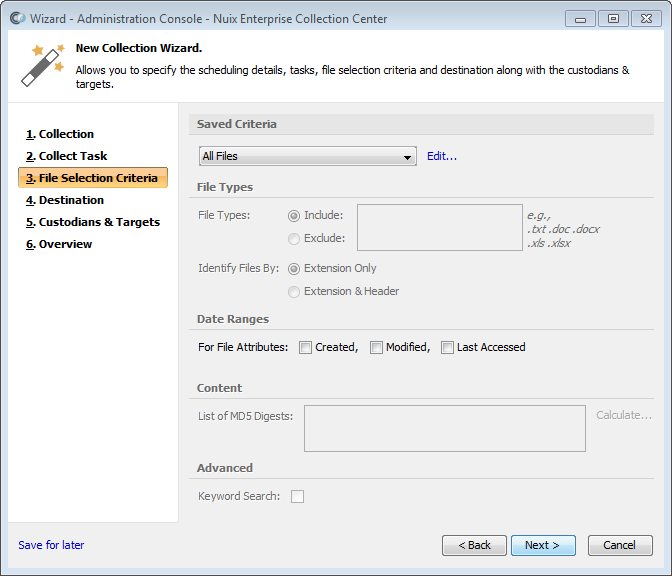
Either select an existing Selection Criteria to restrict which files will be processed, or click Edit to specify new Selection Criteria in the fields provided. Refer to the topic Adding New Selection Criteria for details regarding these fields.
Click Destination on the left side, or click Next to proceed.
The New Collection Wizard will advance to the Destination Page.
Destination page
The Destination page is displayed only for "Collect" and "Collect and Delete" tasks.
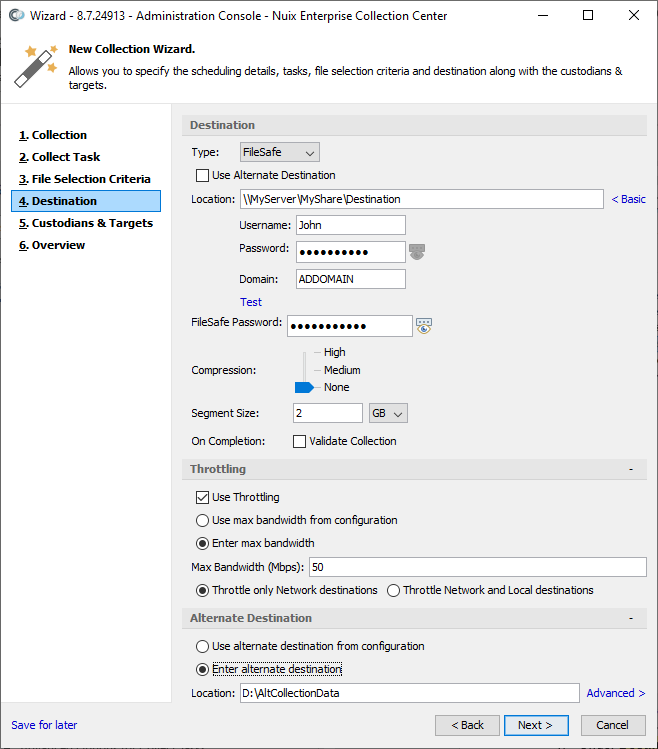
Under Destination, specify:
| Detail |
Description |
| Type (of Destination) |
FileSafe: An evidence file format which preserves files and metadata information in a forensically-sound manner. A FileSafe file, like a ZIP file, contains other files and folders. FileSafe files can be accessed using Nuix Workstation™ and certain other Nuix eDiscovery applications. |
| Native Files: Copies of individual files and folders. This destination type is used for any Collection where FileSafe files are not desired. |
|
| Note: FileSafes are more secure than Native Files, because the files contained within a FileSafe can only be accessed using specific collection tools. Saving a collection as native files is not recommended when collecting sensitive or encrypted data files. |
|
| Use Alternate Destination |
Save collected data and logs in the alternate destination specified in the Alternate Destination section of this window. Disregard the Location field in the Destination section of the screen (i.e. the primary destination). |
| Location |
The folder where collected files will reside (assuming Use Alternate Destination is not selected). This is generally a UNC network share that is accessible to all the computers running ECC Client. It can also be a folder on a local volume, a URL to an Amazon S3 bucket, or a URL to a container in Azure Blob Storage. For details, see topics Guidelines for Destinations and Alternate Destinations below. |
| Advanced |
If the specified Location is a password-protected UNC path, an Amazon S3 bucket URL, or an Azure Blob Storage URL, click the Advanced link to specify the login credentials required to access this path. For details see topic Password-protected destinations. |
| FileSafe Settings |
Detailed settings for Destinations with Type: FileSafe. |
| FileSafe Password |
Optional. Specify a password which will be required to access any of the data stored in the FileSafe. |
| Compression |
Sets the FileSafe compression level. Higher compression saves disk space on the Destination, as well as network bandwidth, at the expense of processing effort at each ECC Client computer. |
| High: Smallest file size but slowest speed. |
|
| Medium: Smaller file size, moderate speed. |
|
| None: Larger file size, fastest speed. |
|
| Segment Size |
The threshold at which a FileSafe is split into multiple files (segments). |
| Native File Settings |
Detailed settings for Destinations with Type: Native Files. |
| Maintain full path |
If checked, then the entire original directory path will be maintained at the Destination. If unchecked, then only the sub-directory paths are maintained; all files and sub-directories will be saved in the Target sub-folder under the Destination folder. This option can cause file overwrite conditions; see the next option for details. Maintain Full Path — Example: Case: MyCase Collection: MyCollection Destination: \\DestServer\DestShare Custodian Name: Fred Smith Target Name: Fred-Docs Target Location: C:\Users\Fred\Documents When Maintain Full Path is Yes, the Target files will be saved to: \\DestServer\DestShare\MyCase\MyCollection\Fred Smith\Fred-Docs\C_\Users\Fred\Documents When Maintain Full Path is No, the Target files will be saved to: \\DestServer\DestShare\MyCase\MyCollection\Fred Smith\Fred-Docs\Documents |
| Overwrite existing files |
If unchecked, then any files collected that have the same file path and name as any files already existing at the Destination will be re-named with a sequential number appended to the end of the file name. If checked, then any files that exist at the Destination will be overwritten by the files being collected (if the file path and names are the same). |
| Validate Collection |
Causes the Client to re-hash every file at the Destination after all files have been collected. Logs any hash errors that occur. |
| Use Throttling |
If this option is enabled, the file collection job will restrict the rate at which collected data is saved to the destination. This can reduce the workload on the network or on the drive where the destination is located, while prolonging the collection. Note: When saving to a network destination, the path must be a UNC path, an Amazon S3 bucket URL, or a URL to a container in Azure Blob Storage. |
| Use max bandwidth from configuration |
Obtain the max bandwidth value from each ECC Client's computer configuration. |
| Enter max bandwidth |
Set the max bandwidth directly, using the Max Bandwidth in mbps (megabits per second) field. |
| Max Bandwidth (Mbps) |
The maximum rate at which collected data will be saved, in mbps). |
| Throttle only Network destinations |
Throttling will only take effect if the collection destination is on a network share (specified as a UNC path), an Amazon S3 bucket, or a URL to a container in Azure Blob Storage. |
| Throttle Network and Local destinations |
Throttling will take effect for file collections whose destination is a network share (specified as a UNC path), an Amazon S3 bucket, a URL to a container in Azure Blob Storage, or a local path. |
| Alternate Destination |
Collected data can be saved to an alternate destination in the event the primary destination (i.e. the upper Location field) is unreachable or unwritable at the start of the collection, or if the Use Alternate Destination option is selected. |
| - Use alternate destination from configuration |
Obtains the alternate destination path from the Computer Configuration associated with each ECC Client participating in the collection. For details see topic Alternate Destinations. |
| - Enter alternate destination |
Specify an alternate destination for each ECC Client participating in the collection. For details see topic Alternate Destinations. |
Click Custodians and Targets on the left side or click Next to proceed.
The New Collection Wizard will advance to the Custodians and Targets Page.
Guidelines for destinations
Be sure to specify a Destination folder which resides on a volume with adequate free disk space, on a computer that can handle the disk I/O load.
Ideally, the computer where the Destination folder is located will have a fast network connection to the LAN. If VLAN's are configured on your network, it is ideal to have the Destination computer on the same VLAN as the ECC Client computers which perform the collections.
It is best to keep Destination paths brief. Numerous sub-folders will be established under this Destination, and it is possible to exceed the path limit of Windows Explorer (which is 256 characters – far less than the NTFS path limit).
Password protected destinations
If the specified Destination path is a password protected UNC path, an Amazon S3 bucket URL, or a URL to a container in Azure Blob Storage, you must click the Advanced link in the New Collection Wizard's Destination page to specify user credentials which the ECC Clients will use to access this path.
For UNC paths (network shares):
Specify an Active Directory domain account when accessing UNC paths on computers which are members of the domain. A separate Domain field is available for specifying the Active Directory domain name.
Specify a local account when accessing UNC paths on computers which are members of a workgroup (leave the Domain field empty).
For Amazon S3 bucket URLs:
The Username corresponds to the Amazon Access Key ID, while the Password corresponds to the Amazon Secret Access Key. Domain can be left empty.
For Azure Blob Storage URLs:
The Username corresponds to the name of the Storage Account (which is distinct from the Azure Account). The Password corresponds to the Access Key generated at the time the Storage Account was created. Domain can be left empty.
Specifying an Amazon S3 bucket as a destination
An Amazon S3 bucket URL may be specified as the destination Location for a Collect task. The S3 bucket must already exist before the collection starts. S3 bucket URLs vary depending on the Amazon AWS region where the S3 bucket resides. The following examples illustrate.
Saving to an S3 bucket in the default AWS region (us-east-1):
Value entered into the Location field:
https://s3.amazonaws.com/mybucketname
Resulting URL in each JobFile for saving collected files:
https://s3.amazonaws.com/mybucketname/case/collection/custodian/type/target {DateTime}
Resulting URL in each JobFile for saving logs:
https://s3.amazonaws.com/mybucketname/case/collection/custodian/Logs/target {DateTime}
Saving Native Files to an S3 bucket in other AWS regions (the region is part of the URL):
Value entered into the Location field:
https://s3-myregion.amazonaws.com/mybucketname
Resulting URL in each JobFile for saving collected files:
https://s3-myregion.amazonaws.com/mybucketname/case/collection/custodian/type/target {DateTime}
Resulting URL in each JobFile for saving logs:
https://s3-myregion.amazonaws.com/mybucketname/case/collection/custodian/Logs/target {DateTime}
For S3 buckets in other AWS regions, the region is part of the URL entered into the Location field:
https://s3-myregion.amazonaws.com/mybucketname
or with a dot after 's3':
https://s3.myregion.amazonaws.com/mybucketname
or using 'virtual hosted' style URLs, e.g.:
https://mybucketname.s3.myregion.amazonaws.com
In the above Amazon S3 bucket URL examples:
myregion is the AWS region where the S3 bucket resides, e.g. 'us-west-1'.
mybucketname is the name of the existing S3 bucket.
case is the case name selected in the first page of the New Collection Wizard.
collection is the collection name as specified in the first page of the New Collection Wizard.
custodian is the Custodian name associated with each selected Target.
type is the destination Type: either Native Copies or FileSafe.
Logs is taken literally.
target is the name of each selected Target.
{DateTime} is a variable which will be replaced with the date and time when the collection begins.
Note: Amazon S3 bucket URLs can be specified as an alternate destination for a collect job. Specifying an Azure Blob Storage Container as a Destination. For details regarding credentials see topic Password Protected Destinations.
Specifying an Azure Blob storage container as a destination
The Azure Storage Account must already exist and must be of type BlobStorage, Storage (general purpose v1), or StorageV2 (general purpose v2). Files uploaded to Azure are always uploaded as Blob types.
Value entered into the Location field:
https://<myblobstorage>.blob.core.windows.net/<mycontainer>
Resulting URL in each JobFile for saving collected files:
https://<myblobstorage>.blob.core.windows.net/<mycontainer>/<case>/<collection>/<custodian>/<type>/<target> {DateTime}
Resulting URL in each JobFile for saving logs:
https://<myblobstorage>.blob.core.windows.net/<mycontainer>/<case>/<collection>/<custodian>/Logs/<target> {DateTime}
In the above Azure Blob Storage container URL example:
<myblobstorage> is the name of the existing Storage Account.
<mycontainer> is the name of the container. It will be created if it does not already exist. The container name should be limited to all lowercase letters, numerals and single dashes. Other characters and spaces will be dropped or converted to single dashes (hyphens).
<case> is the case name selected in the first page of the New Collection Wizard.
<collection> is the collection name as specified in the first page of the New Collection Wizard.
<custodian> is the Custodian name associated with each selected Target.
<type> is the destination Type: either Native Copies or FileSafe.
Logs is taken literally.
<target> is the name of each selected Target.
{DateTime} is a variable which will be replaced with the date and time when the collection begins.
Note: Collecting directly to Azure Blob Storage containers is available only from ECC Client computers running the following operating systems:
-Windows 7 or newer
-Linux 64-bit
-macOS
Azure Blob Storage container URLs can be specified as an alternate destination for a collect job or disk image. For details regarding credentials see topic Password protected destinations.
Destinations for certain task types
"Deploy" and "Relocate" tasks must specify local paths for all destination locations (i.e. paths which are local to the destination computer). UNC paths and mapped drives are not supported.
"Network Capture" tasks generate a pcap file for each ECC Client computer participating in the collection. These pcap files can be saved to the specified Destination: either saved as a Native File, or saved within a FileSafe. Programs such as Wireshark can analyze the network packets captured within these pcap files.
Specifying a Destination is not applicable for "Launch Command" tasks.
Local destinations
Mobile or remote computers may be disconnected from the network when a collection is scheduled to begin. For such computers you can specify a local folder, such as C:\CollectedFiles, as the Destination. This Destination will be assigned to each ECC Client computer performing collections, as soon as the Collection is submitted (see below). The mobile or remote PCs can begin to collect their files to their local Destination folder at scheduled collection start time – even if they are disconnected from the network.
Note: The specified local destination folder must be valid for each computer in the collection. This folder must reside on a local volume with sufficient free disk space to store the collected data. Local volumes formatted with older file systems such as FAT32 will impose severe limits on the maximum file size and are not recommended.
A Move task can be configured with options for overwriting existing files in the specified destination folder. Move tasks are configured with a logs destination that is distinct from the file move destination. For details see Move task.
A Relocate task can be configured to move collected data from a local destination folder to a specified network folder. This way, laptops and other portable computers can successfully collect their data to a local folder while offline, then subsequently relocate that data to a network share once they reconnect to the network. Both the Collect task and the Relocate task are resilient and will persist through periods of time when the portable computer is disconnected or powered off.
If you are collecting from a mix of Windows, Linux and/or macOS computers, and you wish to save the collected data to a local destination, then you will need to configure separate platform-specific collections. For example, one collection would consist of Targets that were running Windows, while another collection would consist of Targets running macOS. Having separate collections allows the local destination to be different depending on the operating system of the ECC Client computer.
Alternate destinations
The Destination page in the New Configuration Wizard provides an Alternate Destination section (shown in the image, below) where an alternate destination for the collected data and logs can be specified. The alternate destination is used in the event the primary destination (i.e. the upper Location field) is unreachable or unwritable at the start of the collection.
The Alternate Destination section offers two approaches for specifying an alternate destination:
Use alternate destination from configuration: Obtains the alternate destination path from the Computer Configuration associated with each ECC Client participating in the collection. If a particular ECC Client has a Computer Configuration which lacks an alternate destination, then no alternate destination will be available for that ECC Client (the collection for that Client will fail if the primary destination is unreachable or unwritable). For details regarding Computer Configurations, see the Nuix ECC Administration Guide.
Enter alternate destination: Specify an alternate destination for each ECC Client participating in the collection. The collection will use the specified alternate destination if the primary destination is unreachable or unwritable. Any alternate destination specified within the Computer Configurations of the ECC Clients participating in the collection will be ignored.
The Advanced option lets you specify login credentials for accessing the specified alternate destination (i.e.: for accessing network shares, Amazon S3 bucket URLs, or Azure Blob Storage URLs). For details regarding credentials see topic Password Protected Destinations.
Note: It is possible for a single collection to collect data from a set of ECC Clients running a mix of Windows, Linux and macOS. Each OS requires different kinds of paths. By using the alternate destination from each ECC Client's Computer Configuration, you can specify destinations which are suitable for each endpoint operating system. This requires several steps:
Create one or more Computer Configurations for each operating system, having an alternate destination suitable for that OS. Associate each ECC Client with a suitable Computer Configuration prior to running the New Collection Wizard. For details regarding Computer Configurations, see the Nuix ECC Administration Guide.
Select the Use Alternate Destination option at the top of the Destination page. This forces the primary destination to be skipped and the alternate destination to be used instead.
Set the Alternate Destination option to Use alternate destination from configuration.
The targets or locations selected for collection must specify paths to collect using volume names and path separators that are recognizable to the OS running on that ECC Client.
Source and destination page
The Source and Destination page is displayed only for "Disk imaging" tasks.
Note: Disk image collections are not supported on macOS High Sierra and later.
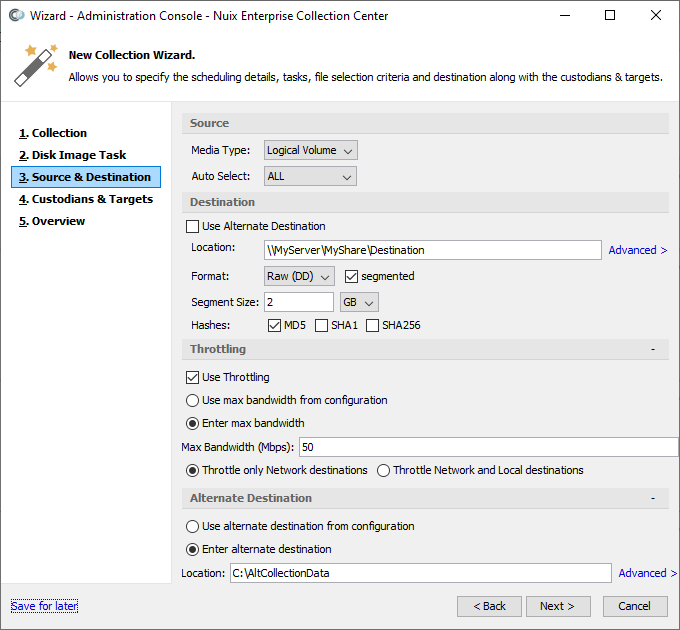
Specify the volumes on each ECC Client computer which will be imaged and collected, as follows:
Under Source specify:
| Detail |
Description |
| Media Type |
Logical Volume: Select this option to create an image of one or more logical volumes. A logical volume can reside within: a primary partition on a physical disk an extended partition on a single physical disk multiple partitions on multiple physical disks, known as a spanned volume However the logical volume is configured, it is recognized by the operating system as a single volume or drive letter. Physical Disk: Select this option to create an image of one or more physical disks. A physical disk is all the data on a specific storage device. This may include a boot sector, a partition table, and one or more disk partitions. The disk partitions, in turn, may contain one or more logical volumes. |
| Note: A separate image will be created for each selected logical volume or physical disk. Each image is a copy of all the sectors on the selected source disk or volume (unreadable sectors are saved within the image as zeros or as a custom padding string). Each image may be stored as one or more spanned files (or segments). |
|
| Warning: When imaging physical disks that contain spanned logical volumes or RAID volumes, the data in the resulting image files may contain unrecognizable data. This is because the data may be striped across the multiple disks, or a particular disk may contain parity data rather than direct data. |
|
| Auto Select |
Select one of the following: ALL: Create separate physical or logical disk images for each local volume detected – on the computers running ECC Client. System: Create a physical or logical disk image for the volume where the operating system is installed – on the computers running ECC Client. Non-System: Create separate physical or logical disk images for each local volume detected – except for the volume where the operating system is installed – on the computers running ECC Client. User Specified: specify the physical or logical volume to be imaged and collected – on the computers running ECC Client. |
| Note: When collecting disk images, RAM disks, CD/DVD/optical drives and mapped network drives (or network shares) are always excluded. |
|
| Volumes |
The Volumes field appears only when Auto Select is set to User Specified. Enter the specification for one or more volumes to be imaged. Examples: \\.\PhysicalDrive0physical disk 0 on Windows \\.\c:logical volume C: on Windows /dev/sdaphysical disk a (block access) on Linux /dev/sda1logical volume a1 (block access) on Linux /dev/rdisk0physical disk 0 (raw access) on macOS /dev/rdisk0s2logical volume 0s2 (raw access) on macOS Each volume should be listed on a separate line. |
| Note: On Linux and macOS systems, disks and volumes can be accessed as either block devices or raw devices, depending on how the device is specified. Auto-detected volumes are accessed as block devices on Linux computers; however, auto-detected volumes on macOS computers are accessed as raw devices. If you specify volumes, specify raw or block devices in a similar manner, depending on whether the selected targets (computers) run Linux or macOS. For details see Disk Access Methods for Linux and macOS. |
Under Destination specify:
| Detail |
Description |
| Location |
Specify the path where the disk images will be saved. This is typically a network share. Advanced: optionally click this link to reveal the fields for specifying the login information needed to access the specified network share from the ECC Client computer. Note: Amazon S3 bucket URLs and Azure Blob Storage container URLs are not supported for saving disk images. |
| Format |
Select Raw (DD) for raw image format. Such images cannot be compressed. Select Encase 6 for EnCase E01 format. These images can be compressed. The segmented option, when checked, allows the disk image to be spanned across multiple files, known as segments. |
| Segment Size |
The maximum size of a disk image segment file. Once this size is reached, a new segment file will be created. A single disk image can span many such segmented files. This option is available only when the segmented option is checked. |
| Note: When Format is Encase 6, the maximum segment size is limited to 7 GB. |
|
| Compression |
Set the degree to which the saved disk image files will be compressed. High compression saves the most disk space but may take longer, depending on your computer's performance. Medium is a compromise between reducing disk space and fast performance. This option is available only when the Format is Encase 6. |
| Hashes |
The following hash values can be calculated for the disk image. Enabling at least one of these hashes will ensure the accuracy of the collected image data, and provide a means to validate the saved images in the future. MD5calculate a hash for each image using the MD5 algorithm SHA1calculate a hash for each image using the SHA1 algorithm SHA256calculate a hash for each image using the SHA1256 algorithm |
Under Throttling specify:
| Detail |
Description |
| Use Throttling |
If this option is enabled, the disk image collection job will restrict the rate at which collected data is saved to the destination. This can reduce the workload on the network or on the drive where the destination is located, while prolonging the collection. Note: When saving to a network destination, the path must be a UNC path, an Amazon S3 bucket URL, or an Azure Blob Storage container URL. |
| Use max bandwidth from configuration |
Obtain the max bandwidth value from each ECC Client's computer configuration. |
| Enter max bandwidth |
Set the max bandwidth directly, using the Max Bandwidth (Mbps) field. |
| Max Bandwidth (Mbps) |
The maximum rate at which collected data will be saved, in mbps. |
| Throttle only Network destinations |
Throttling will only take effect if the disk image collection destination is on a network share (specified as a UNC path. |
| Throttle Network and Local destinations |
Throttling will take effect for disk image collections, whose destination is a network share (specified as a UNC path) or a local path. |
Under Alternate Destination specify:
| Detail |
Description |
| Alternate Destination |
Collected data can be saved to an alternate destination in the event the primary destination (i.e. the upper Location field) is unreachable or unwritable at the start of the collection, or if the Use Alternate Destination option is selected. Note: Amazon S3 bucket URLs and Azure Blob Storage container URLs are not supported for saving disk images. |
| - Use alternate destination from configuration |
Obtains the alternate destination path from the Computer Configuration associated with each ECC Client participating in the collection. For details see topic Alternate Destinations. |
| - Enter alternate destination |
Specify an alternate destination for each ECC Client participating in the collection. For details see topic Alternate Destinations. |
Click Next to proceed.
The New Collection Wizard will advance to the Custodians and Targets Page or to the next Task to configure.
Disk access methods for Linux and macOS
Linux and macOS allow access to a disk via two distinct methods: “block access” and “raw access”. These methods have distinct benefits, drawbacks, and behavior when imaging a disk.
Block access
The block access method transfers data in blocks at once (i.e. in 4 KB chunks, typically). Devices accessed in this manner are buffered at a low level, by their device driver, and read data multiple sectors at a time.
A single 4 KB block contains eight 512-byte sectors, and if even one of those sectors is "bad", the entire block of data is also marked bad by the operating system, making it unreadable by Nuix Disk Collector or any other third-party imaging tools. This means a single 512-byte bad block will often result in 4 KB of data loss.
On Linux, block devices can be imaged while they are mounted
On macOS, block devices cannot be imaged while they are mounted
On macOS, block devices can be much slower to image due to device driver behavior
Raw access
The raw access method transfers data in individual bytes rather than large blocks. Devices accessed in this manner offer more direct (raw) access to the disk, allowing for sectors to be read individually, without the buffering that block devices use.
Using raw access, Nuix Disk Collector can read around a single bad sector without losing any adjacent data.
On Linux, raw devices cannot be imaged while they are mounted -- they require special setup by an administrator
On Linux, raw devices can be much slower to image due to device driver behavior
On macOS, raw devices can be imaged while they are mounted, and are also noticeably faster than block devices
Specifying disk access methods
Linux and macOS provide both a "block device" and a "raw device" for each physical hard disk and logical volume. The disk access method to be used for imaging depends on whether a block device or a raw device has been specified as the source device to be imaged.
Disk imaging jobs can be configured to auto-detect the physical disks or logical volumes to be imaged. The auto-detection routine will select the corresponding block devices on Linux computers, and the corresponding raw devices on macOS computers. This allows imaging of mounted disks and volumes, while providing the best overall performance.
Disk imaging jobs can also be configured to allow the user (or custodian) to specify the physical disks or logical volumes to image. These users will need to know how to specify either block devices or raw devices to be imaged. Block devices are commonly nodes with the prefix /dev/sd (Linux) and /dev/disk (Mac). Raw devices are commonly nodes having the prefix /dev/raw/ (Linux) and /dev/rdisk (Mac). The various device access methods, prefixes and capabilities are summarized in the table, below.
| OS |
Access method |
Device prefix |
Can image disk while mounted |
Used by Auto-Detect feature |
Maximum performance & suggested for most disk imaging |
Maximizes successful imaging of sectors adjacent to bad sectors |
| Linux |
Block |
/dev/sd |
Yes |
Yes |
Yes |
No |
| Linux |
Raw |
/dev/raw/ |
No |
No |
No |
Yes |
| macOS |
Block |
/dev/disk |
No |
No |
No |
No |
| macOS |
Raw |
/dev/rdisk |
Yes (see note below) |
Yes |
Yes |
Yes |
Tip: Specify block devices when imaging disks connected to a Linux computer, and specify raw devices when imaging disks connected to a macOS computer. This will allow you to image mounted disks, while providing the best overall performance.
Use raw access on Linux only when you need to recover every possible sector from a drive with bad sectors. For details see topic Raw Disk Imaging on Linux.
Note: Disk Imaging tasks are not supported on macOS 10.13 High Sierra or newer.
Raw disk imaging on Linux
Raw imaging of Linux disks is possible but should be limited to specific instances where the administrator needs to salvage a disk with known bad sectors. By imaging the bad disk using a raw device on Linux, Nuix ECC Client will be able to salvage the data adjacent to each bad sector that would otherwise be lost by imaging using a block device. But there are drawbacks to this approach: the disk must first be unmounted, and the disk will take longer to image.
To image a disk using the raw access method on Linux:
Identify the device node to be imaged (for example: /dev/sdc). You can list the available disk devices by running sudo fdisk –l, or, if mounted, by examining the mount tab.
Note: The fdisk parameter mentioned here is a hyphen followed by a lowercase L, rather than the numeral one.
Warning: The fdisk command can be destructive if used improperly.
Load the raw kernel module (assumes your computer's Linux kernel was built with this module):
% sudo modprobe raw
Map a raw device to the disk device you identified in Step 1, using the raw command. For example, the disk device /dev/sdc can be mapped to the raw device /dev/raw/raw1 using the following command:
% sudo raw /dev/raw/raw1 /dev/sdc
If the disk you identified in Step 1 is mounted, safely unmount it.
Image the disk using Nuix ECC Client, specifying the corresponding raw device (for example: /dev/raw/raw1) as the source device.
Custodians and targets page
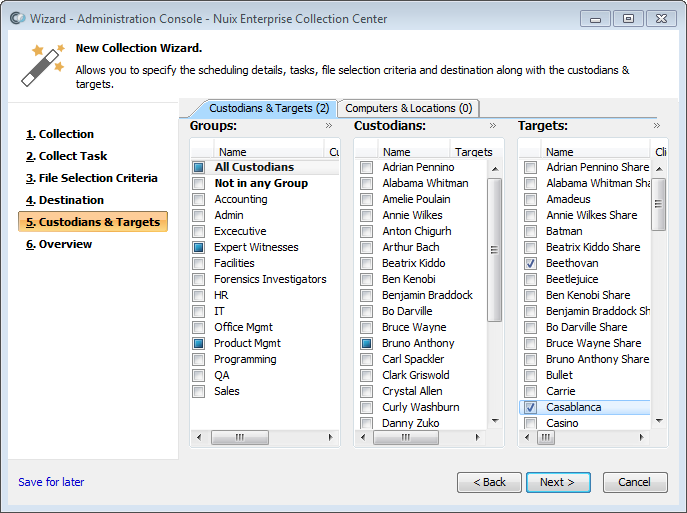
Choose whether to show Custodians & Targets or Computers & Locations, by selecting a tab at the top of the listing. Each tab has different advantages:
For "Survey", "Collect", "Delete" or "Collect and Delete" tasks, selecting by Custodians & Targets is often the easiest. Targets are often configured to specify one or more data locations on the associated computer. The Computers and Locations tab is also suitable for these job types but requires specifying the locations to process.
For "Network Capture", "Launch Command", "Deploy" or "Relocate" tasks, selecting by Computers can be simpler. These tasks do not require data locations or targets.
If showing Custodians & Targets, select the Targets to be included in this Collection. You can click the checkboxes next to each Target to select Targets individually or check their associated Custodians or Custodian Groups.
By selecting individual Custodians, you'll automatically select their associated Targets. You can then manually select or unselect specific Targets regardless of their affiliation to any Custodian.
By selecting Groups, you'll automatically select their associated Custodians, and in turn those Custodians' Targets. You can then manually select or unselect specific Custodians or Targets – regardless of their affiliation. Selecting one or more Groups is often the easiest way to specify the Targets to include.
For "Survey", "Collect", "Delete" and "Collect and Delete" tasks, selecting a Target specifies the data locations to process and the ECC Client computer which will do the processing.
For "Network Capture", "Launch Command", "Disk Image", "Deploy" and "Relocate"-tasks, selecting a Target specifies only the ECC Client computer which will run the task. For these task types, any data locations defined within each Target are ignored.
Note: If multiple Custodians are associated with the same Target, selecting those Custodians will result in separate jobs (generating distinct FileSafe files if collecting to a FileSafe destination). This is new behavior as of ECC version 9.10.0. To collect via a single consolidated job and FileSafe for all of the Custodians on a given Target computer, select the option Force one job per computer. This option appears below the list of Custodians.
Tip: Some computers may not have any targets, making it impossible to include these computers when viewing by Custodians & Targets. You can add new targets to these computers by canceling out of the New Collection Wizard and going to the Computers panel. From the Computers panel select the computers which (1) will participate in the Collection, and (2) lack targets – then right-click and choose New Targets. These targets do not require any data location if they are included in a "Network Capture", "Launch Command", "Deploy" or "Relocate" task.
If showing Computers & Locations, select the Computers to be included in this Collection.
You can filter the list of computers by clicking the >> button on the top right side of the listing, then select Filter Computers. For example, you can list only computers which are currently online and running a particular operating system. You may have to show these columns first before you can filter on them, by clicking the >> button on the top right side of the listing, then select Show/Hide Columns. It is helpful to stretch the screen to widen the display when showing additional columns.
You can also select the Computers to be included in the collection by selecting the labels which appear on the left side of the screen. Any computers associated with the selected labels will be selected. Labels must first be associated with computers before running the New Collection Wizard; for details see topic Labeling Computers.
If the task type is "Survey", "Collect", "Delete" or "Collect and Delete", you can click the Add button which appears on the right side of the listing to specify data locations to process on each selected computer. You can also select from one of the previously configured Location Sets, shown in the Saved Locations list. Be sure the locations you specify for a collection exist on each selected computer.
Note: Every Target* or computer included in your collection will result in more network traffic and disk I/O when the collection runs. This workload can quickly overwhelm a network, causing sluggish responsiveness for all network users. Each additional Target* or computer also increases the amount of free storage space required at the specified destination. This is especially true for:
Disk Image tasks
Collect tasks which collect unallocated clusters
Collect tasks which collect files from entire volumes
You can minimize the network impact of the new collection by breaking up large collections into multiple smaller ones (i.e. a smaller set of targets within each collection). Also, each of these smaller collections can be scheduled to run at a different time.
Alternately, you can schedule a large collection, then pause some of the individual collection tasks as a means of lowering the "pace" of the collection. Paused tasks can be resumed once running tasks have finished. See topic Performance Impact: Setting the Pace of a Running Collection for details.
*Targets which collect only from local volumes and which save only to local destination folders are an exception. Such Targets do not impact network performance in any significant way, nor do they require disk space on a network share destination.
Click Next to proceed.
The New Collection Wizard will advance to the Overview Page.
Overview page
The Overview page is the final page in the New Collection Wizard. From this page, you have the option to review all Collection settings before submitting the new Collection.

Optionally review Collection settings by clicking Back, or by clicking the previous pages in the New Collection Wizard.
Optionally review the JobFiles to confirm the Collection will perform as you intend.
Each JobFile holds the settings you have entered on previous Wizard pages, as well as settings brought in from the underlying Job XML Template.
Tip: Stretch the dialog's bottom-right corner to enlarge it. This will make JobFile review and editing easier. JobFile settings are documented in the Nuix Collector and ECC JobFile Reference.
Optionally click the Advanced link to make direct edits to the JobFiles, or select a different Job XML Template. These procedures are discussed in detail in topic Advanced JobFile Editing.
If the Collection is scheduled to run now, be sure that all the Client PCs that will run the individual collection jobs are presently connected to the network and online.
Computers that are asleep or hibernating may not be able to begin their collection tasks at the specified start time. For details see topic Client PC Status at Collection Start.
Once you are sure that all aspects of the Collection have been properly configured, click Finish to submit the new Collection.
Once you click Finish, collection jobs for each task will be generated, saved to the ECC Server and distributed to the various ECC Client computers on your network. The jobs will begin according the scheduled (or immediate) start date and time.
Tip: Submitted collections can be monitored, paused and canceled; see topic Monitoring and Managing Collections.
Client PC status at collection start
| ECC Client PC status |
New collections can be picked up from the ECC Server |
Collections can begin |
| Off* |
No |
No |
| Hibernated* |
No |
No |
| Sleeping* |
Yes, for most sleep states**. |
Yes, for most sleep states**. |
| Normal |
Yes. |
Yes. |
* A separate Wake-on-LAN utility can be used to wake up PCs several minutes prior to the scheduled collection start time. This can include powering on a powered off PC, or taking it out of hibernation, or waking it from a sleep state. Wake-on-LAN abilities vary for specific computers and operating systems, and requires:
Wake-on-LAN support to be enabled in the PC's BIOS
Wake-on-LAN support in the PC's network interface card
A separate computer running the Wake-on-LAN utility, to broadcast Wake-on-LAN "magic packets" (several minutes prior to the scheduled start time of the ECC Collection)
** ECC Client on a Windows PC will (1) attempt to fetch new collections from the ECC Server while the PC is sleeping, (2) will wake the PC from Sleep Mode when a scheduled collection is about to begin, and (3) keep the PC awake while a collection is actively running. This feature works for most sleep states, with most PC BIOS configurations and Windows Power Options configurations. If a PC goes into hibernation, ECC Client will not be able to wake it.
Login status at collection start
| User login status |
Impersonation |
User privilege level |
Collect local unencrypted files, RAM, volatile info and disk/volume images? |
Collect local EFS encrypted files |
Collect files from mapped drives |
Collect files from UNC network shares |
| Not Logged In |
None |
N/A |
Yes |
No |
No |
Yes, so long as Target credentials are correct |
| Not Logged In |
Logged in User |
N/A |
No |
No |
No |
No |
| Logged In |
None |
Standard |
Yes |
* If User Owned |
No |
Yes, so long as Target credentials are correct |
| Logged In |
Logged In User |
Standard |
Not supported in ECC 9.2.0 |
Not supported in ECC 9.2.0 |
Not supported in ECC 9.2.0 |
Not supported in ECC 9.2.0 |
| Logged In |
None |
Administrator |
Yes |
* If User Owned |
No |
Yes, so long as Target credentials are correct |
| Logged In |
Logged In user |
Administrator |
Yes |
* If User Owned |
No |
Yes, so long as Target credentials are correct |
Note: Collecting from Local EFS-encrypted folders requires configuring the Collection with Impersonation set to Logged in User, and this user must be logged into the Windows computer while the collection runs.
* EFS: Files and folders encrypted using the Encrypting File System features of Microsoft Windows.