Work with items
When working with search results, Nuix Investigate provides several options to help investigators cull and organize the data returned from their queries. This section explains the features that are available throughout Nuix Investigate for narrowing and viewing the details of your search.
The following features are accessible from the Item Details drawer, which is available from both the Search & Review and Investigate Connections workspaces.
Note: When working with items, a total of three panels can be open at a time except for the Exclusions and Folders panels, which can only be viewed independently of the others.
Default preview
Selecting an item within the Grid or Gallery Views expands the Default Preview pane from the Item Details drawer. The preview pane allows you to view the contents of an item. Depending on the MIME type of the selected item, different preview options may be available within the pane. If there are more than two options, click on the  icon to see more.
| Action |
Icon |
Description |
| Expand |
|
Expand the preview window to full width. |
| Collapse |
|
Collapse an expanded preview window. |
| View item in a new window |
|
Click to open the item preview in a new window. |
| Preview |
|
Default view, click to view the contents of an item in plain text. |
| Chat preview |
|
View the selected chat items in a conversational style format. |
| Email preview |
|
View the selected email item. |
| Generate multimedia |
|
Generate a preview of the selected audio of video item. |
| Media preview |
|
Preview the audio or video included in an item. |
| NLP metadata preview |
|
View data analyzed with NLP. |
| Office Online |
|
View the selected item in its native format using the Microsoft Office Online server. |
| Text preview |
|
View text that has been extracted from a multimedia item. |
| View Geo |
|
View the selected items geo location data on a map. |
| Download (Button) |
N / A |
Download the native copy of the selected case item. |
| View PDF (Button) |
N / A |
View the selected item as a PDF in a new window. Note: This does not open in a new window if any pop-up blockers are enabled. |


To prevent excessive load times, the Default Preview pane is configured to display only the first 250,000 characters of an item. If an item is opened that exceeds that value, a message within the pane indicates that text preview has been limited. To view the complete contents of the item, select the Download or View PDF options from the bottom of the view.
After selecting and reviewing an item in the preview panel, the item no longer displays as bold.
Note: An administrator can change the default character limit within the Default Preview pane by modifying the Max Item Text Length property within the Configuration Utility. See the Nuix Investigate Configuration Guide for more information.
To close the view, click the Default Preview  icon in the Item Details Drawer. Once closed, the preview pane remains minimized until you select Preview to reopen the view.
If an item contains XML data, click the View XML  icon to open in a separate browser tab. XML files are better rendered within a native browser window.
Warning: XML documents can be used in malware attacks. Open XL documents in the native browser at your own risk.
If an item does not contain any data (zero bytes), “No Preview Available” is displayed within the pane to indicate that the item does not contain data.
Note: The View item in a new window option is not available for items using the PCX image file format.
Near native viewer
When a Microsoft Office Online Server is made available to Nuix Investigate, the Default Preview pane provides a Near Native Viewer tab that allows supported Microsoft Office file types to be viewed in a read-only native Microsoft Office format. When viewing a document within the Near Native Viewer, the following features are available:
Search item content within the view (CTRL + F)
View evaluated formulas, resize columns, and display hidden worksheets, rows, and columns in a Microsoft Excel spreadsheet
View comments in Microsoft Word, Microsoft Excel, and Microsoft PowerPoint
View slide notes, slide thumbnails, and hidden slides in a Microsoft PowerPoint presentation
Use standard Microsoft Office features to review content
View native files that were created in applications other than Microsoft Office
Watch video files and listen to audio files
Zoom and rotate documents
View HTML documents
Note: Keyword and persistent hit highlighting is not available from within the Near Native Viewer.
Supported file types
When viewing items in the Default Preview Pane or Review View, the Near Native Viewer appears by default, if configured, for the following supported document kinds and file types:
Word documents: (doc, docx, dotx, dot, dotm)
Excel documents: (xls, xlsx, xlsm, xlm, xlsb)
PowerPoint documents: (ppt, pptx, pps, ppsx, potx, pot, pptm, potm, ppsm)
HTML documents: (html, htm, xhtml, xht, mht, mhtml, chm, chtml)
Note: If the Near Native Viewer is enabled, it is also used to render PDF documents, however, users must belong to a group with the Enable PDF/Image View privilege within UMS to view the PDF.
If an item is a supported document kind, but has an unsupported file extension, the Near Native Viewer displays with an error message. If this occurs, the item can still be viewed by selecting one of the other preview options within the preview pane. If a selected item does not match one of the supported document kinds, the Near Native Viewer is not displayed within the view.
Text highlighting
Text highlighting is available when viewing an item’s text to help identify specific query details or other relevant information. Keywords and phrases for highlighting are defined by an administrator in group settings. If you belong to a group with highlighting defined and when enabled, all affected text within an item is highlighted in the preview pane, and the total number of highlights found is displayed at the top of the view.
The following highlighting options are available and can be enabled by an administrator:
Text highlighting: Enabled by default, highlights each discrete word that is specified when performing basic word searches.
Phrase highlighting: Highlights predefined keywords or phrases when found in an item's text, regardless of the applied query.
Note: Enabling phrase highlighting may increase the amount of time needed to process and display highlights within a selected item.
The Text and Phrase highlighting options can be switched on or off from the Nuix Investigate window of the Nuix Configuration Utility. See the Nuix Investigate Configuration Guide for more information.
Note: To see highlighting, the group must have the Group folders location property set to the correct location in the Nuix Configuration Utility. See your administrator for more information.
Chat preview
If Nuix Investigate identifies that an item contains chat messages or conversation data, the Chat Preview tab appears by default when the Preview pane opens. The Chat Preview  tab is located at the top of the pane and presents chat data including attachments in an intuitive, conversational style layout. The Chat Preview provides a timeline of events and identifies the participants in a chat conversation. Conversation items in the Chat Preview are sorted by Item Date, which in most circumstances places the messages in the order in which they were sent.
This layout is also available from within the Review view by selecting the Chat view tab at the top of the view when an item that contains chat data is selected.
The Chat Preview tab is available for any item that contains chat or conversation data. This could include:
SMS messages
MMS messages
Messages from online services, such as: Facebook, Skype, Slack, WhatsApp
When using the Chat Preview to view a supported item type, all active participants within the conversation are listed at the top of the view in alphanumeric order. Click on the participants list to show all and filter on one or more participants.
The Chat Preview loads 50 messages in a thread at a time. When you review the 51st message, click Load previous messages to go back to the previous 50 messages. Each message can contain attachments or reactions.
To view a chat timeline of the conversation, click Load timeline.
A timeline is shown in the left pane showing chat volumes for the whole conversation with // shown to indicate a gap in time. Bubbles on the timeline indicate time increments. The size of each bubble represents the volume of chats within that time frame.
Click the time increment list to select different increments of time by Day, Month or Year.
Within the chat timeline, select a specific timeline bubble to scope to all chat messages from that time increment, with a before and after buffer. When the chat conversation is scoped by date/time, it respects the investigator time zone for the case.
When the chat conversation is scoped by date or by shared file, the following buttons become available:
| Action |
Icon |
Description |
| Go back to beginning. |
|
Go back to the beginning of the conversation. |
| Go back to previous scoped query. |
|
Go back to the previously selected date in this conversation. |
| Go to previous. |
|
Go back to the previous time increment or shared file. |
| Go to next. |
|
Go to the next time increment or shared file. |


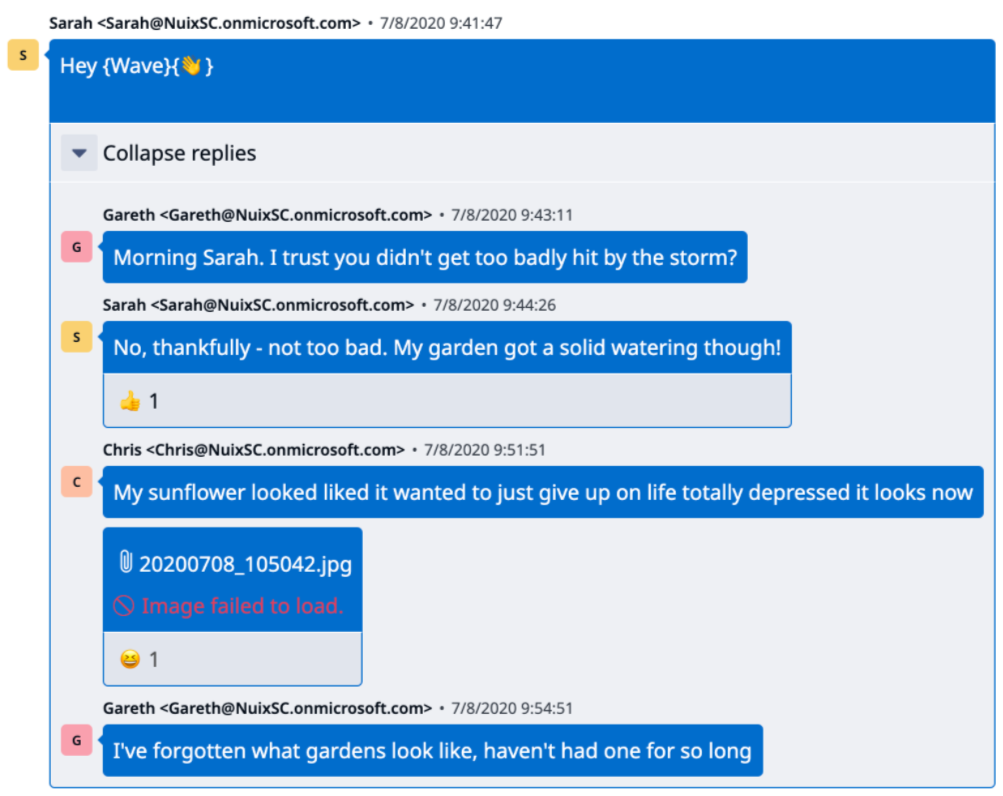
Individual chat responses are presented in separate time-stamped, color-coded bubbles, allowing individual voices to be identified. When viewing individual chat messages within the context of a conversation, the message associated with the currently selected item is highlighted within the view.
Each segment of a chat includes:
Sender's friendly name (if available). Some email providers allow a friendly name to be attached to a user. This shows an easy-to-read name in front of the actual email address in < > brackets while viewing chat conversations.
Sender's ID in < > brackets.
Timestamp of the message.
Chat bubble including the message sent.
Recipients of the message.
Select an attachment of a chat conversation to view it in the Chat Preview window.
An avatar is included for each chat message participant in a different color to differentiate when someone new adds to the chat conversation. If a friendly name is available, the participant's initials are included in the avatar.
Not every response to a chat message necessarily goes to all participants, therefore, the recipients of all individual responses are shown. If the full list of recipients does not fit on one line, click Show more to reveal all recipients. When a chat conversation is printed, the full expanded list of recipients appears on the PDF or printed sheet for each chat message.
Note: If a conversation includes more than two participants, the originator of the conversation appears using one color and all other participants display using a second color.
To help identify participants in the message, the sender's friendly name (if included by their email provider) along with their ID in brackets, and the timestamp of the message appears above each chat bubble within the displayed message.
If a conversation contains embedded images or attachments, those items are identified inline within the conversation. If an image is of a supported file type, a thumbnail of the image is displayed. All other attachments are presented inline within the conversation using the attachments name and an icon that represents the attachments MIME type.
Note: If thumbnails fail to load within the chat and an error is displayed, ensure that thumbnail generation was used when processing the case.
In the chat preview or a popped out chat window, right-click on an image or attachment and click Search to show where else that image or attachment can be found. The results are shown in a new browser tab if the Enable New Tab Pivot Searches property is enabled.
To view the contents of an attachment, click on the attachment's name within the conversation to open the item within the chat preview.
If an attachment is a video, the thumbnail has a play button on top of it. Hover over the thumbnail and click Play in the video player to view the video. Click the play button on the thumbnail to play the video in a larger window.
If an attachment is an audio recording, the chat bubble contains an audio player. Click on the audio player to play the recording.
Note: The Chat Preview tab does not support keyword search text highlighting. To view highlighting for a selected chat message, return to the plain text view by clicking the Preview  tab from the top of the view.
Click on a specific chat bubble and select Days, Months, or Years with a before and after buffer to view all chat messages in the case from that time with the original message highlighted. Select a section of the chat conversation to view all chat messages with the time range selected with a small before and after buffer.
To print a chat conversation, including all embedded images and attachments, click the Print  icon and follow the prompts in the browser's print window.
To pivot on specific text from a chat, highlight the text and right-click. Select Search case for "<selected text>" to start a keyword search. The results are shown in a new browser window if the Enable New Tab Pivot Searches property is enabled.
To apply the following actions to one or more chat messages, hover over their chat bubbles, select them or click Select All, and then click the appropriate action:


Note: If adding chat conversations to restricted folders using Item Security, all individual chat message items that make up the conversation should also be included to ensure they are secured.
After applying Exclusions or Folders, click the Preview  tab to reopen the Chat Preview.
To create a comment, do not select any chat bubbles, just click Comments . A comment can only be created for one chat conversation.
Teams channels
You can view a full Teams channel. Each conversation within the channel is represented with the avatar of who created and started the conversation. Each response in the conversation is displayed in a thread view. When a threaded conversation is displayed, the chat timeline is hidden.
Click the down arrow of a message to see the reply messages. Click it again to collapse the replies.
To select conversations within a Teams channel:
Click the check box for the top-level message one time to select all messages in the conversation.
Click the check box for the top-level message a second time to only select the top-level message.
Click the check box for the top-level message a third time to select all messages within the thread.
Reactions
Chat reactions, such as hearts or smiles, are shown in the preview window below a chat message with the number of instances of each reaction.
Hover over a reaction in a chat message to see the reaction type.
Click on a reaction to see who reacted and when in the Chat Preview window.
Right-click on a reaction to open a context menu to search for the item.
Email preview
If Nuix Investigate identifies that an item contains email messages, the Email Preview tab is displayed by default when the Preview pane opens. The Email Preview  tab is located at the top of the pane and presents email data including attachments. The email preview displays the To, From, Date, and Subject of each email, list of attachments, and the body of the email.
Select any text in the email preview pane and right-click to see a context menu with two options:
Copy selected text
Search case for <selected text>
Search for this item
Email attachments are shown in a tree if there are more than one. Select some or all attachments when applying coding: tags, secured fields, folders, or exclusions. Right-click on an attachment to search for it in a new tab.
Note: If you have access to an email but no access to some of the attachments, you may be restricted from those attachments.
Multimedia options
If a case contains multimedia content, the following options become available within the Default Preview pane when you select an item that contains audio or video:
| Option |
Icon |
Description |
| Generate multimedia |
|
Generate an audio or video preview for the selected item. The generated preview is stored with other case thumbnails and only needs to be performed once per item. Note: Multimedia can be generated for .fly files only if using FFmpeg v4.4 or later. |
| Media preview |
|
Play the audio or video file within the preview pane without having to download the native file. |
| Text preview |
|
Click to utilize Nuix Voice to view any extracted text that is associated with the multimedia. Note: Text preview is only available for multimedia that was processed using Nuix Voice within Nuix Workstation. |


Note: Upon clicking on a video file, the video thumbnail or slipsheet may display prior to showing the play button.
Note: If a multimedia item does not have an MD5 hash value, the item might exceed the maximum size and an error message appears.
Download native
Case items that contain a large amount of text are truncated to display only the first 250,000 characters when viewed within the Default Preview pane.
To view the entire contents of a file, click Download within the preview pane to save a copy of the currently selected item in its native application file format to your desktop. The ability to download items is only available when evidence binary or source data is stored within the case or in a location defined by the case's evidence file that is still accessible.
Single item metadata report
You can create an additional report including metadata profile fields and values plus an image, if applicable.
To include a metadata report for an item:
Select a single item.
On the preview pane, click the arrow option on the Download button.
Select Download with metadata.
As the download starts, observe the progress of creating the files on the window.
Note: If you receive a warning that you are trying to download multiple files, allow it.
When complete, review the files within the zip file in your browser's downloads folder.
Note: The Download with metadata option is available to administrators or users who belong to a group with the Download privilege.
Download attachments
You can include attachments while downloading the native on the Email Preview pane.
To download attachments along with the native:
Select a single email item and view in the Email Preview pane.
Select one or more attachments.
There are two download options.
Click Download to create the natives for the checked attachments and the actual item, bundled in a zip file.
Click the arrow option on the Download button and select Download with metadata to create the natives for the checked attachments, the metadata report, and the actual item, bundled in a zip file.
Note: The Download with metadata option is available to administrators or users who belong to a group with the Download privilege.
As the download starts, observe the progress of creating the files on the window.
Note: If you receive a warning that you are trying to download multiple files, allow it.
When complete, review the files within the zip file in your browser's downloads folder.
View PDF
For most item types, you can view the contents of the item as a PDF by clicking View PDF within the preview pane. When selected, the item renders as a PDF, then appears in a new window for further review. The View PDF option is only available for items when evidence binary or source data is stored within the case or in a location defined by the case's evidence file that is still accessible or if the PDF has been stored.
Tip: If your web browser is equipped with a pop-up blocker, make sure to either allow pop-ups from the Nuix Investigate URL or switch it off to ensure that the generated PDF is not blocked.
Note: The View PDF option is only available to administrators or Users who belong to a group with the Enable PDF/Image View privilege within UMS.
View Geo
The View Geo icon is made available within the Default Preview pane when viewing an item that contains location metadata. Select this option to open the location analytic in a separate window. The analytic displays a world map centered on the selected items pinned location. The position and zoom of the map can be manipulated using standard map navigation controls to explore the exact location where an item originated.
If other items within the result set also contain location metadata, the locations of those items are also pinned within the map. Clicking a pinned location on the map changes the selected item within the result set.
For additional information about the actions available within the map, see the Location section.
Note: The Enable Google location analytics Investigate Property Name in the Configuration Utility must be set to True for the Location analytic to function properly.
Offline maps
You can utilize offline maps to be used in the location analytic by having an administrator set the Map tile server URL property in Nuix Configuration Utility - Nuix Investigate. This makes offline maps the default and works whether you have internet service or not. If the properties are not set up or are incorrect, Google Maps is used if the internet is available.
If Nuix Investigate is running with SSL in a secure environment and offline maps is not secure, Google Maps is used if the internet is available.
Note: Nuix has tested with OpenMapTiles as the tile server.
View item in a new window
Click the View item in a new window  icon to open the preview in a popup window.
Select one or more text messages and click Print to print the text.
In the new window, select some text, right-click, and select Search case for "<selected text>" to start a keyword search. The results are shown in a new browser window if the Enable New Tab Pivot Searches property is enabled.
Item metadata
Select the Item Metadata  icon to view the Item metadata pane displaying metadata that is associated with the currently selected item.
To change which metadata fields are displayed, select a different profile from the Metadata profile list at the top of the pane.
The metadata is categorized into the following categories:
Standard Metadata
Nuix Defined Metadata
User-defined Evidence Metadata
Custom Metadata
Communication Metadata
Properties Metadata
By default, the fields defined by the metadata profile are displayed in each blind in the order in which they appear in the profile. To display the fields alphabetically, expand the Sort menu at the top of the pane and change the sort method.
To pivot the search on a metadata value, hover over a metadata value within the pane.
To pivot on an author, click on an author’s Search icon  to search for items related to that author within the case.
To pivot on an email address, click on the address’s Search icon  . From the context menu, select one or more of the following pivot options, then click Search to pivot on those options:
To: Search for all items with that email address as their To email address.
From: Search for all items with that email address as their From email address.
CC: Search for all items with that email address as their CC email address.
BCC: Search for all items with that email address as their BCC email address.
Note: You can also hover over one of the items to perform pivot options on these metadata fields.
To pivot on a path name, click on the path name’s Search icon  to search for items related to that path name within the case.
To pivot on text in the Default Preview, right-click on a selection of text within an item. From the context menu, select Search Case for “<text>” to start a search for the selected text within the case.
Performing any of the metadata searches shows the results in a new browser tab if the Enable New Tab Pivot Searches property is enabled.
To copy a metadata value to the clipboard:
Hover over a metadata value within the pane.
Click the Copy to Clipboard icon that appears.
For information on creating metadata profiles, see the Building Metadata Profiles section within the Nuix Workstation User Guide.
NLP enhanced metadata
Natural Language Processing (NLP) datasets are used to enable machines to understand and interpret human languages and recognize specific categories of information. If a selected item was processed with NLP, specific NLP related metadata can be viewed by selecting the NLP Metadata tab  within the item metadata panel
  .
.
The NLP Metadata tab shows all nested NLP Dictionary, Risks, and Skill Sets metadata for a selected item. It also displays the relevancy for each item based on the NLP classification.
You can Expand all or Collapse all categories. See Search NLP filters for more information.
Tags
Tags are a type of user-defined metadata that can be applied to items within a case for the purpose of classification. They can be used to flag important items, group similar or related items together, or to simply indicate that an item has been reviewed. Tags are shown with specific colors which can be edited. Employing a tagging strategy can help expedite review and investigation efforts. Once tags are applied, they can be queried within the case like any other type of item metadata. The process of adding or removing tags can be performed manually as described in this section, or with automation using a workflow. For information on using automation to perform tagging operations, see the section on workflows.
Select the Tags  pane from the Item Details drawer to create, apply, and manage tags within a case.
Note: The Tags pane is only available to administrators or users who belong to a group with the Apply Tags or Manage Tags privilege.
Tag tree inheritance
If the Nuix Configuration Utility Tag tree inheritance property is enabled, when you select a tag that has sub-tags, all the sub-tags are also selected.
If the Nuix Configuration Utility Tag tree inheritance property is disabled, each tag and sub-tag in the tree can be independently selected.
See an administrator to change the Tag tree inheritance property, if needed.
Item counts
Item counts can be shown next to the tag name.
To view item counts for a specific tag:
Select the Manage Tags  icon from the Tags pane to open the Tag management window.
Click on the  icon for an existing tag and select Retrieve item count to show the item count for the tag and any child tags depending on your tag tree inheritance property settings.
To view item counts for multiple tags, select individual tags or click Select all tags. Click Retrieve item counts at the bottom of the window to show all item counts for the selected tags.
Apply tags
When an item is selected, the Tags pane refreshes to display all tags currently applied to the item. Tags that are not applied but exist within the case are also displayed.
To add or remove a tag from an item:
Select an item from the result set and open the Tags pane.
Select or deselect tags from the pane to add or remove from the currently selected item.
Click Save to apply the selection or click Save & Next to apply the selection and move on to the next item..
When multiple items are selected, the Tags pane displays all tags that exist within the case, but does not indicate which tags, if any, are applied to the currently selected items. This occurs because different tags may be applied to each selected item. Choose one or more tags to apply to the selected items and then click Save Tags.
Note: When multiple items are selected, tags can only be added. All previously applied tags are not changed or removed because of the new tags being applied.
Manage tags
To create new tags, edit existing, or delete tags, select the Manage Tags  icon from the Tags pane to open the Tag management window. This is only available with the Manage Tags privilege. All tags that have been created within the current case are displayed in a tree with each tag having an editable tag color.
All users who have access to the case with tagging privileges can add, edit, or remove tags through Tag Management.
To search for a tag within the case:
Select the Manage Tags  icon from the Tags pane to open the Tag management window.
Type in the name of the tag in the Search or create new tag field.
Note: The tag name cannot start or end with a space.
Found tags are shown.
To create a new tag:
Select the Manage Tags  icon from the Tags pane to open the Tag management window.
Specify a unique name for the tag in the Search or create new tag field.
Note: The tag name cannot start or end with a space.
The tag name is limited to 256 characters including parent names and delimiters.
The tag name cannot contain a pipe | to create a nested sub-tag. See To create a sub-tag for more information.
Click the add  icon or click Create to add the tag but not apply it.
Create and apply is enabled if at least one item was selected prior to opening the Tag management window. Select it to create the tag and apply it to the item.
Note: Tags are listed in a tree and sub-tags can be created. If there are multiple sub-tags and not all are selected, the top tag displays a mixed state. If all sub-tags are selected, the top tag displays a checkmark. When selecting a top tag, all sub-tags become selected.
Note: All new tags receive a default color tag. If a sub-tag is created, it has the same color tag as the parent-tag.
To edit the color of a tag
Select the anage Tags  icon from the Tags pane to open the Tag management window.
Click on the ellipsis  icon for an existing tag and select Edit tag.
Select the down arrow for colors to the left of the tag name and choose a new tag color.
Click Save.
Note: If you edit the color of a parent-tag, it does not change the color of a sub-tag and if you edit the sub-tag color, it does not change the parent-tag color.
To rename an existing tag:
Select the Manage Tags  icon from the Tags pane to open the Tag management window.
Click on the ellipsis  icon for an existing tag and select Rename this tag.
Enter a new unique name for the tag.
Click Save.
Note: When editing the name of an existing tag, any items that were previously tagged are updated to reflect the new tag name.
To create a sub-tag:
Select the Manage Tags  icon from the Tags pane to open the Tag management window.
Click on the  icon for an existing tag and select Create sub-tag.
Enter a unique name for the sub-tag.
Note: The sub-tag name cannot start or end with a space. The sub-tag name cannot contain a pipe | to create a nested sub-tag.
Click Create to add the sub-tag.
The sub-tag becomes nested under the parent tag.
To delete an existing tag:
Select the Manage Tags  icon from the Tags pane to open the Tag management window.
Select the check box next to each tag to be removed or click Select all tags.
Warning: Deleting a tag is a permanent action that removes the tag from all items. If a tag that contains sub-tags is deleted, all sub-tags are also deleted.
Click Delete to remove the tags from the case.
Secured fields
The Secured Fields pane provides access to document coding questions that investigators or reviewers can answer while reviewing a case. Document coding is a process that can be used to determine if a particular item has certain characteristics or meets specific requirements. These requirements, defined within Nuix Investigate as Secured Fields, can be in the form of Boolean, multiple-choice, or open-ended response questions. Investigators can use the gathered responses to make decisions about the case, such as identifying items that can be disregarded or locating items that may require additional focus.
Note: The Secured Fields pane is only visible to administrators or users who belong to a group with the Secured Fields privilege within UMS.
Secured Fields are defined for each case within UMS by an administrator and are restricted by group access. Users can only see the Secured Fields that have been created within their assigned group or groups.
Tip: If you belong to multiple groups within UMS and each group is assigned a different set of Secured Fields, you can change which set of Secured Fields is displayed by changing your group selection.
Administrators, by default, are shown only the Secured Fields that have been created within the currently selected group. To view all Secured Fields that exist within a case, regardless of group assignment, administrators can toggle the Show All switch that is visible at the top of the Secured Fields pane.
If Secured Fields exist within a case, you can view and provide responses to them for each item in the case from the Secured Fields pane within the Item Details drawer.
Provide a response for an item and click Save to save it or click Save & Next to apply the selection and move on to the next item. You can save in bulk by selecting several items at once, providing a response to the Secured Fields, and then clicking Save.
Responses can be changed at any time by providing a different response to a question and then clicking Save.
View secured field responses
Individual Secured Field responses can be viewed by selecting an item and then opening the Secured Fields pane.
To query the entire case for items with a particular response by using the Query Builder to form a search.
Open the Query Builder.
Expand Other Criteria from the Criteria Selector.
Select the Secured Fields criterion to add it to the workspace.
In the workspace, choose a Secured Field Question and Answer for the criterion.
Click Submit Query to view all items with matching results.
Comments
Open the Comments  pane to comment on or view comments that other users have applied to the currently selected item. Once a comment is applied or removed and you click outside of the commenting field, the changes save automatically. The Comments pane is disabled if more than one item is selected.
Note: The Comments pane is only visible to administrators or users who belong to a group with the Comments privilege within UMS.
Exclusions
Open the Exclusions  pane within the Item Details drawer to create exclusions within a case. Exclusion is a culling method that is used to temporarily remove items from view within a dataset. By excluding items, you increase the effectiveness of your queries by eliminating data that is not relevant to the scope of your case. Excluded items remain a part of the case but are not included in search results.
The ability to see and work with excluded items is determined by Exclusion privileges, which are set at the group level in UMS. You must have one of these group privileges to see or manage exclusions. The following privileges define what functionality is available.
| Group Privilege |
Exclusion Functionality |
|
|
|
View Exclusions |
Exclude / Include |
| None |
No |
No |
| See Exclusions |
Yes |
No |
| Handle Exclusions |
Yes |
Yes |
View Exclusions: View excluded items within the result set.
Exclude / Include: Create new exclusions or include items back into the dataset.
For more information about group privileges, review the Managing Groups section of the Nuix Investigate Configuration Guide.
Exclude items
To exclude an item from a case:
Select the item that you want to exclude from the Grid, Review, or Gallery View.
Click the Exclusions  icon from the Item Details drawer to open the Exclusion pane.
Select an existing reason for the exclusion from the drop-down list or begin typing to enter a new reason in the field. The provided reason should be a simple description that explains why an item is being excluded from the case.
Click Exclude Items.
The Exclude Items button only appears for items that are not currently excluded.
Include items
To include a previously excluded item:
Select an item to include from the Grid, Review, or Gallery View.
Click the Exclusions  icon from the Item Details drawer to open the Exclusion pane.
Click Include Items to include the item back into the dataset.
The Include Items button only appears for items that have been excluded.
Note: To change the reason that is associated with an exclusion, the item must first be included back into the dataset using the Include Items button then excluded once again, choosing a different reason at that time.
If selecting multiple items, both the Exclude Items and Include Items options are presented when the Exclusion pane is opened. This allows you to exclude and include items in bulk. When in this mode, you can:
Click Include Items to remove any existing exclusions from the selected items.
Click Exclude Items to exclude all selected items using the defined reason.
Note: If you belong to a group with the Handle Exclusions but not the See Exclusions privilege, after excluding items, you cannot re-include them because you don't have permissions to see any excluded items. After the exclusion finishes, the excluded items remain in the search results and the Include button appears but does not work. You must refresh the search results or re-execute the search to update the results.
Folders
The Folders  pane allows you to sort and organize items into specific user created folders for future reference or analysis. These folders are stored in the database.
Item Security can also be implemented when foldering to restrict access to select groups of users for targeted analysis and review. An administrator can enable Item Security by assigning one or more groups to the selected folder. Once enabled, only users who also belong to those groups are able to view the folder and its contents.
Folders not assigned to any groups are visible to all users who access the case.
Note: The Folders pane is only visible to administrators or users who belong to a group with the Folder Management privilege.
The Ignore Item Security privilege is also required for any user who needs to implement item security on case items.
To add items to a folder:
Select the items you would like to add to a folder.
Click the Folders  icon from the Item Details drawer.
Click the down arrow to see all folders associated with the case.
Choose an existing folder from the folders list or begin typing to search for a folder and select it.
Optionally create a new folder by entering a unique folder name.
Click Add to Folder to add the selected items.
Note: When you add an item to a folder, all related parent containers are added. The parent containers are included in total items added to the folder count, in the message after the action completes.
To remove items from a folder:
Select the items you would like to remove from a folder.
Click the Folders  icon from the Item Details drawer.
Click the down arrow to see all folders associated with the case.
Choose an existing folder from the folders list or begin typing to search for a folder and select it.
Click Remove from Folder to remove the selected items from the folder.
Note: When you remove a container from a folder, all children within that container are removed. If the container is a parent container, all child containers are removed.
Folders created from within a case are associated with and accessible only from that case. Once created, folders can be managed from the Cases tab of UMS or use the Folders query builder widget to see what items are in a specific folder.
For more information about managing folders, including applying item security, see the Nuix Investigate Configuration Guide.