Use Named Entity Profiles
This section covers how to:
Create a Named Entity Profile
Edit a default Named Entity Profile
Rename a Named Entity Profile in the list editor
Remove a Named Entity Profile in the list editor
Process a Named Entity Profile
Purpose of a Named Entity Profile
The Named Entity Profiles option in the Global Options window allows you to set preferred named entities to use consistently when processing items across your cases. You can use industry-standard regular expressions in the data set and can enact profiles that have a set of these preferred entities for processing. A Named Entity Profile also allows for improved performance as you only then use a particular set of named entities.

Create a Named Entity Profile
A Named Entity Profile sets what preferred entity or entities you want to be consistently used when processing across cases. This profile also improves performance by only selecting the named entities you want to use. You can use any of the following, that must be embedded in the Named Entity Profile:
Standard default named entities
Custom named entities
A combination of both.
Note: This feature is license-restricted and requires the Nuix Data Finder add-on.
To create a Named Entity Profile:
From the Global Options window, select the Named Entity Profiles option to view the list editor.
In the list editor, click the plus (+) sign to add a new Named Entity Profile.
In Scope select User, Case, or Local Computer.
Important: See the following Notes box after Step 8 titled When selecting the scope for a Named Entity Profile.
Click OK to open the Create Named Entity Profile window.
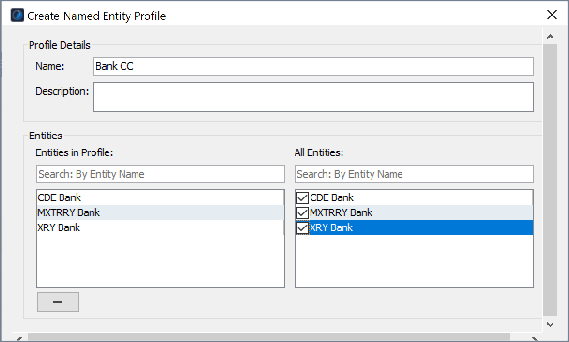
In the Profile Details section, specify a Name and Description for the named entity profile.
Entity names must not contain capital letters or spaces. To separate words, use an underscore (_).
In the Entities section, select, search or filter for an entity you want to add from the All Entities list.
Repeat to add other entities.
The selected entities appear in the Entities in Profile list.
Click OK to proceed and update the list in the list editor and ensure you or others can use the profile.
Note: When selecting the scope for a Named Entity Profile:
- User scope contains User and Local computer scope Custom Named Entities selections.
- Case scope includes Case, User, and Local computer scope Custom Named Entities selections, if the case is open. Then:
> Only appears when the case is open.
> Case scope Custom Named Entities must be present in the case for which the Custom Named Entities were created.
> You can only use a Case scope Named Entity Profile as an evidence-processing settings; and you cannot add one to a data processing profile.
- Local scope only contains Local computer scope Custom Named Entities.
You can directly use a Named Entity Profile as a data processing setting by clicking Advanced when adding case evidence.
Edit a Default Named Entity Profile
You can edit one of four default named Entity Profiles that ship with Nuix Workstation. To use a default Named Entity Profile:
From the Global Options window, select the Named Entity Profiles option to view the list editor.
Select one of the following default Named Entity Profiles and click the pencil Edit (pencil) icon:
Bank PPL
Bank PPLE
CDE Bank
MXTERRY Bank
In the Modify Named Entity Profile window, follow steps 5 to 8 of the preceding Create a Named Entity Profile section.
Edit a Named Entity Profile
To edit a Named Entity Profile:
From the Global Options window, select the Named Entity Profiles option to view the list editor.
In the list editor, from the list, select the profile you want to rename.
Click the Edit (pencil) icon to open the Modify Named Entity Profile window.
Overwrite any existing details you want to change and click OK.
Rename a Named Entity Profile
To rename a Named Entity Profile:
From the Global Options window, select the Named Entity Profiles option to view the list editor.
In the list editor, from the list, select the profile you want to rename.
Click the Rename icon and overwrite the existing profile name in the editor with the one you want.
Note: You cannot rename the profile from the Modify Named Entity Profile window.
You cannot rename the profile from the Modify Named Entity Profile window.
Click OK to update the list in the list editor and remove it from the selection and ensure you or others can use the profile.
Note: When renaming a Named Entity Profile:
- Once you rename a Named Entity Profile, you must select that newly named profile from the Use custom named entity profile list in the Data Processing Settings window, before you process any named entity items.
- Similarly, if the renamed Named Entity profile is part of a Data Processing Profile, you must update that profile by selecting the renamed Named Entity Profile from the Processing profile list in the Add Case Evidence window.
- In both cases, you must click OK to ensure you or others can use the renamed profile.
Remove a Named Entity Profile
Important: Before you delete a Named Entity Profile, verify if that profile is in use for processing. If it is, then all processing jobs using that profile will fail. To remove a Named Entity Profile:
From the Global Options window, select the Named Entity Profiles option to view the list editor.
In the list editor, from the list, select the profile you want to remove.
Click the minus (-) sign.
Click OK to accept the confirmation message to remove the selected profile.
Click OK to update the list in the list editor and ensure you or others can use the profile.
Note: When removing a Named Entity Profile:
- Once you remove or delete a Named Entity Profile, you must update the related processing profile, by selecting another Named Entity Profile to replace it from the Use custom named entity profile list in the Data Processing Settings window.
- When you update the profile in Edit mode from Global options, the Entities in Profile list automatically updates to add or delete named entities.
- Click OK to ensure you or others can use the profile.
Rules When Changing a Named Entity Profile
The following are rules you must follow when you change anything in a Named Entity Profile:
You cannot change the name of a profile inside the Modify Named Entity Profile window.
If you rename a Named Entity Profile, it is removed from the List editor's selection. Once renamed, you must select the Named Entity Profile from the Use custom named entity profile list in Data Processing settings.
Similarly, if you use a Named Entity Profile in a Data Processing Profile, then you must update the Data Processing Profile by selecting the renamed profile from the Processing profile list in the Add Case Evidence window.
If you select to delete a profile that is being used for processing, then the processing will fail. You must check the profile is not currently in use before you remove a Named Entity Profile.
Custom Named Entities are only processed if added to a Named Entity Profile that is being used.
If you delete a Custom Named Entity in a profile, then all processing jobs using that profile will fail. In this case, you must update the profile. When you update the profile in Edit mode from Global options, the Entities in Profile list automatically updates without the Custom Named Entity you deleted. Then click OK to ensure you can use the profile.
Process a Named Entity Profile
Note: When removing a Named Entity Profile:
- Custom Named Entities are only processed if they are added to a Named Entity Profile that is in use.
- Once you remove or delete a Named Entity Profile, you must update the related processing profile, by selecting another Named Entity Profile to replace it from the Use custom named entity profile list in the Data Processing Settings window.
- When you update the profile in Edit mode from Global options, the Entities in Profile list automatically updates to add or delete named entities.
- Click OK to ensure you or others can use the profile.
For how to create a Named Entity Profile, see the preceding Configure a Named Entity Profile. See Configure Profiles Used for Repetitive Processes in the Nuix Workstation User Guide for how to Create a Processing Profile. You can then:
Add the Processing Profile from the Adding Case Evidence window.
Add any Named Entity Profile in your Data Processing Settings by selecting it in two ways:
From the Use custom named entities list which enables either the Extract Named Entities from text or the Extract Named Entities from properties option.
For details, see Enable settings for extracting named entities in Enable settings to analyze named entities.
During processing, any matched entities appear in a separate group for Custom Named Entities. However, if you do not select a profile in the Data Processing Settings, then only the built-in Named Entity is processed. Profile changes are reflected once the evidence reloads.
From the Advanced option while adding case evidence. See Add case evidence for details.
Disable or Enable Certain Default Named Entities
This is an extra customization that allows you to turn on or off certain named entities, which is not possible directly through the user interface. On start-up use the following switches to affect the ingestion of named entities:
To disable all standard default Named Entities:
-Dnuix.namedentities.enableonly=-
To enable only certain standard default Named Entities:
-Dnuix.namedentities.enableonly=country,company,url