Configure profiles used for repetitive processes
Overview
For a faster overall user experience, Nuix Workstation provides the following default profile types to facilitate repetitive processes when you process jobs: Imaging Profiles
OCR Profiles
Production Profiles
Processing Profiles
Configuration Profiles
From each, you can create new tailored profiles. (See Configure Named Entity Profiles with named entities for how to create a Named Entity Profile, which are also used to facilitate repetitive processes.)
![]()

Access settings for these profile types from the Global Options window's fourth or bottom panel:
| Global Option |
Icon |
Details how to... |
| Imaging Profiles |
|
Create or edit an Imaging Profile Import one Export one |
| OCR Profiles* |
|
Create or edit an OCR Profile Create or update an OCR template Set rules for an OCR template Define caching options for an OCR Profile |
| Production Profiles* |
|
Create or edit a Production Profile, including: Define numbering for a Production Profile Define export settings for a Production Profile Enable an export output for a Production Profile |
| Processing Profiles |
|
Create or edit a Processing Profile |
| Configuration Profiles |
|
Create and save a runtime configuration as a profile Import a Configuration Profile Export a Configuration Profile Delete a Configuration Profile |


*For these profile types, see the Guide to OCR Processing and the Guide to Using Production Sets. For details on how to use all these profile types, also see the
Common functions of any Global Option section in Set Global Options.
Tip: During or before processing using any profile, consider pre-filtering using date filters, Search and Tag settings, and use selections of MIME types' checkboxes as a way to pre-filter.
Why use profiles?
Depending on your industry, you use particular Profile types, and in particular ways. For example:
Forensic investigators do not often use Imaging, OCR, or Production Profiles as they rarely export items.
eDiscovery users, on the other hand, use all Profile types, and all their options, for repeatability and according to particular use cases.
The vast majority of options in a Processing profile are rarely used.
It is common to have four or five different profiles that handle different stages of a process depending on the type of case data they need to process.
The profiles differ depending on if the data, for example, includes forensic images, cellphone communication data, loose data, or MSF files.
Usually, your administrator has created a profile for the average user to just click a button.
Note: It is important to know that by enabling a single check box incorrectly, you may mess up your whole data set!
Create or edit an Imaging Profile
An Imaging Profile allows you to consistently use the same saved rendering options, slip-sheet template, and rules for imaging content when processing items. The rules enable items to convert to a PDF, and be slip-sheeted, or not printed. Select the Imaging Profiles option to set the granular rules to manage documents that are imaged by MIME types when creating them, populating stores or exporting them. The settings you decide on tell Nuix Workstation what to process and automatically render in the Preview panel.
Note: You are most likely to use the default Imaging Profile that ships with Nuix Workstation. This default profile does not generate printed images for spreadsheets, so you may want to remove the rule for that option.
To create an Imaging Profile:
From the Global Options window, select the Imaging Profiles option, and click the plus (+) sign. The Add Imaging Profile window opens.
Select its scope: either User or Local Computer.
Provide a brief description of the Imaging Profile.
Under Renderer Settings set the way Microsoft documents convert and generate to printed images using the internal exporter or Microsoft Office, as follows:
| Options |
Action |
|
| Microsoft Excel |
Set options to generate printed images of Excel spreadsheets, as follows: To show or hide gridlines, headings, hidden columns, hidden rows, hidden worksheets, notes, or comments. The page size, orientation, zoom, and the number of pages printed per worksheet. Recommended: Produce Excel files in their native format because PDFs of Excel documents rarely print as whole pages. If you must convert Excel documents to images, before using this export option, ensure you preview how the PDF renders to check it meets expectations. |
|
| Microsoft PowerPoint |
Set options to generate printed images of PowerPoint presentations, as follows: To show or hide imaging of hidden slides, date and time field codes, footers, and slide numbers. To additionally print the notes, outlines, or the slides as handouts (with 1, 3, 4, 6, or 9 per page). Note: Some print types are only available on Office exporter. |
|
| Microsoft Word |
Set options to generate printed images of Word documents, as follows: To show or hide markup comments. Actions for the following field codes: DELETE: Remove the field (to not print at all). AS-IS: Print it as it is rendered in Word. EMBEDDED: Show how the field was seen when last opened in Word. CODE: Show the last used raw field, for example <"first name" >. BOTH: Show both the last used raw CODE and EMBEDDED fields. To strip the formatting around a field the last time it was printed. For example, if a name was bolded, then to remove it from the field code. |
In the Slipsheets section, configure the rules to manage the slipsheet, using an existing slipsheet template or by creating a new custom one. To create a slipsheet template, see the following Create a slipsheet template section.
Click Advanced to access the following fields:
Custom template file: Select the check box and browse to select the file, or add your custom velocity template for a slipsheet using:
\user-data\templates\ExportPrinting\<file name>
Custom vertical alignment: Select an option for your preferred vertical alignment.
In the Rules section, click the plus (+) sign to add a new rule to manage imaging content based on its MIME type, MIME kind, assigned Tags, or Flags. An item that satisfies an Item Condition in the Rules table applies the associated imaging rule. Using rules, reduces manual and repetitive actions.
To configure a rule, complete options as follows:
| Options |
Description |
| Items |
To add or edit an item condition: Double-click the All items field to open the Edit Item Condition window. (You set a rule for All Items in case an item fails to print.) Click the down arrow to open a menu, from which to select one of the following: MIME Types MIME Kinds Flags Tags Print generation methods Item must match, then select Any part or All parts. |
| Situation |
Select If unprintable, Always (default) or *When page count exceeds. |
| Page Count |
Only active if you set Situation to When page count exceeds which replaces the printed attempt with a slipsheet. Then, specify a page count. |
| Imaging Content |
Select Replace with Slipsheet (default) or Do not image. That is, your rule must apply a slipsheet or not print the image at all. |
| Slipsheet Template |
Default slipsheet (selected by default) or select a custom slipsheet to be the default. (You cannot delete a slipsheet you select in rules.) |
In the Rules table, you can also:
Move the order of the rules up or down.
Click the Remove icon to delete selected items from the table.
Click Clear, to clear the entire Rules table, which you then must confirm you want to do.
Click Set Default, to set a selected Imaging Profile as the default profile whenever you regenerate images from the Printed Image tab.
Note: The Imaging Profile's Processing Default option is set as the default Imaging Profile to use when performing imaging during front load processing. You can change this in the Evidence Settings window.
Create a slipsheet template
You mostly use a slipsheet when exporting TIFF files, and especially when you need a custom slipsheet that includes your company's icon, logo or branding.
Government agencies also use a slipsheet when sending data to other agencies and they want to ensure the data states where it originated, who created it, and that sort of information.
To create a slipsheet template:
Continuing from Step 5 of the preceding Create or edit an Imaging Profile, click the plus (+) sign to display the Add slipsheet template dialog.
Specify a name and a brief description for the new slipsheet.
Complete fields as follows:
In Custom text: Select the option and provide the free form text.
In Custom font: Select the option, then a font from the menu and select its font size.
In Custom image: Select the option, click Choose to browse for a TIFF, JPG, PNG, or PDF the image file, and click Open. A preview of the image appears.
Select No image if you do not want to use an image.
In Custom introduction: Optionally, provide an introduction.
In Custom metadata profile: Select a custom metadata profile, and set appropriate values for field names. as well as blank values against fields you do not want to display so that the columns in the Results view do not display if they contain no data.
In Custom font: Select a custom font and choose the points required.
In Custom left alignment: Set the margins in points or centimeters to lay out the content.
In Custom line spacing: Select a special line spacing from the menu.
Return to Step 6 of the preceding Create or edit an Imaging Profile.
Create or edit an OCR Profile
An OCR Profile provides control over what OCR occurs during data ingestion or processing. Each profile uses a customized template of OCR settings, so when you use one, it can involve editing the Edit OCR Template dialog that also contains the Perform OCR option.
Note: You are most likely to use the default OCR Profile that ships with Nuix Workstation as it covers most options relating to items that require to be OCRed.
However, if you need to be more specific, for example to only OCR TIFF files, you can tailor your own OCR Profile.
Tips:
Language selection is important. Emojis or other symbols, might be taken as a Japanese character instead of just a symbol.
If there is a lack of text in some items, it is useful to tag them as "Candidates for OCR", as they most likely contain many pictures or photos. It is useful to OCR photos.
Available on the Nuix Customer Portal, see the Guide to OCR Processing for full information on how to do the following:
Create, edit or customize an OCR Profile
Create, edit or customize an OCR
Set rules for an OCR template
Define caching options for an OCR Profile
Create a Production Profile
A Production Profile is mainly used in eDiscovery, but also by anyone exporting data out of Nuix Workstation as it automizes export settings in particular. However, all settings in a Production Profile are necessary.
A Production Set is the outcome of using a Production Profile, and allows you to reuse that Production Set on other Nuix Workstation installations to produce the same output. A Production Profile can be exported and or imported between a Nuix Workstation installations so that a consistent Production Set configuration can be produced. For more details about using a Production Set, see the Guide to Using Production Sets.
Select the Production Profiles option to configure a Production Profile to manage stamping, redaction, and exporting items in a case. To create or edit a Production Profile:
From the Global Options window, select the Production Profiles option.
Click the plus (+) sign to create a new profile.
Select its scope: either User or Local Computer.
The Add Production Profile window appears with the following tabs:
Numbering tab: Contains numbering settings for a legal export.
Endorsing tab: Allows you to set headers, footers, and markup text.
Export Setting tab
Export Output tab
General tab
Enter the details as described in the following named tab subsections:
Define numbering for a Production Profile
Define headers, footers, and markup text
Define export settings text files and export rules
Enable Export Output settings
On the General tab, you can add a description for the profile.
It can be either a general description or one that conforms with your way of creating Production Profiles.
Click OK to save the profile and trigger a check on the compatibility of the numbering type and export type. If the compatibility check fails, an error message appears.
Edit a Production Profile
To edit a Production Profile:
From the Global Options window, select the Production Profiles option.
Select an existing profile and click the Edit (pencil) icon.
In the Edit production profile window, follow all the following subsections in this section to:
Define numbering for a Production Profile
Define headers, footers, and markup text
Define export settings text files and export rules
Enable Export Output settings
Define numbering for a Production Profile
The Numbering tab contains numbering settings for a legal export. A legal export includes requirements to assign a numbering scheme to the items so that each item has a unique identifier that can be referenced through the life cycle of the case and can include a digitally imaged version of the native item. Default numbering settings are not enforced to avoid using old profiles being used. This helps avoid inconsistent outcomes.
When you create a new Production Profile no settings are pre-selected. When you open an existing Production Profile in Nuix Workstation, all settings are disabled. Select the Enable numbering check box to enable Standard, Advanced and Formatted options. For detailed information on these options, see the Numbering tab section in the Nuix Workstation Production Sets Feature Guide available on the Customer Portal.
Define headers, footers, and markup text for a Production Profile
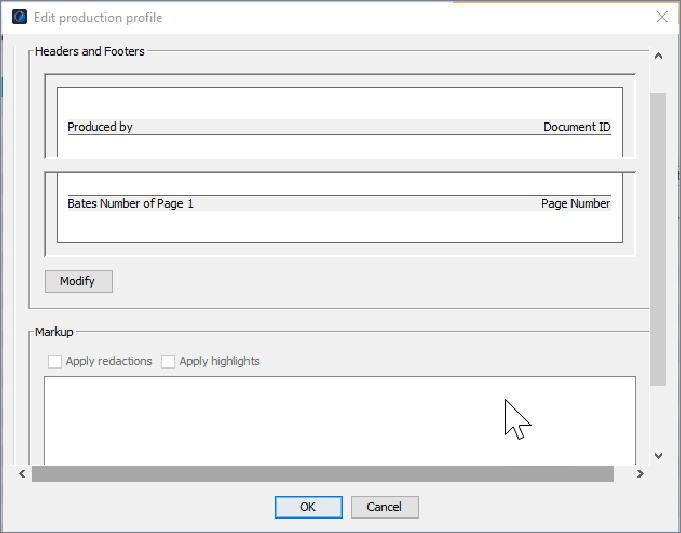
The Endorsing tab allows you to set headers, footers, and markup text. A layout page shows a generic placeholder in the header and footer. To modify the header or footer, click Modify.
To define headers, footers, and markup text for a Production Profile:
On the Endorsing tab, click the Modify to open the Headers & Footers window.
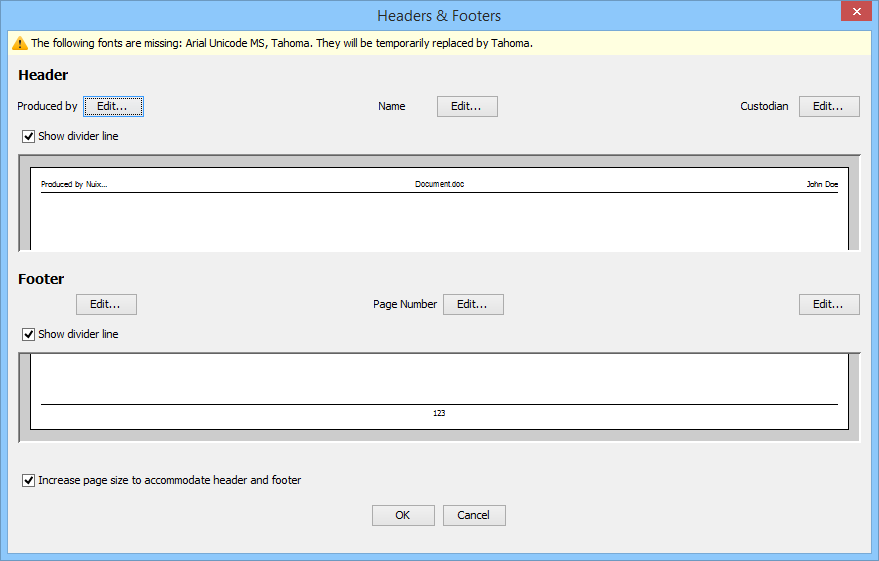
Optionally, select the Show divider line checkbox to show a black rule beneath the header text (the default) or clear to hide it.
As wanted, in the left, middle and right Header and Footer sections, click Edit to open the Edit Stamper dialog.
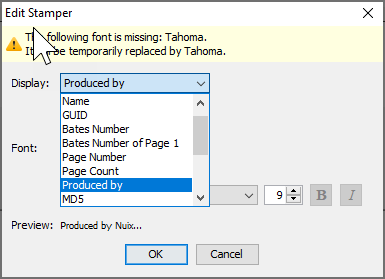
In Display, select any of the following identifiers to 'stamp' your items:
Name: Set to 'Name' (by default), as the subject of an email or the name of a file.
GUID: Set to 'GUID' as the Globally Unique Identifier used by Nuix Workstation to refer to an individual item. This ID is unique to every item, but not every page.
Bates Number: Set to a Bates Number as the Document ID for the file or page during the PDF/TIFF process. The number is unique to every page of an imaged document.
Bates Number of Page 1:
Page Number:
Page Count:
Produced by: Set to 'Produced by' but enter your name if performing the export operation.
MD5
SHA-1
SHA-256
Custodian
Production Set
Custom text
Metadata
For each selection, select the Font and its size, which then reflects in the following Preview field.
Click OK to return to the Endorsing tab and see the Markup section with the following options enabled if you preset these:
Apply redactions to redact sensitive content in the image.
Apply highlights to highlight content.
Define export settings text files and export rules for a Production Profile
To define export settings for text files, and export rules for a Production Profile:
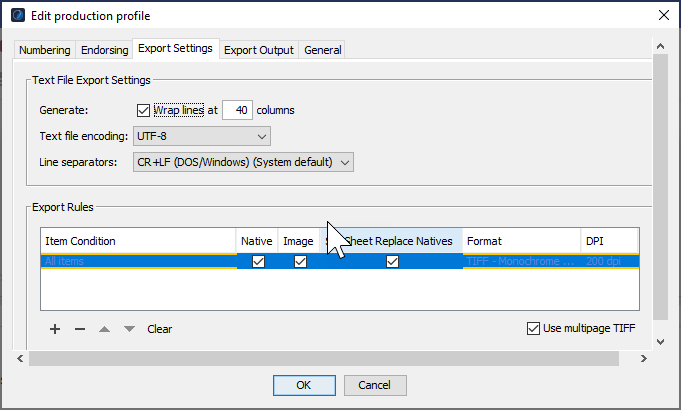
On the Add or Edit production profile window, select the Export Settings tab, and leave or modify the following fields:
Against Generate, select Wrap lines to set to wrap text strings in text files at a defined number of columns so that all document text is easily viewable. (Disabled by default.)
In Text file encoding, select on the encoding options to enable text file encoding when creating text files for use in review platforms.
Nuix Workstation is Unicode-compliant allowing you to export text files with any encoding. After ISO-8859-1, UTF-8 is the most commonly used encoding, which enables you to export Unicode characters as part of the load file.
(Older versions of some review platforms are not Unicode-compliant and only support ASCII characters.)
In Line Separators, select the line separator type. (Default = CR+LF in DOS/Windows, where CR is carriage return and LF is line feed.)
Under Export Rules, add, reorder, and configure export rules to reduce manual and repetitive actions by specifying conditions or rules for how to export items.
To add a new export rule, click the plus (+) sign under the Rules section. By default, All items are added.
Double-click to edit item conditions.
Move rules up or down to change their order from application order.
To configure a rule, complete options as follows:
| Options |
Action |
| Items |
Add or edit an item condition as follows: Double-click the All items field to open the Edit Item Condition window. From each of these fields, select the required item from its drop-down: MIME Types MIME Kinds Flags Tags Against Item must match and must match Any part or All parts. |
| Native |
Select to export the file in its native format. Clear if you want to select the native filetype on legal export. |
| Image |
Select to export the image as a Tagged Image File Format (TIFF)> Clear if you want to select the TIFF filetype on legal export. |
| Slip Sheet Replace Natives |
Select to not export the native files of slipsheeted items. Clear to export the native files of slipsheeted items. |
| Format |
Select the format for the export file. |
| DPI |
Select one of the following to change the resolution (dpi settings): 72dpi, 150dpi, 200dpi, 300dpi. |
| Use multipage TIFF |
Select to capture multiple page documents as individual image files. Note: This option does not apply to JPEGs. |
Enable Export Output for a Production Profile
On the Export Output tab you can do the following:
Change the name of items when exporting. (This is very important.)
Export the items using sub folders:
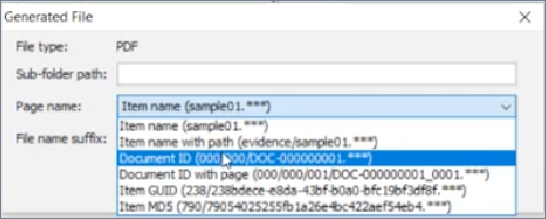
Rename the files using different options:
Note: Numbering settings and Export Output settings have the following restrictions:
Standard numbering is compatible with all the export types, except Ringtail.
- Advanced numbering requires the Export Type to be Ringtail.
- Formatted numbering does not work with any Export Type, and then you should disable Export Output settings.
To enable the export output for a Production Profile:
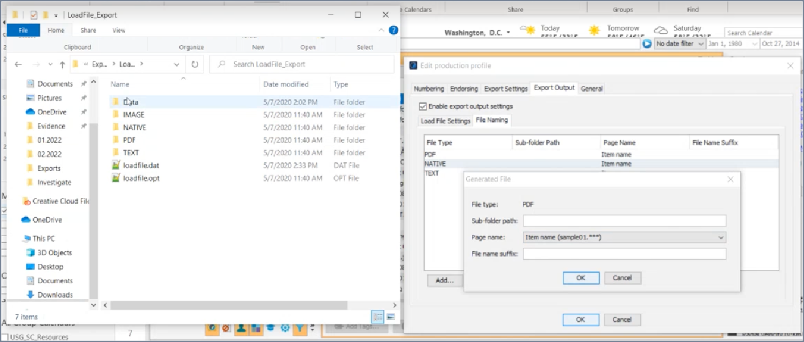
On the Add or Edit production profile window, select the Export Output tab.
Enable the Export Output check box, if you want your load file settings and file naming strategy settings to appear as two separate tabs:
On the Load File Settings tab, select the Export type that then dictates the settings for each of the various exporting programs.
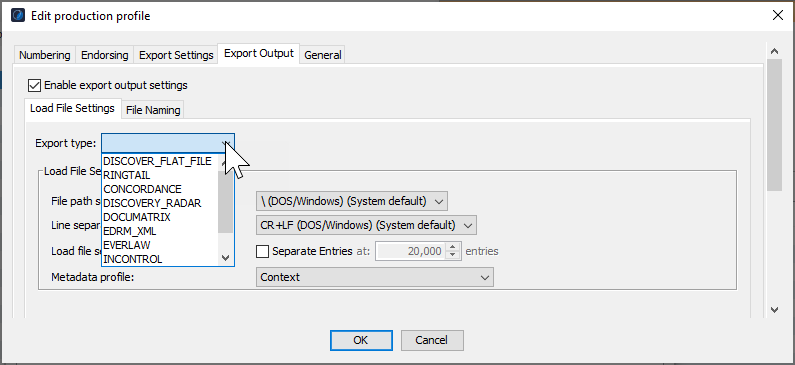
For example, if you export to Ringtail, your Production Profile settings allow you to make changes to settings in Other Settings and Map Export Extras.
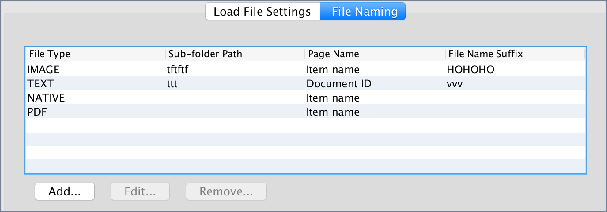
Select the File Naming tab to add, edit, or remove selected rows and settings for each file type.
Create a Processing Profile
A processing profile defines what options to apply to assets added in Nuix Workstation. It allows you to define different Processing Profiles with specific configurations to control how items are processed. You can reuse Processing Profiles for new cases that require the same processing configuration without the need to change individual settings for different cases.
For further details on processing settings, see Configure data processing settings. Generally:
It is usual to create more than one Processing Profile.
Usually, you do not need to change MIME type settings.
Parallel processing settings relate to those for your Workers. Setting the number of Workers you want to allocate for processing in a profile gives you flexibility.
RAM memory is important to keep.
Decryptions keys should not be part of a Processing Profile as they are unique to the data set you work with.
A Worker script is usually written for you by a Nuix Subject Matter Expert to provide you with more flexibility. Such scripts are not often used.
Nuix Data Finder generates Worker Side Scripts.
Note: While most settings only involve selecting a check box, it is important to understand how you use each of them, and when to ignore individual settings or categories of them.
A good use of a Processing Profile is to set its maximum digest size to one that is larger than an allowable Java integer value, such as 1000000000000000 or 1 petabyte.
Processing Profiles can be:
Light: ROT analizis
Light/Medium
Medium: MD5 (deduplication)
Deep: For malware or forensic investigations when you need to extract things like DLLs, CSVs, forensic artifacts, and so on.
To create a Processing Profile:
From the Global Options window, select the Processing Profiles option, and click the plus (+) sign.
Select its scope: either User or Local Computer, and click OK. The Add Processing Profile window opens.
Select the processing options you wish to apply for the profile, and click OK. The Processing Profiles Global Options pane appears.
Rename the profile as you wish and click outside the entry field to save the profile.
To use other functions, such as Move, Duplicate, Import, Export, see the Common functions of any Global Option section in Set Global Options.
Manage Configuration Profiles
Select the Configuration Profiles option to do the following:
Create and save a different runtime configuration as a profile when working with different case types.
Import a Configuration Profile
Export a Configuration Profile
Delete a Configuration Profile
To create a Configuration Profile:
From the Global Options window, select Configuration Profiles and click the plus (+) sign.
In the Configuration Profiles window, click Create to open the Create Configuration Profiles window.
Enter a Configuration Profile name, appropriate description, and click OK to create it. To import a Configuration Profile:
From the Global Options window, select the Configuration Profiles option.
In the Configuration Profiles window, click Import.
Browse to the location of the required profile and click Open. The Configuration Profile list populates with the imported profile.
To export a profile from the list, click Export and save the file to a specified location.
To delete a profile from the list, select the profile, click Delete, and confirm the warning message.