Configure data processing settings
Providing granular control over how you want to ingest and reload evidence, the Data Processing Settings tab, of the Evidence Processing Profile or Edit Processing Profile window allows you to:
Decide on how to process evidence and set Evidence Settings
Decide on Deleted File Recovery and Forensic Settings
Decide on Family Text Settings and on Text Indexing Settings
Decide on Upfront Processing Workflow Settings
Decide on Item Content Settings
Decide on Image Settings
Decide on Digest Settings
Overview and tips for setting up data processing settings
For a deeper forensic profile, enable the following options:
Index unallocated space
Carve file system unallocated space
For much lighter processing, disable the following options:
Enable near-duplicates
Note: While most settings only involve selecting a check box, it is important to understand how you use each of them, and when to ignore individual settings or categories of them.
Extract named entities from text Store binary for data items
Also see how to Create a Processing Profile in Configure profiles used for repetitive processes.
To open this tab, see Open the Evidence Processing window in Configure Evidence Processing settings.

Decide how to process evidence and set Evidence settings
Nuix Workstation allows you to select one of three options for how to process your evidence:
| Option |
Action |
| Perform Item Identification |
Select to perform further indexing options on individual items beyond a light scan of the file system properties on the outside of items. Then Nuix looks at the 1s and 0s that make up the header of a file to see what type of file it is (A Word or Excel document, for example), which makes the processing time slower. If unselected, Nuix Workstation creates an "Unknown Binary File" entry for each physical file it encounters along with limited file system metadata. Then Nuix only looks at the file extension, file name and file system metadata, which makes the processing time faster; and also disables the following Data Processing Settings: Traversal: Process loose files, but not their contents Text extraction Image Settings Digest Settings |
| Calculate processing size up- front |
Select for Nuix to count the size of all files that as they process and display a progress bar showing the amount of processed evidence as it is ingested, and how long it is going to take. |
| Traversal |
Select one of three options to traverse the documents on ingestion: Full traversal: To extract all items (containers and embedded objects) completely according to all other evidence processing settings you select in this window. Process loose files but not their contents: To produce a quick directory listing of all files presented for ingestion without extracting their contents. Process loose files and forensic images but not their contents: To produce a quick directory listing of all forensic images and loose files presented for ingestion without extracting their contents. For example, if you have a forensic image of a hard drive and only want to process the loose files, Nuix examines and inventories the HD. Text and image settings only work on the loose files not on the contents of any containers like zip files. |
Select an additional Evidence settings option for how to process your evidence
| Option |
Action |
| Reuse evidence stores |
Select to add the new evidence to existing evidence indexes, which in turn results in faster searching and exporting. |
| Calculate audited size |
Select to calculate the Audit size field and update it with the file size of items considered to be 'Material items', that is the size of actual items and not the container. For example, in a zip file of 520 bytes that contains a Word document with embedded images, Nuix calculates the size of the Word document and ignores the zip file. |
| Store binary of data items |
Select to store a copy of the item in binary format in the databases in the case directory, up to the maximum size of one gigabyte. (Default maximum = 250 megabytes.) This makes the case completely portable. Note: This option not only reduces indexing speed by 15-20% but increases the amount of storage required for the case folder from 20-50% of the original data set to 220-250%. |
| Maximum binary size |
To update the maximum binary size value for Elasticsearch cases, start Nuix Workstation, and with the following switch, manually enter the required value. For example: -Dnuix.data.maxBinaryStoreItemSize=100000000000 |
Decide on Deleted File Recovery and Forensic settings
| Option |
Action |
| Recover deleted files from disk images |
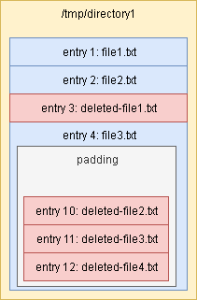
Select to enable Forensic Mode on the evidence, and do the following: Scan the file system for deleted files for physical or logical storage, exposing unallocated space on physical images. This feature is required to index and then carve unallocated space. Mark files and directories as items deleted by the file system, where the original file details (metadata) are mostly intact. (If not enabled, you cannot analyze forensic data.) Recovery Level Depending on the file system, and how much of the file is overwritten, deleted files are flagged with one of the following recovery levels: All blocks available: Indicating none of the blocks initially assigned to the deleted file are currently in use in the file system. They may have been overwritten and then freed again since the file was deleted. Some blocks available: Indicating the file system is using some of the blocks originally assigned to the deleted file, and so at least part of the file has been overwritten. Metadata recovered: Indicating only the metadata for the file was recoverable. About some deleted files FAT File Systems: In File Allocation Table (FAT) file systems, the Nuix Engine overwrites the first character in file names of deleted entries; and replaces the deletion marker with a '?' character for files it recovers. NTFS Orphans: A special case of deleted files and directories in an NTFS file system, where their records are recovered, but it is not clear which directory is their original parent. ext2/3/4 Deleted directory entries: In extX file systems, you can recover some deleted directories entries. These are partial entries left after the deletion process and which cannot be linked back to their original data. The ext2/3/4 processing code reads the directory entries under each directory. Depending on the implementation of the ext2/3/4 driver running in the OS, some entries are marked 'Deleted' to the left of their entry in the list. These are recoverable. Additionally, the last entry in the list is set to fill the remaining space in the directory's cluster on the disk. The padding space in that last entry is also scanned for any potential deleted entries which have not been overwritten. |
| Option |
Action |
|
|
|
| Extract end-of-file slack space from disk images |
Select to extract the end of file slack space from disk images, if you have a forensic image of a hard drive or an actual hard drive. If you do not have these, you do not have the file system to look for the slack space. |
| Smart process Microsoft Registry files |
Select to process sections of the Microsoft Windows Registry that are most useful for forensic investigations. If you have an image of a computer with an operating system, use this option to scan items intelligently and only look for high value items. |
| Extract from mailbox slack space |
Select to extract deleted files or email fragments from PST, OST, and EDB mailboxes at a different, lower level allowing access to slack space items. Recommended: Use this option in conjunction with the Store binary of data items option. |
| Index unallocated space |
Select to strip text in the unallocated space for text index searches. The resulting item is the entire unallocated space when a match is found. If you have a forensic image of a hard drive or an actual hard drive that has empty space, Nuix looks for the 1s and 0s of that space to see if it contains deleted files. |
| Carve file system unallocated space |
Select to carve files from the system in unallocated space. Recommended: Only use if reloading selected unallocated space items after initial processing. Carved items are areas on the file system which previously held the content of files in the file system. These deleted files with its metadata allow recovery to link back to its original data. For NTFS, that means that both the file and the file record in the MFT are deleted. For FAT file systems, both the file and the associated directory entry are deleted. For HFS+ file systems, due to the B-tree structures used to store the file records, as soon as a file is deleted its associated record is almost always overwritten too. Although the deleted file metadata is not available to use to recover the deleted files, often a lot of the content (the actual data from the file) is still available on the disk. Carving recovers this data by searching all parts of the file system which are not in use for known file signatures. Any hits are then used to carve regions out of the unallocated space which may have previously been live files. If you have a forensic image of a hard drive or an actual hard drive that has empty space, Nuix looks for the 1s and 0s of that space to see if it contains deleted files. |
| Carving block size (in bytes) |
Select to manually specify a block size to use in cases where the file system was reformatted with different block sizes. For example, the original file system used 1KB blocks, but the drive is reformatted with a quick format using a larger block size, 4KB. The default setting attempts to pick the block size from the file system to be carved. For example, when carving unallocated space from an NTFS file system formatted with 4KB clusters, the carving block size will also be 4KB. This means that any data located on another boundary smaller than 4KB is skipped. Note: Setting a smaller the block size then carves data at a finer level; but takes longer to carve the region because the data carver compares more offsets with all the enabled carving factories. |
Decide on Family Text Settings and Text Indexing Settings
| Option |
Action |
| Create family search fields for top-level items |
Select to create an extra field with all child items' text added to their parent's text, allowing for the use of "family" searches for faster searching. See the Nuix Search Guide for syntax when using this field. Alternatively, from the Help menu select Help Topics > References > File Types. A top-level item is a material item with no material ancestors, that is, the first material item in an item path. This extracts all the text from a family (for example, an email and its attachments) into a searchable field. |
| Hide Immaterial Items (text rolled up to parent) |
Select to automatically hide immaterial items in the Results pane when processed. This removes clutter from the results set. The extracted text from hidden immaterial items is appended to its parent item so it is still available to search on. |
| Analysis Language |
Select English or Japanese to use for text indexing. You can only use one language for each evidence store and you cannot change it when you select the 'Reuse Evidence Store' option. Japanese uses a different tokenization than English. This option allows Nuix to know how to index the data. |
| Use stop words |
Select to not index all stop words, or noise words, for your selected language. When indexing text, this hugely speeds up processing. For example, if you are looking for the word "fraud" within six words of "tax", this option makes the difference between counting stop words or not to return this query. |
| Option |
Action |
|
|
English stop words are: a, an, and, are, as, at, be, but, by, for, if, in, into, is, it, no, not, of, on, or, such, that, the, their, then, there, these, they, this, to, was, will, with. |
| Use stemming |
Select for Nuix Workstation to create a text index that only stores stemmed components of words for an entire case. For example, if your search word is "control", enabling this option returns documents containing "control", and "controlling", "controller", and "controls". Warning: Stemming can cause problems with the document similarity functionality, potentially returning more similar documents than you expect. If you intend to use document similarity, disable this option. |
| Enable exact queries |
Select to store the text content of items with punctuation and capitalization, so that when searching, you essentially perform an exact string match. (For such a search, ensure you use single quotes (‘ ‘) around your search term to invoke exact queries.) Text indexing normalizes all text to lower case and punctuation is treated as empty space. So, if you want to search for 'IT' turn this on or this returns every file that contains the word 'it' as well. Create a separate text index with character indexes to allow searching for punctuation and other symbols which are usually not indexed. This increases processing time and significantly increases case size. |
Note: Different search products exclude different stop words from their index by default. This can result in different search counts being returned when comparing the results of Nuix Workstation and other search products’ proximity queries.
Decide on Upfront Processing Workflow Settings
| Option |
Action |
| Printed image |
Select to generate printed images when processing images or PDFs that have non-digital text but has images that clearly have text. You can either set this to Default or use one of your Processing Profiles to determine your imaging rules. |
| Export Metadata |
Select to export metadata during ingestion, using rules that you have created if you set up a database that contains the required tables and columns. Use this option to start pushing metadata to a different database as it is coming in so you can see it as it is being processed and start making decisions. |
| Perform OCR |
Only available for certain license types. Select to perform OCR during ingestion, and not have to run OCR in the future if you created an OCR Profile. |
Decide on Item Content Settings
| Option |
Action |
| Process text |
Select to extract the text content of evidence to enable searching. If you disable this option, you can only search across an evidence item’s metadata. Sometimes you do not have a warrant to read the text but can see who is sending an email to whom and that sort of thing. |
| Enable near-duplicates |
Select to identify items that are similar, that is, word shingles for Near-Duplicate detection and clustering in the case. This option automatically selects the Process Text option, if not pre-selected. Using shingling, Nuix indexes every five (5) words on a rolling basis and then overlaps them and compares them to find duplicate items. |
| Enable text summarization |
Select to calculate and store text summaries from documents when data is ingested, using an algorithm. This option automatically selects the Process Text option, if not pre-selected. |
| Extract named entities from text |
Select to extract named entities (patterns of letters and numbers) across the text of all the items; and select Include text stripped items to include text stripped items while extracting named entities from text. Nuix Workstation uses Text Stripping when it is able to identify an item’s file type but it cannot cleanly extract all text and metadata in accordance with the file type’s API. The result is a data item that is searchable, but the text may be garbled or not properly formatted. Text Stripping scans the bytes of the data item and looks for runs of string data at least three characters long. |
| Extract named entities from properties |
Select to search in the metadata properties associated with an item where it identifies entities contained in the metadata and properties of a supported file type, including those found in log files or databases. This takes a long time because Nuix scans through the metadata properties of all items. |
| Extract named entities from communications |
Select to extract named entities such as phone numbers and email addresses from the metadata of communication items such text messages using Nuix Workstation standard or custom named entities. When selected, it enables the Use custom named entity profile option. |
| Use custom named entity profile |
Select to enable selection of a Custom Named Entity Profile for processing from the menu if you want to look for specific named entities. Note: You must select the Extract named entities from text or Extract named entities from properties option to enable selection of this menu. |
* Nuix Workstation Guide to Extracting Named Entities
This guide identifies specific data sets to use that enable information such as companies, personal IDs, names, or phone numbers to be brought to the surface of a data set.
Decide on Image Settings
The following settings tell the Nuix Engine what to process and to render the results within the Preview panel automatically.
| Option |
Action |
| Generate thumbnails for image data |
Select to generate a thumbnail version of images in the dataset and the size in which to generate them. Options include: Workstation: To generate standard thumbnail size images (200 px) Web: To generate a 350 X 350 px thumbnail image Custom Size (in pixels): To generate thumbnail images to a size you specify. |
| Perform image colour and skin-tone analysis |
Select to detect and capture skin tone information on images processed in the dataset. This allows you to utilize the skin-tone and other color related filters: severe, high, medium, low, black and white, and filter to blur them. |
| Detect faces |
Select to analyses the image for skin tones, and to detect faces and facial features. The higher the confidence value, the more likely Nuix Workstation has discovered a face. |
| Classify Images using Deep Learning |
Select to classify images in different categories, such as guns, drugs, cars, corporate logos, and so on, by using models. |
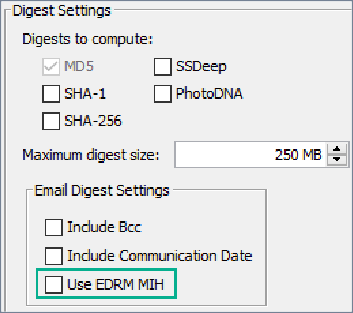
Decide on Digest Settings
| Options |
Action |
| Digests to compute |
Select to generate any of the following digests: MD5: (default) the digital fingerprint of the file SHA-1: mainly used by forensic investigators SHA-256: mainly used by forensic investigators SSDeep: used by forensic investigators PhotoDNA: to compute robust hashes for geographical image files Note: These digests are not used in the deduplication process, and all add to processing time due to their heavy computational nature. |
| Maximum digest size |
Specify the maximum size of each digest, so digests with sizes under this limit are computed. (Default = 250MB) Depending on the limit you want to set, you can use a shorthand way to express this. For example, enter "10GB" instead of 10000000000. Nuix only calculate the MD5 digest of files of a certain size. For anything larger than an integer value, use a Processing Profile. |
| Email Digest Settings |
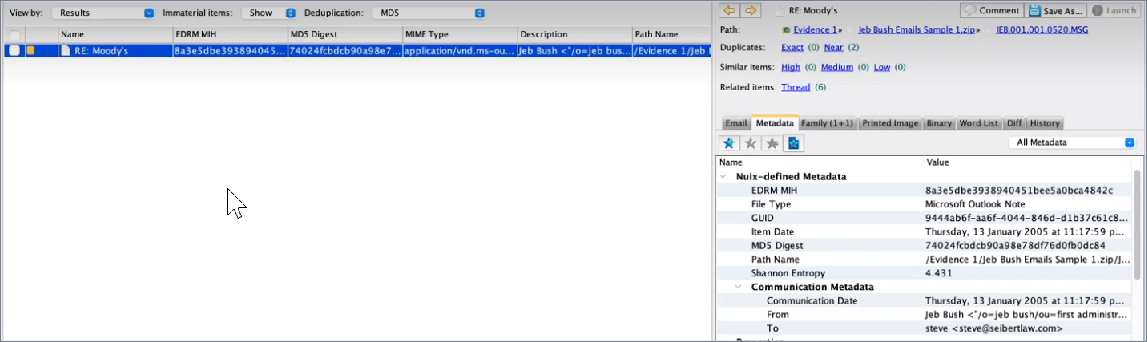
Optionally select Include Bcc and Include Communication Date as additional fields to add to the default ones when creating digests from email messages. Or select Use EDRM MIH to produce unique message IDs on most email message types. See the following Deduplicate emails using EDRM MIH hashing section for details. This is because email providers treat the text to create the hash in different ways, and depending on the server, the same email can have a different time stamp. |
Deduplicate emails using EDRM MIH hashing
To deduplicate emails using EDRM MIH hashing:
On the Data Processing Settings tab of the Edit Processing Profile window, under Digest Settings > Email Digest Settings, to maximize the uniqueness of the MD5 values returned, enable the following:
Use EDRM MIH check box
Include Communication Date check box (optional, however)
This is similar to enabling the MD5 checkbox under Digest to compute to calculate new hash values during ingestion.
Note: Enabling or disabling the Include Communication Date option has no effect on the EDRM MIH hash values produced as these are always based only on the Message-ID. However, the EDRM MIH and MD5 hash values that are produced do differ if this date is enabled, as the MD5 values are based on the Message-ID with the Date. (When the Include Communication Date is OFF, both the EDRM MIH and MD5 hash values have exactly the same value.)
Then search using text-custom-metadata:"edrm-mih:*" or "edrm-mih:12345". to find targeted results in the Results view which you can then see more details in the Preview pane's Metadata tab.