Advanced collection topics
JobFile templates
Overview
JobFile templates store collection settings which automatically load into the Collector Wizard to provide initial settings. These default values allow individual collections to be configured quickly. The JobFile templates for each collection type can be modified as needed.
Note: Whenever you select a collection type in the Wizard, the default values from the associated default JobFile are re-loaded into various fields throughout the Wizard.
JobFile template names and locations
Nuix Collector Suite includes several JobFile templates which containing the default values shown within the Collector Wizard. These JobFile templates are located in the Modules sub-folder under the Nuix Collector installation folder. They are associated with collection types as follows:
| Collection type |
Template file |
| Files |
Params.xml |
| Files (Portable Device) |
RemoteParams.xml |
| SharePoint |
SharePointParams.xml |
| Disk Image |
DiskCollectorParams.xml |
Editing JobFile templates
A JobFile template is an ordinary JobFile:
JobFiles and JobFile templates are XML files – a particular kind of text file. They may be encoded in ASCII, UTF-8 or UTF-16 LE encoding.
JobFile templates may be modified the same way a regular JobFile can be modified. For details, see topic Customizing JobFiles in the Nuix Collector & ECC JobFile Reference.
All the fields accessible with the Collection Wizard can be specified within a JobFile template.
JobFile templates can be opened in Collector Wizard, then modified and saved. This provides the obvious benefit of using the Wizard screens to easily configure your JobFile template. But doing so may change the text encoding of the JobFile template, and will remove all comments from the JobFile template. These comments can be helpful in configuring JobFile templates. To preserve the original encoding or comments, use a text editor or XML editor rather than the Collector Wizard to edit JobFile templates.
The Modules sub-folder under the Nuix Collector installation folder is a protected folder, so JobFile templates can only be edited by a program that is running with elevated permissions. Collector Wizard always runs with elevated permissions. To edit a JobFile template with a text editor or XML editor, launch the editor as Administrator.
Editing JobFile templates using a "schema-aware" XML editor, such as XML NotePad, will help ensure the edits you make are valid. Such editors will show documentation for the various elements and attributes as you edit. In order for the schema-aware XML editor to locate the schema, the file CollectorEngine.xsd must be present in the same folder where the JobFile template you are editing resides. Nuix Collector Suite includes a copy of this XML schema file in the Modules sub-folder under the Nuix Collector installation folder (where the JobFile templates are also located).
FileList formats
Three FileList formats are supported as input sources to a collection: Regular, Extended, and XML.
Regular FileList
A Regular FileList is plain text file with either ASCII, UTF-8, or UTF-16 LE encoding. The file contains the full path of each file, unquoted, one per line. Here is a sample of a Regular FileList with 5 file entries:
D:\Temp\Sample Files\2000.dat
D:\Temp\Sample Files\2001.dat
D:\Temp\Sample Files\2002.dat
D:\Temp\Sample Files\2003.dat
D:\Temp\Sample Files\2004.dat
Extended FileList
Each line within an Extended FileList specifies a single file to be processed. The FilePath value is the full file specification for the file to be processed.
An Extended FileList can specify additional attributes for each file, such as creation date, modification date, access date, file size and MD5 Hash. These additional attributes will be matched when performing a Survey, Collection or Deletion using the Extended FileList as the file selection criteria. If a file's attributes no longer match what is specified in the Extended FileList, that file will be skipped.
The following additional values may be specified to ensure the file being processed is the intended file and has not changed since the time the Extended FileList was last saved:
| Attribute |
Description |
| CreationDate |
The date (and time) the file was created |
| The date (and time) the file was last modified |
|
| LastAccessDate |
The date (and time) the file was last accessed (not a reliable attribute, as this value can easily change) |
| FileSize |
The size of the file (in bytes) |
| MD5Hash |
The MD5 hash checksum for the content of the file |
Here is a sample of one line of an Extended FileList with all attributes specified:
FilePath="D:\Temp\SampleFiles\2000.dat" CreationDate="2019-01-29T10:27:41.572084" ModificationDate="2016-11-09T09:04:50.239659" LastAccessDate="2019-01-29T10:27:41.572084" FileSize="1" MD5Hash="9371d7a2e3ae86a00aab4771e39d255d"
Note: The various date attributes specify both a date and a time.
Note: The above Extended FileList example is actually only one line; however, this page is too narrow to show the complete line without wrapping it.
Tip: Extended FileLists can be generated based on a copy of a Responsive log file (in CSV format) created by a previous Survey.
Warning: When preparing an Extended FileList from a survey's Responsive log file for a Delete or Collect and Delete job, be sure to exclude any files with Undetermined status in the Responsive log (i.e. files which could not be keyword searched due to the file being encrypted, locked, corrupted, or unrecognized). Review the Extended FileList carefully to ensure it contains only files that should be deleted.
XML FileList
An XML FileList can contain the same file attributes as an Extended FileList, but uses an XML format. Each file listed within an XML FileList is specified by a <File> element. Here is a sample of an XML FileList with a single file specified (the same file as in the example for an Extended FileList):
<Files>
<File FilePath="D:\Temp\SampleFiles\2000.dat" CreationDate="2019-01-29T10:27:41.572084" ModificationDate="2016-11-09T09:04:50.239659" LastAccessDate="2019-01-29T10:27:41.572084" FileSize="1" MD5Hash="9371d7a2e3ae86a00aab4771e39d255d"/>
...
</Files>
Tip: A copy of the Responsive log file (in XML format) from a Survey can be used as the basis for creating an XML FileList. To enable XML logs for a Survey on a Windows computer*, edit the JobFile for the survey and revise the <Logs> element so it includes an optional attribute to enable XML log files:
<Logs GenerateXML="yes">
* XML log files can be generated only on a Windows computer.
Preparing a portable collection device for Linux or Mac
To prepare a portable collection device for running on either Linux or macOS computers:
Connect the external drive or Flash drive which will serve as the Portable Collection Device to the Windows computer where Nuix Collector Suite is installed.
Format the external drive or Flash drive, if necessary, using the exFAT file system (exFAT can be accessed on Windows, Linux and macOS, and is one of the disk format options available in Windows 7 and newer).
Warning: Formatting a disk is a destructive operation. Copy any files you need from the external device before beginning the disk format. Take your time and be sure you are formatting the external device which you intend to use.
Launch the Nuix Collector Wizard and specify the settings for your Portable Collection Device.
On the Sources tab, set the Collection type to Files (Portable Device), then specify the various files and folders to be collected.
On the Filters tab, specify any additional file selection criteria.
On the Portable Media tab, select the option to create a Linux / Mac zip file, then specify the Zip File destination folder. This is typically an empty folder on a local drive.
On the Destination tab, specify where the collected files will be saved and in what format.
On the Reports tab, specify the reports and logs you wish to generate.
From the File menu, click Create Portable Device to save the ZIP file in the specified folder.
Copy the ZIP file from the folder specified in Step 3.c to the root of the Portable Collection Device, but do not extract the contents of the ZIP file just yet.
Disconnect the Portable Collection Device from your Windows computer.
Connect the Portable Collection Device to a Linux or macOS computer. The remaining steps occur on the Linux or Mac computer.
Mount the Portable Collection Device so it can be accessed.
Extract the contents of the ZIP file in the root folder of the Portable Collection Device.
Extracting the ZIP file from the Linux or Mac computer ensures the file permissions are extracted properly.
Dismount and disconnect the Portable Collection Device.
The Portable Collection Device is now ready to be connected and mounted on other Linux or Mac computers to execute portable collections.
Note: It is possible to configure a single portable collection device that can execute collections on Linux, Mac and Windows computers. The steps are documented in the script file RunCollection.sh, which is located within the Linux and Mac Zip File.
For assistance with preparing portable collection devices contact Nuix Technical Support.
Disk access methods for Linux and macOS
Linux and macOS allow access to a disk via two distinct methods: “block access” and “raw access”. These methods have distinct benefits, drawbacks, and behavior when imaging a disk.
Block access
The block access method transfers data in blocks at once (i.e. in 4 KB chunks, typically). Devices accessed in this manner are buffered at a low level, by their device driver, and read data multiple sectors at a time.
A single 4 KB block contains eight 512-byte sectors, and if even one of those sectors is "bad", the entire block of data is also marked bad by the operating system, making it unreadable by Nuix Disk Collector or any other third-party imaging tools. This means a single 512-byte bad block will often result in 4 KB of data loss.
On Linux, block devices can be imaged while they are mounted
On macOS, block devices cannot be imaged while they are mounted
On macOS, block devices can be much slower to image due to device driver behavior
Raw access
The raw access method transfers data in individual bytes rather than large blocks. Devices accessed in this manner offer more direct (raw) access to the disk, allowing for sectors to be read individually, without the buffering that block devices use.
Using raw access, Nuix Disk Collector can read around a single bad sector without losing any adjacent data.
On Linux, raw devices cannot be imaged while they are mounted -- they require special setup by an administrator
On Linux, raw devices can be much slower to image due to device driver behavior
On macOS, raw devices can be imaged while they are mounted, and are also noticeably faster than block devices
Specifying disk access methods
Linux and macOS provide both a "block device" and a "raw device" for each physical hard disk and logical volume. The disk access method to be used for imaging depends on whether a block device or a raw device has been specified as the source device to be imaged.
Disk imaging jobs can be configured to auto-detect the physical disks or logical volumes to be imaged. The auto-detection routine will select the corresponding block devices on Linux computers, and the corresponding raw devices on macOS computers. This allows imaging of mounted disks and volumes, while providing the best overall performance.
Disk imaging jobs can also be configured to allow the user (or custodian) to specify the physical disks or logical volumes to image. These users will need to know how to specify either block devices or raw devices to be imaged. Block devices are commonly nodes with the prefix /dev/sd (Linux) and /dev/disk (Mac). Raw devices are commonly nodes having the prefix /dev/raw/ (Linux) and /dev/rdisk (Mac). The various device access methods, prefixes and capabilities are summarized in the table, below.
| OS |
Access method |
Device prefix |
Can image disk while mounted |
Used by auto-detect feature |
Maximum performance and suggested for most disk imaging |
Maximizes successful imaging of sectors adjacent to bad sectors |
| Linux |
Block |
/dev/sd |
Yes |
Yes |
Yes |
No |
| Linux |
Raw |
/dev/raw/ |
No |
No |
No |
Yes |
| macOS |
Block |
/dev/disk |
No |
No |
No |
No |
| macOS |
Raw |
/dev/rdisk |
Yes (see note below) |
Yes |
Yes |
Yes |
Tip: Specify block devices when imaging disks connected to a Linux computer, and specify raw devices when imaging disks connected to a macOS computer. This will allow you to image mounted disks, while providing the best overall performance.
Use raw access on Linux only when you need to recover every last possible sector from a drive with bad sectors. For details, see topic Raw Disk Imaging on Linux.
Note: Disk Image collections on macOS 10.13 High Sierra and newer are not supported.
Raw disk imaging on Linux
Raw imaging of Linux disks is possible, but should be limited to specific instances where the administrator needs to salvage a disk with known bad sectors. By imaging the bad disk using a raw device on Linux, Nuix Disk Collector will be able to salvage the data adjacent to each bad sector that would otherwise be lost by imaging using a block device. But there are drawbacks to this approach: the disk must first be unmounted, and the disk will take longer to image.
To image a disk using the raw access method on Linux:
Identify the device node to be imaged (for example: /dev/sdc). You can list the available disk devices by running sudo fdisk –l, or, if mounted, by examining the mount tab.
Note: The fdisk parameter mentioned here is a hyphen followed by a lowercase L, rather than the numeral one.
Warning: The fdisk command can be destructive if used improperly.
Load the raw kernel module (assumes your computer's Linux kernel was built with this module):
% sudo modprobe raw
Map a raw device to the disk device you identified in Step 1, using the raw command. For example, the disk device /dev/sdc can be mapped to the raw device /dev/raw/raw1 using the following command:
% sudo raw /dev/raw/raw1 /dev/sdc
If the disk you identified in Step 1 is mounted, safely unmount it.
Image the disk using Nuix Disk Collector, specifying the corresponding raw device (for example: /dev/raw/raw1) as the source device.
Hash list file overview
A Hash List File is a text file containing a list of MD5 file hashes to be processed by Nuix Collector or Portable Collector. The Hash List File must be encoded as a UFT-16LE or UTF-8 text file. File hashes appear in the file one per line, as a 32-character string. No hyphens or other delimiters are permitted – only hexadecimal numerals 0 through 9 and A through F are allowed.
Hash list file example
The following Hash List File contains four lines – each line contains an MD5 hash value corresponding to a unique file:
08FD8A7864B6469296D21A363A7E3B9A
0B124F8F91F011D1B8B5006008059382
F56F6FDDAA9D4618A949C1B91AF43B1A
E64424376C684f5294DD2CFED267EFB9
Using a hash list file
Once you have compiled a list of MD5 file hashes into a Hash List File, you can configure a Collector job to use this list to identify files to process, as follows:
From the Collector Wizard, click the Filters tab, then check the Filter by: Hash option.
Click Add near the Additional Hash Lists field, as shown in topic Additional Hash Lists. Select the Hash List File you prepared earlier.
Deleting files
Nuix Collector and Nuix Portable Collector can be used to delete files which match specific file selection criteria. Files can also be collected and then deleted (in effect, moving the files from a source location to the specified destination location).
To configure a file Deletion job (or a Collect & Delete job):
Review the topic Precautions when Deleting Files and Folders, and consider running a survey prior to configuring a deletion job. The survey results can be used to ensure that only intended files are deleted.
Specify the Collect type: either Files, or Files (Portable Device), depending on your Collector license and from where the deletion job will run.
Check the Deletion option shown on the upper half of the Collector Wizard, then select either or Collect & Delete or Delete Only.
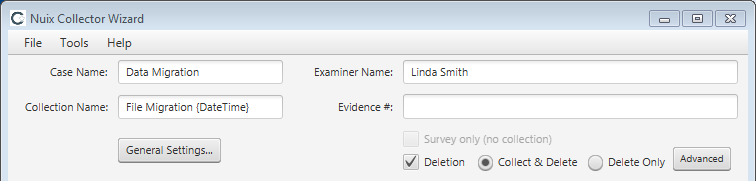
Click the Advanced button to specify Deletion Advanced Settings
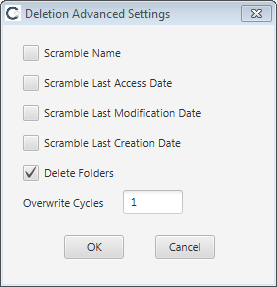
The following Deletion Advanced Settings are available, and apply to all files being deleted (i.e. all files matching the file selection criteria specified in the job):
| Setting |
Description |
| Scramble Name |
Sets a random Filename in the file allocation table for each file deleted |
| Scramble Last Access Date |
Sets a random Last Access Date in the file allocation table for each file deleted |
| Scramble Last Modification Date |
Sets a random Modification Date in the file allocation table for each file deleted |
| Scramble Last Creation Date |
Sets a random Creation Date in the file allocation table for each file deleted |
| Delete Folders |
If, after deleting files in a given folder, that folder becomes empty then that folder will be deleted as well. |
| Overwrite Cycles |
The number of times to overwrite each deleted file's content on disk with random data. If 0, the file's content will not be overwritten by the file deletion job. |
|
|
Note:Any ordinary write activity on a logical volume containing a deleted file may result in the space previously used by that deleted file being partially or fully overwritten. |
Specify the files and/or folders to delete (or collect & delete), using the Sources tab and Filters tab. Only files which meet all the selection criteria will be deleted.
Warning: do NOT perform Delete jobs or Collect and Delete jobs which specify Advanced Search (keyword search) criteria. Any file that the search engine cannot read and that meets other specified file selection criteria will be deleted. This includes any file that is encrypted, locked, or has a file type that is unrecognized for any reason. See the topic Deleting files using an Extended FileList for an alternate approach.
Select the reports and logs to generate from the Reports tab. For a full audit trail of all file deletions, ensure that the Deletion Report (or log) is selected, as well as the Not Deleted Report (or log).
Save the JobFile and optionally run it (for Nuix Collector), or create the Portable Collection Device (for Nuix Portable Collector).
Precautions when deleting files and folders
As a precaution against unintended data loss, consider the following approach when deleting files:
Run a Survey before performing a Deletion, to ensure the file selection criteria you intend to use are correct. The Responsive log generated by the Survey can be used to verify that only intended files were selected. This Responsive log can then used to build an Extended FileList. The Extended FileList, in turn, can be used to select files for deletion.
File M.A.C. times (ModificationDate, CreationDate), file sizes and/or content hash values can be obtained from a survey's Responsive log and included in the Extended FileList. This approach ensures that specified files will be deleted only if they have not changed since the survey took place.
Optionally perform a Collect and Delete, so you can retain a copy of the files you are going to delete.
For details see the next topic Deleting files using an Extended FileList.
Deleting files using an Extended FileList
A FileList can be used to specify which files will be deleted. This allows an opportunity to review the list of files to be deleted before running the Delete or Collect and Delete job.
An Extended FileList can also specify file attribute values such as the Last Modified Time and the Size. These optional file attributes, when present, will ensure the file is deleted only if its attributes in the FileList match those on the actual file just prior to deletion.
The following approach is suggested as a "best practice" way of deleting files with Collector – regardless of the search criteria used – because this approach provides an opportunity to review and alter the list of files to be deleted.
Run a Survey to select the files that will be deleted.
Prepare an Extended FileList based on a copy of the Responsive log file generated during the previous step.
Review the Extended FileList carefully to ensure it contains only files that should be deleted.
Be sure to exclude any files with Undetermined status from the Extended FileList. These are files which could not be keyword searched during the survey due to being locked, encrypted, unrecognized or other issue.
Specify optional file attributes to ensure at the time the Delete job is run that the specified file has not been modified. Remove the LastAccessDate attribute from each file within the Extended FileList, as it is unlikely to remain unaltered.
Note: For an example showing the Extended FileList format see the topic Extended FileList.
Tip: Specifying ModificationDate and FileSize is generally sufficient to ensure the file has not changed since the file was last surveyed. Specifying MD5Hash offers further assurance, but this requires running a survey with pre-hashing enabled, which can take a long time to process.
Prepare a Delete (or Collect and Delete) job. Before running the job edit the JobFile so it references the Extended FileList file as its sole file selection criteria, as shown in the following example:
. . .
<CliParameters>
. . .
<Input PreHash="No" CrawlOnly="No">
. . .
<FileLists PreHash="No" ExcludeADS="No">
<ExtendedFileList>C:\SomeFolder\MyExtendedFileList.txt</ExtendedFileList>
</FileLists>
. . .
Tip: The <ExtendedFileList> tag features optional attributes to specify credentials for accessing the Extended FileList from a network share. You can then specify a UNC path to the Extended FileList file. For details see the Nuix Collector and ECC JobFile Reference.
File signature analysis
Overview
File Signature Analysis can successfully identify a file's type, even when the filename has the wrong extension or has no extension at all.
When Signature Analysis is enabled, Nuix Collector determines a file's type by searching the content of the file for a matching "header signature".
The Signatures file provides a cross-reference between a list of filename extensions (file types) and header signatures (sequences of characters or codes consistently found within files of this type).
Enabling signature analysis
In Collector Wizard, enable Signature Analysis from the Filters tab by checking the Filter by: Type option and then checking the Perform Signature Analysis option. One or more file types must also be added to the File Types list. Nuix Collector will analyze the beginning content of all files that are crawled to determine if each file's "header" contains a search pattern (a "signature") corresponding to one of the specified file types.
When the Include option is selected, then the following files will be collected:
any files that have one of the listed filename extensions, regardless of their content
If any of the listed file extensions has a corresponding signature in the Signature Headers file, and if any of those signatures are found in the beginning content of a file, then that file will be collected regardless of the file's filename extension.
This behavior can cause Nuix Collector to over-collect in some situations, as some file types have similar header patterns.
The Exclude option collects all files except for any files whose content matches the signature of any one of the listed file extensions.
If a specified file type is not listed in the Signatures file, and Signature Analysis is enabled, and Include is selected, then only the files which have the corresponding filename extension will be collected.
If a specified file type is not listed in the Signatures file, and Signature Analysis is enabled, and Exclude is selected, then all files will be collected – even those with one of the listed filename extensions.
Customized file signature analysis
Nuix Collector uses a simple text search and/or a regular expression search to identify each file's header signature. The header signature search terms and their associated file types are stored in an XML file, named File Headers.xml. This file is stored inside the Signatures directory within the Nuix Collector installation folder.
You can edit the Signatures file to modify the list of known file types and their corresponding header signatures. Common motives for modifying this file include:
Your organization uses a custom program or a commercial application which uses data file format that is not represented in the Header Signatures file.
Your organization uses a newer version of an application, and the data file format for that application has changed.
The Signatures file can be edited in a text editor, an XML editor or within Microsoft Excel.
Note: If Excel is used to edit this file, be sure to save the edited file as an XML file.
The header signatures within the file can be a "regular expression" search string, a simple search string, or a combination of the two. Simple search strings can be case sensitive or non-case sensitive.
Note: Regular expression syntax for header signatures is based on the regular expression dialect used by version 5 of the Perl programming language.
For details on customizing the header signatures, refer to the Knowledgebase on the Nuix Support web site, at https://nuix.service-now.com/support, or contact Nuix Technical Support.
File signature analysis limitations
File types can only be identified via Signature Analysis if a filename extension and a corresponding signature search pattern are properly specified within the Header Signatures file. Nuix Collector Suite comes with a Header Signatures file containing numerous signatures, but it is by no means complete.
Some filename extensions, such as .doc, may be shared among multiple versions of an application (e.g. Microsoft Word 95 and Microsoft Word 2003), and each version may have a unique signature.
Some file types, such as Microsoft Word and Excel files, are often saved within a compound OLE2 file format. It can be difficult for signature analysis to identify the file types stored within such containers.
Some filename extensions may be associated with different data formats than the common associations listed in the Signatures file.
Some files use encoded XML or zipped content. Such file types cannot be reliably determined via signature analysis.
Excluding files
By excluding irrelevant files from file collections and extractions, you can minimize the amount of disk space required.
In addition, smaller collections and extractions can be indexed and searched more quickly than large collections (requires Nuix Workstation or other search and analysis products – licensed separately).
This section describes the most commonly used file exclusion methods available within Nuix Collector Suite.
Excluding files by type using filename extensions
Files can be excluded from processing by specifying the filename extensions on the Collector Wizard Filters tab. This requires checking the Filter by: Type option, and then adding one or more filename extensions to the File Types list.
The Include and Exclude options affect which file types will be processed:
Include: Select this option to INCLUDE files whose filename extension matches one of the specified file types. All other files will be EXCLUDED.
Exclude: Select this option to EXCLUDE files whose filename extension matches one of the specified file types. All other files will be INCLUDED.
Excluding files by type using file signature analysis
In Collector Wizard you can enable Signature Analysis, which allows certain file types to be detected – even if the files are named with non-standard filename extensions. Enable Signature Analysis from the Filters tab by checking the Filter by: Type option and then checking the Perform Signature Analysis option. One or more file types must also be added to the File Types list.
When the Exclude option is selected and Perform Signature Analysis is enabled, all files will be collected except for any files whose content matches the signature of any one of the listed file extensions. i.e. only files with matching signatures will be EXCLUDED.
Excluding duplicate files
When de-duplication is enabled via the Collector Wizard, Nuix Collector checks the hash value of each file to see if it is found in the Duplicate Database:
Files whose hash values are not found in the Duplicate Database are processed (provided they meet all other criteria). The file's hash value is then added to the Duplicate Database, to prevent future processing of this same file whenever de-duplication is enabled.
Files whose hash values are found in the Duplicate Database are skipped, and the duplicate detection is noted in the crawl database and subsequent de-duplication logs.
Impact on Disk Space and Performance: De-duplication can result in smaller collections; however, it requires additional processing time. When performing an extraction of native copies from a FileSafe, de-duplication usually results in a smaller and faster extraction.
The Duplicate Database Is Cumulative: The same Duplicate Database can be used for multiple collections or extractions. With each run, the duplicate database accumulates more entries. This allows a file processed in a previous collection or extraction to be recognized as a duplicate when performing a subsequent collection or extraction days or weeks later.
Multiple Duplicate Databases: You can establish separate duplicate database folders for the various projects you are working on. Doing so lets you reference a duplicate database built up from specific prior collections or extractions.
Avoid Redundant De-Duplication: If you perform a collection with de-duplication enabled, and with the target destination being a FileSafe, the files you collect will each be unique. Any duplicate files detected during the collection process will be collected only once, and the hash values for all the files collected will be added to the Duplicate Database.
When it comes time to extract files from this FileSafe, avoid enabling de-duplication, as this would skip extraction for any files already listed in the Duplicate Database (i.e. all the files in the FileSafe would be skipped during the extraction).
You can examine the JobFile which produced the FileSafe to see if de-duplication was enabled; for details, see topic Extracting the JobFile from a FileSafe. Or you can enable de-duplication during the extraction, but specify a new, empty folder for the Path to duplicate database.
Excluding files listed in the NIST database
You can leverage a huge collection of hashes from known operating system and application files to exclude these files from Nuix Collector processing jobs. The U.S. National Institute of Standards and Technology (NIST) publishes an updated catalog – approximately 30 million known files as of this writing – four times per year. The catalog can be downloaded at no charge and then utilized by either Evidence Browser or Nuix Collector.
When Ignore files in the NIST hash database is enabled via the Collector Wizard, Nuix Collector checks the hash value of each file to see if it is found in the NIST database:
Files whose hash values are not found in the NIST database are processed (provided they meet all other criteria).
Files whose hash values are found in the NIST database are excluded, and the detection is noted in the crawl database and subsequent NIST logs.
Impact on Disk Space and Performance: De-NISTing can result in smaller collections; however, it requires additional processing time. When performing an extraction of native copies from a FileSafe, De-NISTing usually results in a smaller and faster extraction.
Excluding files listed in the known files hash database
Nuix Collector Evidence Browser lets you add files to a Known Files Hash Database, so these files can be excluded from processing. This can save time and storage space by avoiding the collection and processing of irrelevant files.
One common Known Files scenario involves desktop computers which were built with a replicated disk image. You can add all the files in a fresh disk image to the Known Files Hash Database, then exclude all these files from subsequent collections or extractions.
To add a set of files to the Known Files Hash Database:
Make a freshly-imaged desktop hard disk (or any other set of files) accessible to Nuix Collector Suite via a network share or other means.
Run Nuix Collector Evidence Browser and add the files in the disk image to the Known Files Hash Database. For details, see the Evidence Browser topic Using a Known Files Hash Database.
Run Collector Wizard to configure a network collection or extraction. On the Filters tab, check the Filter by: Known Files option. Under the Exclude Known / Duplicate Files section, check the option Known Files. Be sure the Path to Database points to a copy of the known files database that was updated in Step 2.
When Known Files filtering is enabled via the Collector Wizard, Nuix Collector checks the hash value of each file to see if it is found in the Known Files Hash Database:
Files whose hash values are not found in the Known Files database are processed (provided they meet all other criteria).
Files whose hash values are found in the Known Files database are skipped, and the detection is noted in the crawl database and known files logs.
Impact on Disk Space and Performance: Enabling the Known Files filter can result in smaller collections; however, it requires additional processing time. When performing an extraction of native copies from a FileSafe, Known Files filtering usually results in a smaller and faster extraction.
Updating the NIST hash database
Nuix Collector and Nuix Collector Evidence Browser can avoid collecting or extracting standard operating system or application files by utilizing the NIST hash set. Developed and maintained by the U.S. National Institute of Standards and Technology, the NIST hash set is a massive hash database (~ 30 million entries) developed to identify standard system and software application files. This database is also known as the Reference Data Set, which is packaged into a free product called the National Software Reference Library.
To update the NIST hash database used by Nuix Collector Suite:
In your web browser, go to the National Software Reference Library section of the NIST website, at https://www.nist.gov/itl/ssd/software-quality-group/national-software-reference-library-nsrl/nsrl-download.
Scroll down the page to the "Reduced Sets" heading.
Download the "Minimal Set" – a ZIP file containing over 29 million distinct hash values of known files. Save this file in a folder you can locate easily, such as the Desktop.
Note: Avoid the "Unique Set"; download the "Minimal Set" instead.
The "Minimal Set" download will require over 2 GB of free disk space, plus an additional 3 to 4 GB of space to extract the contents of the ZIP file. Download times may be an hour or more, depending on the speed of your internet connection.
Optionally verify that the file has been downloaded correctly by comparing the hash signature value of the ZIP file you downloaded to one of the hash signature values found on the website. This requires a hash checksum utility.
In Windows Explorer, right-click the ZIP file you downloaded, and choose Properties. Click the Unblock button (if shown), then click OK.
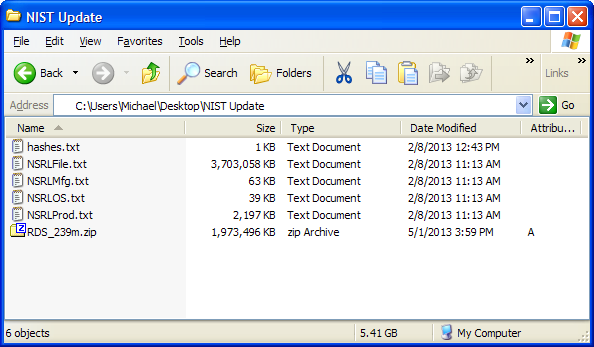
Extract the five text (TXT) files within the ZIP file you downloaded, and save these extracted files into a new (empty) folder. You can use the unzipping capabilities built-in to Windows, or use an unzipping utility such as 7-Zip.
Open Nuix Collector Evidence Browser, and then go to Tools > Import NIST Hash Sets. A dialog box will appear.
Navigate to the folder you created in Step 6, then open the NRSLFile.txt. A status dialog titled “Load NIST Hash Progress” will display. An hour or more may be necessary for Nuix Collector Evidence Browser to load the hash values.
Exit Nuix Collector Evidence Browser.
You can now configure JobFiles and/or Nuix Collector Evidence Browser to utilize the NIST database (i.e. to ignore files listed in the NIST database).
Repeat this procedure periodically, so that the NIST database utilized by Nuix Collector Suite contains the latest set of hash values.
For more information on NIST files, visit the National Institute of Standards and Technology website: http://www.nsrl.nist.gov.
Note: If a NRSLFile.txt file is imported twice, the duplicate entries will be filtered out (the NIST database used by Nuix Collector will not grow).
Similarly, if an older NIST hash set is imported after a newer one (say v2.21 is imported when v2.26 has already been loaded), Nuix Collector’s NIST database will not grow or shrink, as the newer version contains all the older version’s hashes.
Collecting EFS-encrypted files
To access EFS-encrypted files, the collection program must be running with the user credentials of the same user who last saved or copied the EFS-encrypted files.
The easiest way to run such collections is to prepare a portable collection (either an external hard disk or a network share) and have the user execute the collection.
Note: EFS-encrypted files which are collected via Portable Collector will be saved (copied) to a FileSafe – without EFS encryption. Access to this FileSafe should be restricted to authorized users only (as with any FileSafe).
Accessing restricted Amazon S3 buckets
If your organization uses AWS S3 policies to limit access to S3 buckets, please note that the account used by Nuix Collector to access an AWS S3 bucket must be granted permissions to perform the following S3 actions:
GetObject
PutObject
ListBucket
ListMultipartUploadParts
ListBucketMultipartUploads
AbortMultipartUpload
DeleteObject
The above actions are typically granted as permissions in the form s3:actionname via an AWS S3 Bucket Policy. It is beyond the scope of this document to describe these policies or how to apply them. See Amazon's S3 Developer Guide for further information regarding bucket policies.
Advanced settings
JobFiles can be manually edited to configure advanced settings that are inaccessible from the Collector Wizard, including the following:
| ExcludeADS |
Exclude Alternate Data Streams from a collection (Windows only). |
| IgnoreOlderVersions |
For SharePoint collections – collect only the most recent version of each SharePoint item, rather than collecting all current and past versions of each item (Windows only). |
| GenerateXML |
Generate log files in XML format (Windows only). |
| GetAlternateMACTimes |
Obtain alternate MAC times from the Master File Table of an NTFS volume (Windows only). For systems compromised by malware, these alternate MAC times may be more reliable than MAC times obtained in the normal manner. |
For details, refer to the Nuix Collector & ECC JobFile Reference.