Getting started
Tip: This Users Guide refers to several terms specific to collections, such as Collection, Custodian and Target. If these terms are unfamiliar to you, please review the Appendix A: Glossary before proceeding.
Before any files can be collected or deleted, several initial actions must take place:
Install and Configure Collection Center
Collection Center components must be installed on the computers involved in the Collection process. This includes embedding an ECC Server Connection Profile into installers for ECC Client, as well as configuring ECC Server options. Please refer to the separate ECC Administration Guide for installation details.
Initial Configuration
Establish your organization's Targets and Custodians via the Administration Console. Targets specify the volumes, folders or SharePoint Sites to be processed, as well as the computer which will do the actual processing. A Custodian is the individual associated with a given Target.
Optionally configure Selection Criteria at this time. Selection Criteria consist of file types and attributes, which restrict the files to be processed.
Add a Case and Collection
At least one new "Case" and "Collection" must be established via the Administration Console. A Case (or project) is a set of one or more related Collections. Collections consist of Collection Type (Collect, Collect and Delete, Delete, Survey or Launch Command), Target locations to process, Selection Criteria (files to select), Destination folder or URL (only for tasks that collect), and a scheduled Start Time.
Run the Collections
One or more Collections must be scheduled to run. Before the first Collection begins, the computers containing the items to be processed must be up and running and the ECC Client program or service must be actively running (on the same computer where the data resides, or on a designated Worker PC).
The following section introduces the ECC Administration Console ("Administration Console"), followed by a section on performing the Initial Configuration.
Administration Console - Introduction
The Administration Console allows one or more designated administrators to set up and manage Collections across the organization.
Starting the Administration Console
If Administration Console was installed on your computer via a stand-alone installer you can start Administration Console via a desktop shortcut.
If you are launching Administration Console from a web browser, be sure that:
ECC Server is running on a server on your network
Nuix Launcher is installed on your computer. Nuix Launcher can be downloaded from the ECC Server's web page and then installed.
To start Admin Console from a web browser:
Open your web browser and browse to the web URL for your ECC Server, e.g. http://ecc1.mydomain.org:8080. If your organization has multiple ECC Servers, you can connect to each ECC Server by specifying its corresponding URL.
Note: If your web browser warns of a security risk, check with the person who installed ECC Server to ensure the URL is correct. If so, you can then add a security exception in your web browser, or install the self-signed or company-issued SSL certificate into the certificate store used by your web browser. See the ECC Administration Guide for details.
Click the Launch Admin Console button to launch Admin Console. Clicking this link downloads and opens a package containing the Admin Console program.
Note: If your web browser prompts you to associate a program with the .launcher-package filename extension, you may need to download Nuix Launcher using the links at the bottom of the ECC Server's web page, then install the downloaded file.
If your web browser continues to prompt you to associate a program with the .launcher-package filename extension, proceed to associate this extension with the Nuix Launcher program. You can typically locate this program in the following paths:
Windows:C:\Program Files (x86)\Nuix\Nuix Launcher\NuixLauncher.exe
macOS:"/Library/Application Support/Nuix/Launcher/NuixLauncher.app/Contents/MacOS/NuixLauncher"
Linux: /bin/nuix-launcher-gui or /usr/bin/nuix-launcher-gui
Connect to an ECC Server and log in
Administration Console will present a login screen where you can select an ECC Server to connect to, then specify an ECC user name and password to log in. You can also modify ECC Server connection settings using this login screen.
If the ECC Server is configured to authenticate using Keycloak or Azure AD, then ECC Admin Console will open a login screen in your web browser when you try to connect to an ECC Server. Log in using Keycloak or Azure AD then return to the ECC Admin Console program.
Warning: If ECC Server is configured to use its internal user directory (the default configuration) and no users or passwords are configured, Administration Console will permit login to the ECC Server using the pre-configured ECC user name 'Administrator' and no password. Set a password for the Administrator user soon after installing the ECC Server, to ensure the system is not accessible by unauthorized users.
For details on configuring ECC Server Connections, see the topic Managing Server Connections.
Quick reference tools and controls
State of collection

Dashboard panel
The Administration Console initially displays the Dashboard: an overview of the status of all Collections.
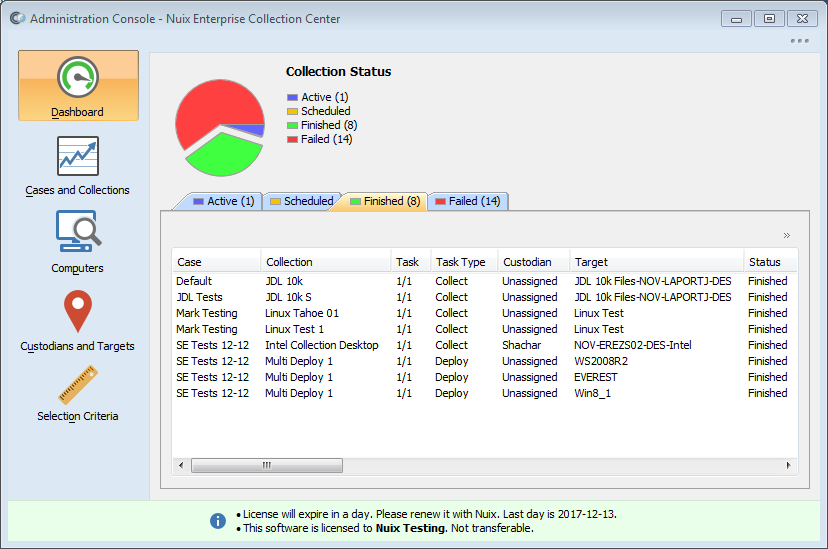
Collections are shown summarized under the following status headings:
Active
Lists any actively running or paused Collections. Active Collections can be paused, resumed or canceled from this screen.
Scheduled
Lists any Collections that are scheduled to run in the future. Scheduled Collections can be canceled from this screen.
Finished
Lists any Collections that have completed successfully.
Failed
Lists any Collections that have encountered errors that prevented their successful completion. Failed Collections can be restarted from this screen.
Tip: The top of the Dashboard shows a graphical breakdown of jobs by status. You can click a graph segment or label (e.g. Finished) to jump to the corresponding tab.
Cases and collections panel
The Cases and Collections panel displays details of each Collection, listed by Case or by Collection. From this screen, you can add new Collections, monitor active Collections, and pause, cancel or resume one or more Collection Jobs.
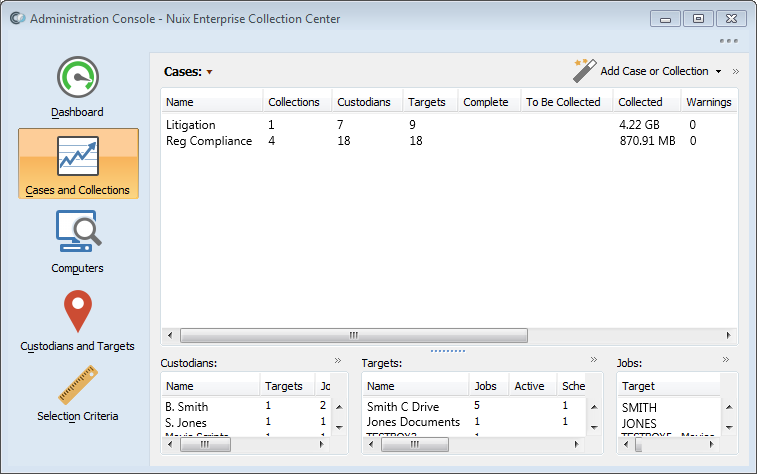
Actions
The Add Case or Collection button at the top-right of the screen runs the New Collection Wizard, to establish a new Collection (and, optionally, a new Case).
By clicking the Cases heading, you can view collection details listed by Collection, rather than by Case.
By selecting a Collection, you can view the status of individual collection jobs within the Collection, as well as the Custodians and Targets that make up the Collection.
Right-clicking a Case or Collection opens a context menu offering several additional actions:
| Action |
Description |
| View |
View the settings for a particular Collection |
| Error Log |
View the errors (if any) for a finished Collection |
| Warning Log |
View the warnings (if any) for a finished Collection |
| Pause |
Pause an actively running or scheduled Job |
| Cancel |
Cancel an actively running or scheduled Job |
| Resume |
Resume a paused Job |
| Relocate |
Configure a collection with a Relocate task to move the collected data or logs from the selected task's destination folders to a new destination folder. |
| Copy |
Copies all the settings of a Collection into the New Collection Wizard |
Column reference
Under the Cases heading, the following details are shown for each Case:
| Detail |
Description |
| Name |
The name of the Case |
| Collections |
Total number of collections in this Case |
| Custodians |
Total number of custodians in all collections in this Case |
| Targets |
Total number of targets in all collections in this Case |
| Complete |
The progress (% complete) for all collections in this Case |
| To Be Collected |
Total number of files that have been – or will be – collected from all collections in this Case, in gigabytes (for Collections which collect files only) |
| Collected |
Total size of files that have been collected from all collections in this Case, in gigabytes (for Collections which collect files only) |
| Warnings |
Total file collection warnings from all collections in this Case |
| Errors |
Total file collection errors from all collections in this Case |
| Jobs |
Total number of file collection jobs (tasks) from all collections in this Case |
| Active |
Number of active file collection jobs (tasks) from all collections in this Case |
| Scheduled |
Number of scheduled file collection jobs (tasks) from all collections in this Case |
| Finished |
Number of finished file collection jobs (tasks) from all collections in this Case |
| Failed |
Number of failed file collection jobs (tasks) from all collections in this Case |
Under the Collections heading, the following details are shown for each Collection:
| Detail |
Description |
| Name |
The name of the Collection |
| Case |
The name of the Case this Collection belongs to |
| Custodians |
Number of Custodians in the Collection |
| Targets |
Number of Targets in the Collection |
| Complete |
The progress (% complete) of the collection |
| To Be Collected |
Total size of files in the Collection that have been – or will be – collected (for Collections which collect files only) |
| Collected |
Total size of files in the Collection that have been collected, in gigabytes (for Collections which collect files only) |
| Warnings |
Number of warnings encountered during the collection |
| Errors |
Number of errors encountered during the collection |
| Jobs |
Number of file collection Jobs (tasks) in the Collection |
| Active |
Number of jobs (tasks) in the Collection that are active |
| Scheduled |
Number of jobs (tasks) in the Collection scheduled to start in the future |
| Finished |
Number of jobs (tasks) in the Collection that have completed |
| Failed |
Number of jobs (tasks) in the Collection that started and then failed |
The Custodians, Targets and Jobs (tasks) in each case or collection are shown in the lower half of the Cases and Collections screen:
Custodians:
| Detail |
Description |
| Name |
The name of the Custodian |
| Targets |
Number of Targets associated with this Custodian |
| Jobs |
Number of Collection Jobs (tasks) associated with this Custodian |
| Complete |
The progress (% complete) of any active collection associated with this Custodian |
| To Be Collected |
Total size of files associated with this Custodian that have been – or will be – collected (for Collections which collect files only) |
| Collected |
Total size of files associated with this Custodian that have been collected, in gigabytes (for Collections which collect files only) |
Targets:
| Detail |
Description |
| Name |
The name of the Target |
| Jobs |
The total number of collection jobs (tasks) associated with this Target |
| Active |
The number of active collection jobs (tasks) associated with this Target |
| Scheduled |
The number of scheduled collection jobs (tasks) associated with this Target |
| Finished |
The number of finished collection jobs (tasks) associated with this Target |
| Failed |
The number of failed collection jobs (tasks) associated with this Target |
| Complete |
The progress (% complete) of any active collection associated with this Target |
| To Be Collected |
Total size of files associated with this Target that have been – or will be – collected, in gigabytes (for Collections which collect files only) |
| Collected |
Total size of files associated with this Target that have been collected, in gigabytes (for Collections which collect files only) |
Jobs:
| Detail |
Description |
| Target |
The name of the Target associated with this Job |
| Collection |
The name of the Collection associated with this Job |
| Status |
The Job status |
| Start |
The date and time when the Job started or is scheduled to start |
| Complete |
The progress (% complete) of this Job |
| To Be Collected |
Total size of files associated with this Job that have been – or will be – collected, in gigabytes (for Collections which collect files only) |
| Collected |
Total size of files associated with this Job that have been collected, in gigabytes (for Collections which collect files only) |
| Files |
Number of files associated with this Job that have been – or will be – processed |
| Warnings |
Number of warnings encountered during the processing of this job |
| Errors |
Number of errors encountered during the processing of this job |
Computers panel
The Computers panel lets you see all the computers on the network which have contacted the ECC Server which you are logged in to. This includes other computers running ECC Admin Console, as well as computers running the ECC Client service.
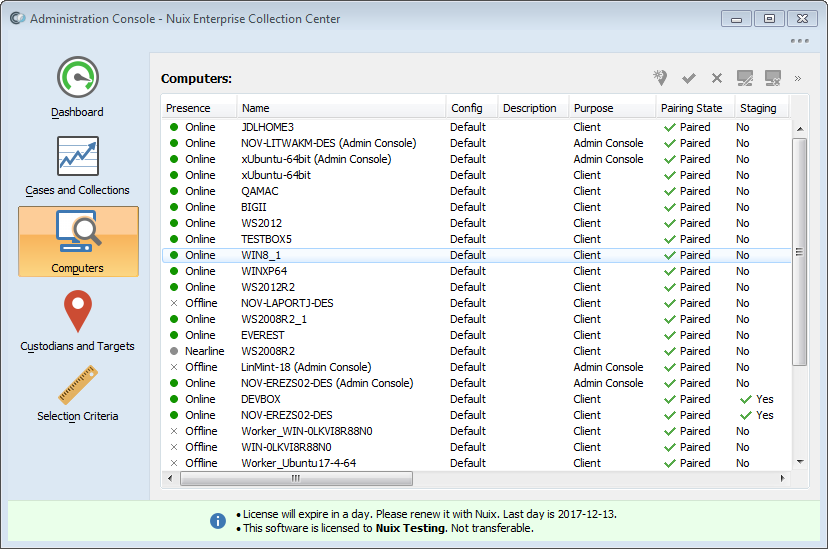
You can review or alter the "Pairing State" of any ECC Client computer from the Computers panel. ECC Client computers which are paired with a security key are activated: they can participate in ECC collections.
You can also edit each computer entry to review system information about the computer and its users, or alter its ECC configuration settings. See topic Configuring ECC Client Computers in the Nuix ECC Administration Guide for details regarding ECC Client configuration settings.
Custodians and targets panel
The Custodians and Targets panel lets you specify the location of the files to be processed (the Targets), and the individuals (Custodians) and Groups associated with those files.
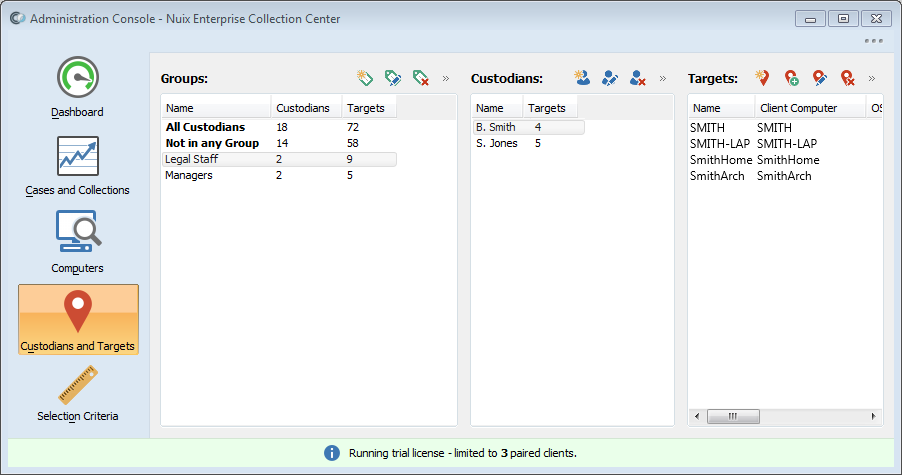
A Target specifies a location containing data to be processed. Targets may include:
All local volumes
Specific volumes or folders
A specific UNC path representing a share on a server, desktop, laptop or NAS drive
A URL to a SharePoint site on a SharePoint server
A Target also specifies the name of the computer that will process the data. This may be the same computer where the data resides, or it could be a separate Worker PC running ECC Client.
A Custodian is a person or entity associated with the data at one or more Targets.
A Group is a set of one or more Custodians.
Tip: Groups and Custodians are ways to organize sets of Targets. They make it easier to select Targets when creating a new Collection:
•Selecting a Custodian selects all the Targets associated with that Custodian.
•Selecting a Group selects all the Custodians associated with that Group and in turn, this selects all the Targets associated with those Custodians.
Actions
Targets can be added to specify the locations of data to process and the ECC Client computers which will do the actual processing.
Custodians can be added and associated with existing Targets.
Groups can be added. You can assign Custodians into one or more Groups. Later, when creating a new collection, having your Custodians organized into Groups will help make the selection of Custodians and their Targets simple and efficient.
Adding, editing and deleting Targets, Custodians and Groups can be done using the buttons at the top of each column in the Custodians and Targets screen, or by right-clicking an existing item. Built-in items cannot be deleted.
Selection criteria panel
Tasks which process files, such as a Collect task or a Delete task, can be configured using Selection Criteria to restrict which files will be processed. File Selection Criteria can:
Include or exclude files based on their filename extensions
Include or exclude files based on their intrinsic type, as determined by inspection of the file's binary content
Include files based on a range of dates when the file was created, last modified or last accessed
Include files based on their MD5 hash value
Include deleted files in addition to normal files
Include deleted files only
Include files based on full-text searches of the text within each file
For example, a Selection Criteria named PST 2010 could restrict a Collection to only include Microsoft Outlook PST files last modified between January 1, 2010 and December 31, 2010.
Establishing Selection Criteria in advance from this panel will make the process of configuring file-related Collection tasks much simpler.
Actions
Selection Criteria can be added, edited or deleted using the buttons in the upper-right side of this screen. A Selection Criteria can also be edited or deleted by right-clicking it.
Initial configuration
Note: Before proceeding with this topic, be sure that an ECC Server Connection and Administrator password have been configured for Administration Console. These steps are covered in the ECC Administration Guide, under the topic Configure ECC Users and Security.
Adding new targets
Targets are the first items that should be set up in Administration Console. A Target specifies a data location to be processed and the name of the computer which will do the processing.
The Custodians and Targets panel in Administration Console shows a list of Targets on the right side of the screen. Buttons next to the Targets heading allow you to add, duplicate, edit or delete a Target:
|
|
Add a new Target |
|
|
Duplicate the selected Target |
|
|
Edit the selected Target |
|
|
Delete the selected Target |


Adding new targets
From the Custodians and Targets panel in Administration Console, click New above the Target list.
The Target Details dialog appears:
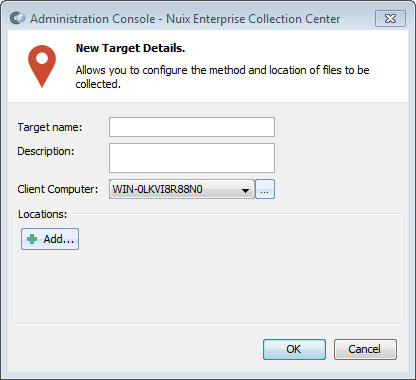
Enter values as follows:
| Value |
Description |
| Target Name |
The name of the file collection Target. Use a brief, descriptive name that will identify this Target in a meaningful way. |
| Note:The Target Name will be used as a sub-folder under each Collection's default Destination folder. Keeping Target Names brief helps to keep the length of Destination folder paths within the 256 character limit of Windows Explorer. |
|
| Client Computer |
Select the name of the computer running ECC Client that will perform the collection of the target files. You can select from a list of computers which have ECC Client installed and have previously registered with the ECC Server. |
| Locations |
Click the All local volumes: This location specifies all the local volumes that are accessible on the specified computer. Files are gathered starting from the root folder on each local volume and include all folders. Local Path: A path such as C:\Documents or D:\ that resides on the Computer performing the Collection. If the Target's Client Computer is online, then you can click the [...] button to the right of the Local Path field to browse the Client Computer's drives and folders. You can then select one or more paths. File Share: A UNC path to a regular share on a server, desktop or NAS device. Login credentials for the share must also be specified. Administration Share: A UNC path to an administrative share on a server, desktop or NAS device. Login credentials for the share must also be specified. SharePoint: A URL to a SharePoint site. Login credentials must also be specified. File Shares, Administration Shares and SharePoint sites will prompt for login credentials: User name: The User ID required to access this location. Password: The password for the specified User ID. The Password field is masked so an IT Administrator can fill out the Target Details, without exposing security credentials to a Collection Administrator. Domain: The Active Directory Domain associated with the specified User ID. Leave blank if the User ID is a local User ID (i.e. if the network is a Workgroup). |
| Note:SharePoint sites may not be added to a Target that already contains other kinds of locations, such as local paths or file shares. The Client Computer for a SharePoint Target must be a Windows computer. SharePoint sites require further configuration (for details, see topic Configuring SharePoint Locations, below). |
|
| After specifying a location, click the To see multiple locations easily, scroll downward or stretch the size of this dialog. |
 Add button to add a data location to process. The location can be any one of the following types:
 button to delete a location from a Target.
Tip: Newly added Targets are not yet associated with any Group or Custodian. To see these Targets in the Custodians and Targets screen, select the Group named "Not in any Group", and select the Custodian "Unassigned".
Tip: For best results collecting open files from Windows computers, configure the Target to collect from Local Paths only. I.E. run ECC Client on the same Windows computer where the files reside.
Note: ECC Client PCs which collect files residing across the network on another computer will result in higher network traffic than collections performed on local targets. Also, collections across the network are unable to collect open files in certain circumstances. Consult with your IT administrator to determine the collection method with the best balance of computer responsiveness, network responsiveness and open files access for each Target.
When none of a Target's locations are local drives but instead are shares or SharePoint sites, then the Client Computer associated with this Target is acting as a Worker PC. In some situations, performance may be better optimized by installing and running ECC Client directly on a workstation or file server. The extent to which Worker PCs are utilized – if at all – should be determined in consultation with your organization's Systems Administrator. See the Appendix A: Glossary entry for Worker PC for further details.
Configuring SharePoint locations
Enter the SharePoint URL and login credentials, then click the Configure button.
Administration Console will connect to the SharePoint server, then display the SharePoint Location Details dialog:
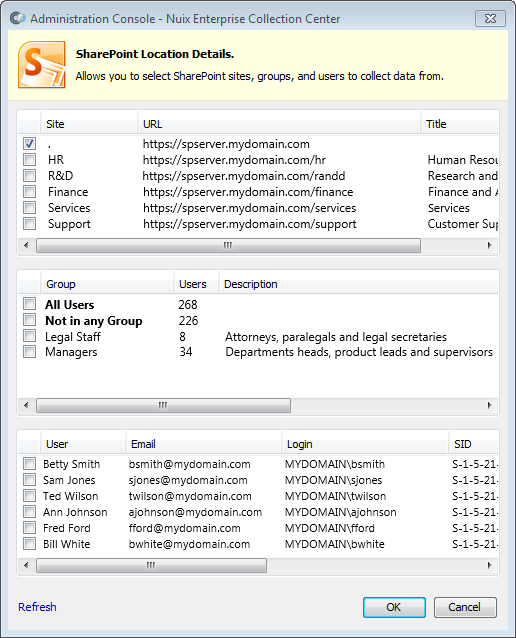
From this dialog, you must place a checkmark next to each SharePoint site to be collected. The dialog also allows you to restrict the collection to only the SharePoint pages last edited by specific users or by members of specific user groups.
Note: Selecting a site at a given level in the site hierarchy does not select sites under that level. Each site to be collected must be explicitly checked.If no SharePoint groups or users are selected, then all pages from the selected sites will be collected.
If any SharePoint groups or users are selected, then only pages last modified by members of the selected groups or selected users will be collected. If the All Users group is selected, the collection will still exclude certain pages created by the SharePoint system or by deleted users. To ensure all pages of a site are collected, do not select any group or user – even the 'All Users' group should not be selected.
If your collection's Criteria limit the collection to a specific range of modification dates, those dates will apply to SharePoint website pages as well (i.e. only selected SharePoint site pages that were modified within the Criteria's date range will be collected).
To edit an existing target:
From the Custodians and Targets panel in Administration Console, right-click a Target, or select an existing Target and click the Edit button above the Target list. The Target Details dialog appears.
Edit target fields. See topic Adding New Targets, above, for a description of each Target field.
Bulk target editing
Targets can be added or edited in bulk, as follows:
To edit existing targets in bulk:
From the Custodians and Targets panel in Administration Console, select multiple Targets by holding down the Ctrl key as you make your selections.
Right-click one of the selected Targets and choose Edit Target. The Edit Locations for All Selected Targets dialog will appear.
Add or remove locations.
Click OK. The locations for all selected targets will be updated to reflect what is shown in the dialog.
To add new targets in Bulk:
From the Computers panel in Administration Console, select multiple Computers by holding down the Ctrl key as you make your selections.
Right-click one of the selected Computers and choose New Targets. The New Target Details dialog will appear.
Enter an optional Prefix for each target name.
Add locations.
Click OK. New targets will be created. Each new Target will be given the same name as its corresponding computer but with this optional prefix at the beginning.
Note: If a Target already exists with the same name, a prompt will appear asking to ignore (skip) creation of targets which already have a same-named Target, or to proceed with adding the Targets.
If you proceed to add Targets which already exist, the older existing Targets will not be changed or overwritten. Instead, the new Targets will be created with a unique number appended to the end of the Target name.
Adding new custodians
Custodians are the individuals who are responsible for the files at specific locations (Targets). By adding Custodians and associating Custodians with specific Targets, you'll ease the process of selecting Targets when you later configure a new Collection.
Tip: Add file collection Targets before adding their corresponding Custodians.
Custodians can be imported from Active Directory users, or from Custodian within Legal Hold Pro. For details, see topic Importing and Exporting Data.
The Custodians and Targets panel in Administration Console shows a list of Custodians in the middle of the screen. Buttons next to the Custodians heading allow you to add, edit or delete a Custodian:
|
|
Add a new Custodian |
|
|
Edit the selected Custodian |
|
|
Delete the selected Custodian |


Click the New button at the top of the screen, next to Custodians.
The Custodian Details dialog appears:
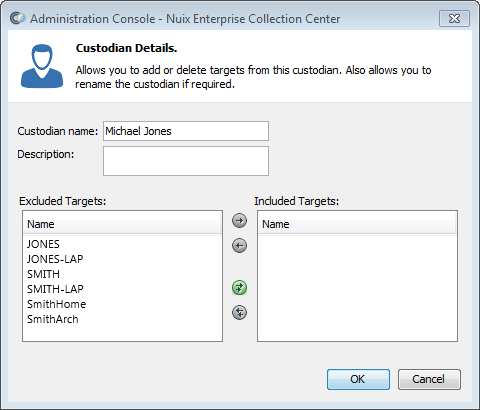
Enter values as follows:
| Value |
Description |
| Custodian name |
The name of the person responsible for a set of files to be processed. |
|
|
Note: The Custodian name will be used as a sub-folder under each Collection's default Destination folder. Keeping Custodian names brief helps to keep the Destination folder paths within the 256 character path limit of Windows Explorer. |
| Description |
An optional description for this custodian. |
| Excluded Targets |
A list of file collection targets which are not currently associated with this custodian. |
| Included Targets |
A list of file collection targets which are associated with this custodian. |
Select one or more Targets from the left side of the screen, then click the [ > ] button to associate those Targets with the Custodian. The arrow buttons have the following actions:
|
|
Include the Targets selected on the left side |
|
|
Exclude the Targets selected on the right side |
|
|
Include ALL the Excluded Targets on the left side |
|
|
Exclude ALL the Targets on the right side |


Note: Each Target may be either unassociated or associated with one Custodian. If you cannot find the Target you wish to assign in the Excluded Targets column, the Target either (a) does not yet exist, (b) is already assigned to a different Custodian, or (c) is already assigned to this Custodian.
Adding new groups
Tip: Add a few Custodians before adding any Groups.
Groups are sets of one or more Custodians. Groups are an optional but highly recommended way to organize Custodians. By adding Custodians to various Groups, you'll ease the process of selecting Custodians and their Targets when you later configure a new Collection.
The Custodians and Targets panel in Administration Console shows a list of Groups on the left side of the screen. Buttons next to the Groups heading at the top of the screen allow you to add, edit or delete a Group:
|
|
Add a new Group |
|
|
Edit the selected Group |
|
|
Delete the selected Group |


Click the New button next to Groups.
The Custodian Group Details dialog appears:
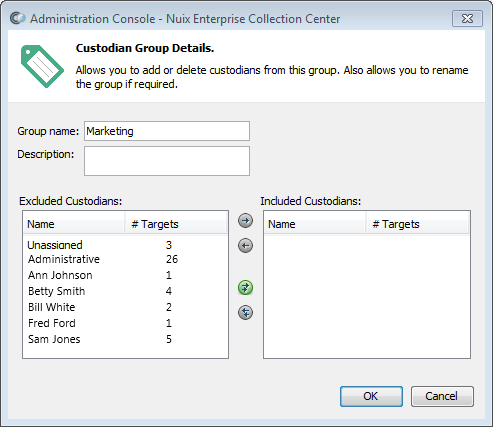
Enter values as follows:
| Value |
Description |
| Group name |
The name of the Group. |
| Description |
An optional description for the Group. |
| Excluded Custodians |
A list of Custodians who are not currently associated with this Group. |
| Included Custodians |
A list of Custodians who are associated with this Group. |
Select one or more Custodians from the left side of the screen, then click the [ > ] button to associate those Custodians with the Group. The arrow buttons between the two columns have the same behavior as described in the topic Adding New Custodians, above.
Note: Each custodian may belong to no Group, one Group or multiple Groups.
Adding new selection criteria
Selection Criteria define a set of file extensions, date ranges, MD5 hash values and full-text search terms for the files to be processed. Carefully crafted Selection Criteria ensure that only relevant files are processed, which keeps processing time and required storage space to a minimum; however, some selection criteria can extend the time it takes to perform the collection.
ECC comes with a several pre-defined Selection Criteria, and new Selection Criteria can be added. Any one of these Selection Criteria can be selected when configuring a new collection.
To add a new selection criteria:
From the Selection Criteria panel in Administration Console, click the New Criteria button at the top of the screen.
The File Selection Criteria Details dialog appears:
Specify the details for the new Selection Criteria, as follows:
Criteria
| Type |
Description |
| Name |
The name of the Selection Criteria |
| Description |
An optional description for this Selection Criteria |
File types
| Type |
Description |
| Include |
Include only files with the filename extensions specified. |
| Exclude |
Exclude only files with the filename extensions specified. All other filename specifications will be included in the Collection. |
| Note: Enter each filename extension starting with the period. Enter a return to separate multiple extensions, so each extension has its own line. |
|
| Identify files by – Extension Only |
The filename extension is used to determine whether the file is to be included or excluded. |
| Identify files by – Extension & Header |
If Include is selected, files whose filename extension matches a listed extension will be included. Also, files whose binary content corresponds with the file types of the listed extensions will also be included, regardless of the file's extension. If Exclude is selected, files whose binary content corresponds with the file types of the listed extensions will be excluded but all other files will be included in the collection. |
| Note:This setting has some non-obvious ramifications; see topic Extension & Header Behavior, below, for details on how this setting impacts a Collection. |
Date ranges
| Type |
Description |
| For File Attributes |
Select the Created option to include files which were originally created during the date range specified, below. Select the Modified option to include files which were last modified during the date range specified, below. Select the Last Accessed option to include files which were last accessed during the date range specified, below. |
| Note: Files will be processed that fall within the date range for any of the attributes you select. For example, a date range from January 1, 2021 to January 31, 2021 where both the CREATED and MODIFIED options are selected, will process files that were created OR modified anytime in the month of January 2021. Starting dates always begin at 00:00:00 am and ending dates always end at 11:59:59 pm. |
|
| In Last ___ days |
Specify a relative date range by selecting the Last option, then enter the number of previous days to include. This will include all files created, modified and/or last accessed during the specified number of days past up until the present day (the day the collection is run). |
| From |
Specify a fixed date range by selecting the From option, then enter a Starting (From) date. |
| To |
Enter the ending of a fixed date range. |
Content
| Type |
Description |
| List of MD5 Digests |
Type the MD5 hash value of each file to be processed, then press Enter so that each MD5 hash value appears on its own line. Any files having the same MD5 hash value will be collected, so long as the other criteria specified in this dialog are met. |
| Calculate |
If you have access to copies of the specific files you wish to process, you can click the Calculate button to select these files. The MD5 hash value of each selected file will be calculated and added to the List of MD5 Digests. |
Deleted files
| Type |
Description |
| Include Deleted Files |
Whether to include deleted files in the survey of collection jobs, in addition to normal files. |
| Note: Deleted files can only be collected from ECC Client computers running Windows and having NTFS or FAT formatted local volumes. |
|
| Deleted Files Only |
Whether to include only deleted files in the survey of collection jobs – i.e. excluding normal files. |
Advanced
| Field |
Description |
| Keyword Search |
Performs a full-text search of each file which meets all the other file selection criteria. |
| Note: This kind of search can only run on ECC Client computers where the search feature has been installed (this depends on which ECC Client installer was run). Full-text search generally requires each ECC Client computer to have at least 2 GB of RAM to perform well (4 GB is helpful when searching massive files). Enabling full-text search can prolong the collection process by several hours – or even by more than a day. Although extra time is required, ECC can run these full-text searches simultaneously on dozens or hundreds of computers across your network to search many terabytes of data in a relatively short amount of time. |
|
| Tip: Specifying additional file selection criteria and narrowing down the volumes and folders to search can greatly reduce the amount of time required to perform the full-text search. |
|
| Expressions |
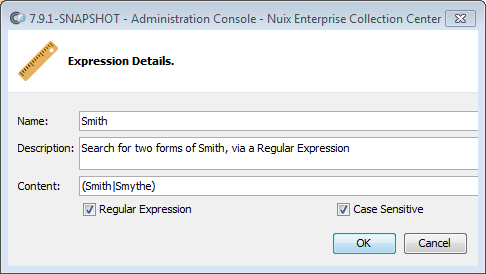
A list of search terms for the full-text search. If any of the search terms are found in a file, the file will be included in the collection or survey. Otherwise, the file will be excluded from processing. Terms can be added, edited and deleted via the New Expression, Edit Expression and Delete Expression buttons at the top of the list. To add a full-text search expression, click the New Expression button. A context menu will appear, listing numerous pre-formed Regular Expressions. Select an existing expression, type some letters to narrow down the list, or select New at the top of the list to create your own search expression. Each search expression has the following fields: |
| # |
The number of the search expression. Can be used in the Formula field to refer to this search expression. |
| Name |
The name of this search expression. Can be used in the Formula field to refer to this search expression. |
| Description |
An optional description. |
| Expression |
The literal text or regular expression pattern to search for. |
| Kind |
Determines how the specified expression is interpreted. Can be Plain Text or Regular Expression. |
| Case Sensitive |
When enabled, the letter case of the Content must match exactly. When disabled, the letter case of Content is ignored. |
|
|
|
| Note: There are several "dialects" of Regular Expressions. ECC recognizes Java Regular Expressions – specifically, the Oracle Java SE 8 Regular Expression Constructs, as documented at https://docs.oracle.com/javase/8/docs/api/java/util/regex/Pattern.html. |
|
| Whitespace between |
Modifies the search expression so any extraneous spaces, tabs or newlines will not impede the search. Can be set to Allow whitespace between words or Allow whitespace between characters: between words: The search expression will be modified so any number of spaces, tabs or newlines is permitted between each word in the search text or pattern. Valid only for search patterns which contain one or more spaces. between characters: The search expression will be modified so any number of spaces, tabs or newlines is permitted between each word or character in the search text or pattern. |
| Generated Regular Expression |
Some search expression options require that a new regular expression be generated and used to perform searches. When such regular expressions must be generated, they appear in the Generated Regular Expression field. This field is not directly modifiable; however, you can select the generated regular expression and copy it to the Clipboard (e.g.: for subsequent pasting into an online regular expression tester). |
Tip: The option Allow whitespace between: words allows search expressions which contain one or more spaces to be effective even when the phrase being searched for has been split across multiple lines. This is because "whitespace" in this context includes newlines (carriage returns and line feeds).
The option Allow whitespace between: characters is recommended to ensure productive searches against poorly formatted documents (including OCR text from image files and text extracted from certain PDF files).
The Allow whitespace between options do not have a measurable impact on performance.
Regular expressions can be tested against samples of text using an online regular expression tester. If you use an online regular expression tester, be sure your computer is protected against viruses and other security threats and that you select an online tester that is based on the Java SE 8 regular expression dialect.
When specifying Keyword Search criteria in the New Collection Wizard, the following additional fields can be configured:
| Field |
Description |
| Formula |
Allows multiple search expressions to be combined in various ways; for details, see the topic below. |
| Collect individual items from within container files |
Container files (such as PST files or ZIP files) contain other files within, such as EML files (email messages), DOCX documents, PDF documents, XLSX workbooks, etc. When this option is enabled, only those items within a container file whose content matches one of the search expressions will be surveyed or collected. Full-text searches take longer when this option is enabled, because the entire content of each container file must be searched. When this option is disabled, the entire container file will be surveyed or collected if any of the items within the container file have content which matches one of the search expressions. |
| Timeout |
The maximum amount of time, in seconds, to allow for the search process to finish searching each file for any of the search expressions. This Timeout resets after each file is searched. If the search of a given file has not completed before this Timeout elapses, the search on that file will be cancelled and the file will be included in the collection. So it is possible for files to be included in the collection which lack any of the search terms. This behavior is intentional and conservative: to ensure that files which might include the search terms but which cannot be successfully searched by ECC, are not missed. When searching massive PST files or ZIP files, the search can take several hours. A Timeout value of 14400 (seconds, or 4 hours) is suggested for most scenarios to permit these larger files to be searched. Especially large PST or ZIP files may require a longer timeout. A Timeout value of 0 will permit an unlimited amount of time for searching each file. |
Formula
Multiple search expressions can be joined together to specify complex search criteria (i.e. a "Boolean search") using the Formula field. For example:
Given the following search expressions:
| Number |
Name |
Search pattern |
| 1 |
John |
John |
| 2 |
Adams |
Adams |
| 3 |
Quincy |
Quincy |
...the formula:
1 AND 2 AND (NOT (3))
...will find documents containing "John" and "Adams" but exclude documents referring to "Quincy".
Each numbered search expression can be plain text or a regular expression.
Tip: The formula can refer to search expressions by their number or name. If each search expression has a concise name, then the Formula becomes more readable, e.g.:
John AND Adams AND (NOT (Quincy))
If the Formula field contains the single word OR, or is left empty, then each specified search expression will be joined together using OR (meaning that files containing any one of the search expressions will be selected for processing -- assuming all other file selection criteria are met). You can instead specify the single word AND for the Formula, which joins all search expressions with an AND (meaning that only files containing every search expression will be selected for processing).
Extension & header behavior
If Identify files by is set to Extension & header and File Selection is set to Include, then the collection will:
INCLUDE: all files with a filename extension listed under Include file types
INCLUDE: all files, regardless of filename extension, whose header indicates the file may be one of the file types specified under Include file types
If Identify files by is set to Extension & header and File Selection is set to Exclude, then the collection will:
EXCLUDE: only the files, regardless of filename extension, whose header indicates the file is one of the file types specified under Exclude file types
INCLUDE: all other files
The identification of file types by inspecting a file's binary content is limited to a set of common file "signatures", which are associated with a specific list of filename extensions. The signatures and filename extensions list can be customized to enable binary file format identification of other files, including files from custom programs, obsolete programs, obscure programs and new versions of common applications. For details, refer to the Nuix Knowledgebase for Enterprise Collection Center, or contact Nuix Technical Support.
Configuring computers
Each Computer running ECC Client can be configured from Admin Console's Computers Panel, as follows:
Be sure the computer shows "Client" in the Purpose column. These are the computers running ECC Client.
Select the computer and click the Edit Computer toolbar button. Or right-click the computer and choose Edit Computer. The Computer Connection Details dialog appears:

Edit the Computer as follows:
| Field |
Description |
| Name |
The name of this ECC Client computer |
| Description |
An optional description for this computer. |
| Purpose |
Indicates Client or Admin Console. Cannot be modified. |
| Pairing |
Whether this computer has a security key paired (associated) with it. Only paired computers are active. |
| Staging |
Whether this computer can be utilized as a "staging computer" for Deploy tasks or Relocate tasks. Deploy tasks copy files from the staging computer to other ECC Client computers. Relocate tasks copy or move previously collected data and logs to the staging computer. Tip: A staging computer used for a Relocate task must have sufficient free disk space to hold all the collected data that is being copied or moved to the staging computer. |
Note: In the Computer Connections dialog the System Info tab contains in-depth details regarding each ECC Client computer, including the operating system, memory, volumes and user information. These details can be helpful when configuring collections.
The Configuration tab contains parameters for tuning the operation of ECC Client computers and specifying the range of TCP ports used for Deploy and Relocate jobs. A default alternate destination can also be specified. See topic Configuring ECC Client Computers in the Nuix ECC Administration Guide for details regarding these parameters.
Labeling computers
One or more text labels may be associated with each computer running ECC Client. These labels can be used to quickly select a set of related computers. A label can be any text; sample labels include:
Windows
Linux
macOS
Desktops
Laptops
or any other category.
Once the computers are labeled, it is very easy to select a specific set of computers when configuring a new collection; for details see the topic Custodians and Targets Page (within the New Collection Wizard).
To create a computer label:
From the Computers Panel, click the New Label button, or press Ctrl+N.
Enter a Name for the label (brief names are best) and an optional Description.
Note: You can also edit and delete labels using the corresponding Label buttons at the top of the Computers panel.
To associate computers with a label:
From the Computers Panel, list the computers that you wish to label. You can add filters to the columns so that only certain computers are shown.
Select the computers to be labeled. You can select more than one computer at a time by using Shift+click for a contiguous selection, or Ctrl+click to select non-adjacent computers.
Right-click one of the selected computers and select Manage Labels.
Click the Add a Label button or press Ctrl+N, then select one of the existing labels to associate with the selected computers. If you need to add a new label, select Manage Labels from the top of the label selection and add the new label.
Optional: Repeat the previous step to associate additional labels with the selected computers.
Optional: To remove a label from association with the selected computers, select the label from the Labels list, then click the Remove Selected Labels button or press Del. You can select one or more labels at a time using Shift+click or Ctrl+click and then remove them.
Click OK to save your changes.
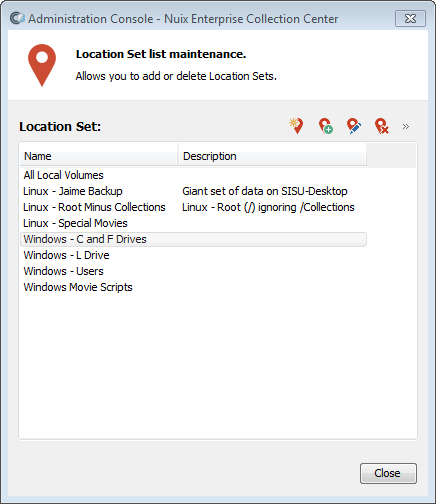
Configuring location sets
A Location Set includes one or more data collection locations, such as a volume, a local folder path, a network share path or a SharePoint site. Location Sets make it easy to perform collections from a set of Computers; they are an alternative to specifying Custodians and Targets.
Note: Location Sets can be utilized when selecting Computers for the following kinds of jobs:
Survey
Collect
Collect and Delete
Delete
To manage Location Sets:
Click the ● ● ● button near the upper-right corner of the screen to access the menu, then select Location Sets. The Location Set list maintenance dialog appears:
From the toolbar within this dialog, click the New Location Set button. The Location Set Details dialog appears:
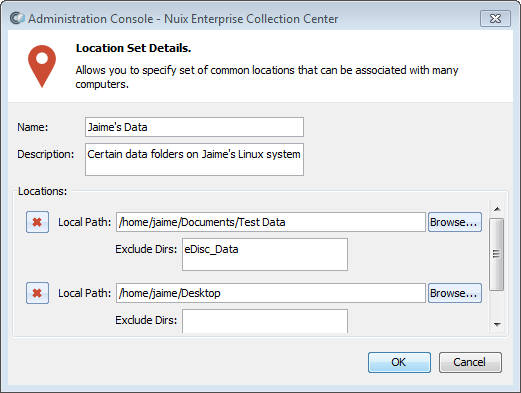
Edit the Location Set as follows:
| Detail |
Description |
| Name |
The name of this Location Set |
| Description |
An optional description for this Location Set. |
| Locations |
Click the Add button to add one or more data collection locations to the location set. Each data location can be of the following types: |
| All local volumes |
All files from every accessible local volume on an ECC Client computer. |
| Local Path |
A specific local path on an ECC Client computer. The Exclude Dirs field allows the exclusion of specified sub-folders. The Browse button allows you to connect to a particular ECC Client computer to browse and select a folder available on that computer and to include or exclude certain sub-folders. |
| Local Paths |
One or more local paths on an ECC Client computer (including all sub-folders). The Browse button allows you to connect to a particular ECC Client computer to browse and select the local folders available on that computer. |
| File Share |
An ordinary network share, with the option to exclude specified sub-folders. Network credentials can be specified to access the network share. |
| Admin Share |
An administrative network share, with the option to exclude specified sub-folders. Network credentials can be specified to access the network share. |
| SharePoint |
A SharePoint URL. SharePoint credentials can be specified to access the URL. |
Tip: Location Sets can be configured to specify locations that are common to a whole set of ECC Client computers. Or a Location Set may include locations that are specific to only one or a few computers. The Name and Description for the Location Set should provide a hint as to which Computers the Location Set is intended for.
Exiting Administration Console
To exit from Administration Console, click the red [X] in the upper-right corner of the program.
You can also exit as follows: click the ● ● ● button near the upper-right corner of the screen to access the menu, then select Log out Administrator (or whichever user you are logged in as). The Log in dialog will appear. Click Cancel to exit the program.
Initial Configuration Complete – Where to Go from Here
Once Targets, Custodians and Selection Criteria have been established, you are ready to configure and schedule Collections. For details, see topic Adding Cases and Collections, on the following page.
Tip: Make a backup of your ECC Server's Data folder at this time. For details, see topic ECC Server Data Backup in the ECC Administration Guide.