Perform OCR
This section details the two ways to perform OCR in Nuix Workstation:
Perform OCR after ingestion - Best Practice
Perform front-load OCR during ingestion
Because every environment and dataset combination are different, Nuix recommends that you test run your settings on a limited set of documents to understand the results. This allows you to know how to adjust your settings to refine the ultimate results.
You can run the OCR process at two stages of processing items in a case:
Running OCR during the ingestion process is known as "front-load OCRing".
After ingestion, which you do from the Results view on a Workbench tab, the recommended way.
Doing so after ingestion allows for more targeted OCR processing of items, and is a more cost-effective method of OCR processing as only items selected for OCR will be processed.
Either way, the OCR process is controlled by an OCR Profile - a set of rules and OCR actions that applies to a selection of items. See Customize an OCR Profile for details.
Running OCR as a background process is no longer possible for Simple Lucene/Derby cases. However, it is still possible for Compound and Elastic cases.
Perform OCR after ingestion - Best Practice
The OCR dialog accessed from the Results view of a Workbench tab contains all the necessary configuration you need. It is a 'cut-down' version of the Data Processing Settings tab with settings that focus on handling text extracted from the OCR process, that is language detection, named entities, and family text settings. Any settings you select do not override those in an OCR Profile.
This dialog also includes the option to:
Store binary copies of the native files of only the data items you OCR instead of your whole data set (which is the case when you perform OCR during ingestion).
This means there is now no longer a need to review the PDF files generated after OCRing and then re-image them.
Reconfigure the number of Workers and memory to process the job in the most efficient way.
If you need to OCR items post-ingestion on Compound cases performed in versions of Nuix Workstation before v9.8, then on starting Nuix Workstation, pass the
"-Dnuix.ocr.useExportProcessor=true" parameter.
The following steps summarize a ‘Best Practice’ OCR workflow. To perform OCR after ingestion:
Tag items you want to review post-OCR before you run the OCR process. See Tag or code evidence in the Nuix Workstation User Guide for details.
Search for non-searchable PDFs using this search syntax: mime-type:application/pdf AND NOT content:*
Non-searchable PDFs are items that Nuix Workstation determines are PDFs through header recognition, but that do not contain indexable text. These items are most frequently image-only PDFs and warrant further investigation, as the content in these PDFs is not text indexed, and therefore unsearchable by Nuix Workstation. (Nuix Workstation allows you to use a third-party tool to export the items to OCRed images (for example, PDF, TIFF, and PNG) and import the searchable text and PDFs back into Nuix Workstation.)
From the Results view, select and right-click the PDFs and images you want to OCR, and from the pop-up menu, select Perform OCR. Alternatively, select the PDFs and images you want from the Results view, and from the Items menu select Perform OCR.
When a Confirm OCR Process message prompts you to acknowledge the number of items to OCR, click Yes.
The OCR dialog opens with the following pre-enabled:
English selected as the Analysis language
Item Content Settings: Process text, Enable near-duplicates and Enable text summarisation
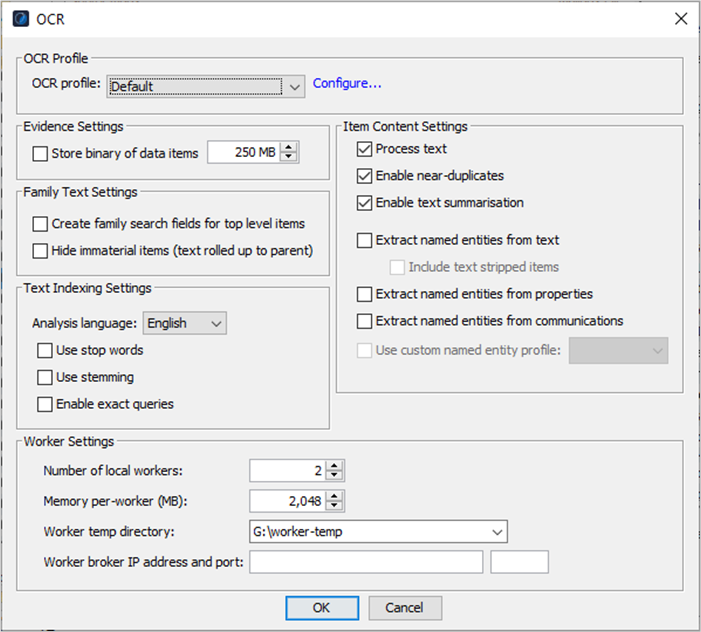
Configure your OCR settings before reprocessing your evidence, as follows:
| Option |
Action |
| OCR Profile |
Leave the Default selected or click Configure to do either of the following: Select a pre-customized OCR Profile. Edit the Default to customize a new OCR Profile. |
| Evidence Settings |
Select Store binary of data items to store a copy of the native file in the databases in the case directory while you OCR items, up to the maximum size of one gigabyte. The default maximum is 250 megabytes. This allows you to directly review the PDF files, that are generated after OCRing, as images. Note: This option can reduce indexing speed by 15-20%, and increase the amount of storage required for the case folder from 20-50% of the original data set to 220-250%. |
| Family Text Settings |
Select either or both of the following options: Create family search fields for top level items To create an extra field with all child items' text added to their parent's text, allowing for the use of "family" searches for faster searching. (A top level item is a material item with no material ancestors, that is, the first material item in an item path.) See the Nuix Search Guide for syntax when using this field or from the Help menu select Help Topics > References > File Types. Hide immaterial items (text rolled up to parent) To automatically hide immaterial items in the Results pane when processed and remove clutter from the results set, yet append the extracted text from hidden immaterial items to its parent item so it is still available to search on. |
| Text Indexing Settings |
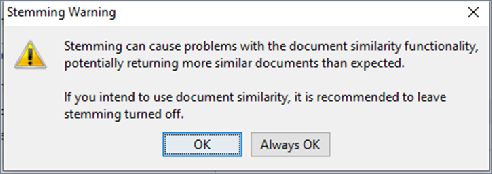
In Analysis language, select English or Japanese. You can only use one language for each evidence store and you cannot change it when you select the Reuse Evidence Store option. Then select any of the following options: Use stop words: To not index all stop words, or noise words, for your selected language. English stop words are: a, an, and, are, as, at, be, but, by, for, if, in, into, is, it, no, not, of, on, or, such, that, the, their, then, there, these, they, this, to, was, will and with. Use stemming: To create a text index that only stores stemmed components of words for an entire case. For example, if your search word is "control", enabling this option returns documents containing "control", and "controlling", "controller", and "controls". However, be aware of this warning:
Enable exact queries: To store the text content of items with punctuation and capitalization, so that when searching, you perform an exact string match. (For such a search, remember to use single quotes (‘ ‘) around your search term to invoke exact queries.) Hover over this field to see this tooltip: “Create a separate text index with characters indexed one by one to allow searching for punctuation and other symbols which are usually not indexed. This will increase processing time and significantly increase case size.” |
| Worker Settings |
Reconfigure any of the following settings to process your OCR job more efficiently: Number of local workers Memory per worker (MB) In general, 4GB of RAM is sufficient for most operations. If working with very large datasets and performing operations like finding top- level items or deduplicating, it is not uncommon to increase the Memory to 30GB or more depending on your hardware. It is important to balance the amount of memory you allocate to Nuix Workstation and to Nuix single Workers for processing operations. For information on allocating application memory, in the Nuix Workstation Installation Guide see the Hardware configuration page, and Recommended memory (RAM and CPU) allocation section. Worker temp directory |
| Option |
Action |
|
|
Worker broker IP address and port |
| Item Content Settings |
Select any of the following to use these features: Process Text: To extract the text content of evidence to enable searching. If you disable this option, you can only search across an evidence item’s metadata. Enable near-duplicates: To identify word shingles for Near-Duplicate detection and clustering in the case. This option automatically selects the Process Text option, if not pre-selected. Enable text summarisation: To calculate and store text summaries from document data that is ingested. This option automatically selects the Process Text option, if not pre-selected. Extract named entities from text: To extract named entities from text; and select Include text stripped items to include text stripped items while extracting named entities from text. Nuix Workstation uses Text Stripping to identify an item’s file type but it cannot cleanly extract all text and metadata in accordance with the file type’s API. The result is a searchable data item, but the text may be garbled or not properly formatted. Text Stripping scans the bytes of the data item and looks for runs of string data at least three characters long. Extract named entities from properties: To search in the metadata properties associated with an item. Extract named entities from communications: To extract named entities such as phone numbers and email addresses from the communication metadata using Nuix Workstation standard or custom named entities. When selected, it enables the Use custom named entity profile option. Use custom named entity profile: To enable selection of a Custom Named Entity Profile for processing from the menu if you selected the Extract named entities from text or Extract named entities from properties option. |
Click OK to display the progress of processed items before the processed results appear in the Results view.
Go to Check success or failure of OCRed items, then see Perform post-OCRing tasks for some of things you may then want to do.
Perform front-load OCR during ingestion
The front-load OCR feature allows you to perform OCR during data ingestion for Lucene-Derby and Elastic cases. This means you do not have to manually run OCR again to generate the PDFd files once the items are ingested into the case. Depending on your use case, resources and the data types to be ingested, this method, while less targeted than performing OCR after data ingestion, can be useful.
To perform front-load OCR during ingestion:
Add evidence to your case in the Add/Edit Evidence window.
Click the Configure profile link to access the Data Processing Settings tab on the Edit Processing Profile window. See Configure data processing settings for further details.
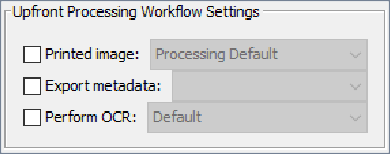
At bottom left of this tab, under the Upfront Processing Workflow Settings section, ensure you select both the following options:
Select the Perform OCR check box.
From the adjacent lookup, select the OCR Profile you want to use, if you do not want the Default profile.
Configure all other Data Processing Settings as you see fit, and click OK.
Click Load items or Reload items to open Evidence Processing Settings.
A message dialog prompts you to further select Text indexing, Family Text and Item Content settings, among other things.
Click OK to re-access the Data Processing Settings tab and, for example:
Under Extract named entities from, select the following:
Properties
Communications
Text
Optionally, update Text Indexing Settings.
Click OK.
See Perform post-OCRing tasks for some of things you may then want to do.